
Job Details
This article pertains to the Job Details section of the Customer Jobs screen. The Job details can be accessed by selecting a Job from any Job link in CommTrak (e.g. Active Jobs list, Customer Jobs List, etc.).
When a Job's details are displayed (e.g. by selecting the Job from one of the Job lists, or when selected elsewhere in CommTrak), the Modify Job Details section is displayed.
Edit or view the Job fields as required, and press Save to apply any changes that have been made to the Job details.

Job Notes
Job notes are displayed below the Job details. Please refer to the section Job Notes, later in this article.
Job Fields
The fields displayed on the Job Details screen depend on the currently-selected Job View. Please refer to Support Centre article Job Views for further information about the Job Views feature.
Job ID (read only)
The ID of the Job; this sequential number is allocated automatically.
Related Contract
The contract (if any) that relates to this Job can be selected from this drop-down list.
Sales Rep (read only)
The salesperson assigned to this company, as specified on the Customer's Main Info page.
Job Description (mandatory)
General information about the work that needs to be completed for this Job.
My Scope
This field displays the scope of work assigned to the currently-signed-in user:

The details in this section are obtained from the Schedule field.
The intention is that the Completed box should be ticked in the My Scope field by the technician who completed the task.
The completion of a Job is not dependent on the Completed field being ticked; a Job is designated as being completed when the Job Status is updated to Closed.
Inventory
Reserve (or modify an existing reservation) or Dispatch Inventory items from this Job. This field displays a list of inventory items (if any) that have been reserved for this Job. Pressing the pop-out icon presents the Dispatch / reserve inventory items window.
CO Number
The order number relating to this job. This drop-down list is populated with orders that have previously been created for this Customer in the Inventory module.
CO Equipment (read only)
If an order number has been selected (see the CO Number field above), the CO Equipment field will be populated automatically with the relevant order details (if any).
Special Comments
This text area can be used to provide additional details that may be useful to Technicians or other staff with an interest in this Job.
Job Address
By default, this field will display the company's address as provided on the Customer's main info screen.
The job address can be changed as required; for example, a technician may need to attend a satellite office. When changing the address the default address will be removed automatically from this field.
Job Type
The type of work that needs to be performed. This may assist in allocating which technician is most suitable for the Job. The choices in this drop-down are configured in Job Types (Settings).
Taken By
The name of the person creating the Job. By default, this is the currently logged-in user but may be changed to any CommTrak user.
Order No (mandatory)
The customer order number relating to this Job. The order number is provided by the customer; for example, they may wish to provide a purchase order number. If the customer does not wish to provide an order number, it is recommended that the name of the customer contact with whom the Job has been agreed is entered into this field.
Invoice
This drop-down list is used to advise how, if at all, this Job should be invoiced. The choices in this drop-down are configured in Job Invoice Actions (Settings).
Additional invoicing information can be provided by editing the text field located to the right of the Invoice drop-down list.
Amount Quoted
If the Customer has been quoted for the cost of the Job, the quoted amount should be entered here. If this field is used, the currency symbol should be entered manually.
The amount will not be shown on the Job card unless the Show Amount option (see the Show Amount field below) is ticked.
Inc-Tax
This box should be ticked if the amount quoted is inclusive of sales tax.
Inc-Service Call Out
This box should be ticked if the Amount Quoted includes the service call-out fee.
Show Amount
The Amount Quoted is not shown on the job card by default. If the Amount Quoted is required on the job card, tick this box.
KMS Travelled
The technician should enter the distance travelled (kilometers) into this field.
Site Contact
The primary contact person for the site. There are three options for specifying the site contact person; from the dropdown list, select one of the following:
- Add new contact - Create a new contact person for this company; the Add new contact pop-up window will be displayed. See Support Centre article, Customer Contacts for further details.
- Select an existing contact - Existing contact names are shown in the drop-down list.
- Other - If this option is selected, two additional fields will be displayed; Contact Name and Phone Number. An arbitrary contact name and phone number can be entered for site contact.
If an arbitrary name and number are provided, the contact details will be saved with the Job, but will not be added as a new contact person for the customer record. This feature is useful when, for example, the site contact is a third-party contractor.
Other Contacts
Designate other Customer contacts pertinent to this Job, by ticking the box adjacent to the contact's name.
Product Type (read only)
A list of product types used by the Customer (or related Lead). The information in this read-only field is generated as follows:
- If the Job is not related to a Lead, the Job Product Types field is populated from the Product Types field in the Customer's Main Info tab.
- If the Job is related to a Lead, the Product Types field in the Lead are shown in Job Product Types field.
- Regardless of the source of the Product Types, any text in the Customer's Equipment Information field is preceded by a hyphen, and appended to the Job's Product Types field.
Time Added (read only)
The date and time the Job was created. This date and time stamp is automatically generated at the time the Job is created.
Last Modified By (read only)
Displays a staff name and date / time that the Job record was last modified.
Related to
Jobs can be related to other CommTrak components, for example:
- Lead
- Workflow
- Ticket
- Project
For more information about this feature, see Support Centre article, Related Records.
Order Summary
If a Lead is related to the Job, and the Lead contains a Quote, pressing the Order Summary information (i) icon, displays a pop-up window containing order summary details. The icon is only displayed when a Lead is related to the Job.
Related Equipment
Select, or display equipment that is related to this Job.

To view the details of related equipment, press the item name (for example, FCM-XM 4 port in the previous image); a pop-up window will open displaying the history of the selected item.
To select (or deselect) related equipment, press the pop-out icon to display a list of Inventory items that have previously been dispatched to this Customer:

Tick (or untick) items as appropriate, and press Save to update the Related Equipment field.
Due Date
The Due Date is the date upon which the Job is expected to be completed. For example, the customer may specify that they wish the Job to be completed by a specific date. This information can assist in the scheduling of jobs.
Schedule
The Schedule field displays details of the Technicians (if any) who have been scheduled to work on specified days and times. If no Technicians have been scheduled, the field is displayed as shown in the following image:

The following image shows an example of two Technicians who have been scheduled to work on the same day and time:

To modify the schedule, press the pop-out icon adjacent to the Schedule field label (visible in the previous image). Please refer to the Job Schedule Field article for more information about this feature.
Email Technician
If this field is ticked, each technician assigned to this job will receive a notification email advising them of the Job details.
The default choice for this option is specified in CommTrak Settings. See Support Centre article, Jobs Miscellaneous (Settings), Enable emailing of new jobs to technicians by default.
Job Status
Specify the Job status. It is important that the correct job status is selected, as the status directly impacts the accuracy of the Scheduler (please see the Scheduler section of the User Guide) and the number of available technician hours per day.
Below is the description of each job status:
- Booked - Scheduler will include the hours in the calculation for total hours booked for the day
- Closed - Job will appear with strike-through text in the Scheduler, and will not include the hours in the calculation for total hours booked for the day
- Cancelled - Scheduler will not display the Job
- Other Status - Any status, other than those listed above, is a custom status, and is considered to be open but not Booked. The scheduler will not include the hours in the calculation for total hours booked for the day
Custom statuses can be configured in Job Statuses (Settings).
Notify Customer
If a tick is placed next to a customer contact name in this list, the job details will be emailed to the specified contact.
The details emailed to the contact are as follows:
- Job ID
- Time Created
- Taken By
- Job Status
- Date(s) and Time(s) allocated to the job (only when the Job Status is Booked)
The customer notification emails are sent when Save is pressed, and only when the Job Status has been changed.
Only contacts with a valid email address can be selected to receive a job notification email. Contacts without a valid email address will be displayed in the selection area in red, strike-through text.
Progress
This field is only displayed if the Job Status is open; i.e. if Job Status is not one of the following:
- Booked
- Cancelled
- Closed
When any other Status is specified, the Progress field drop-down option will be displayed, and the user may specify the appropriate Progress Type.
Progress types are configured in Job Progress Types (Settings).
Notify Customer
If a tick is placed next to a customer contact name in this list, the job details will be emailed to the specified contact when Save is pressed.
The details emailed to the contact are as follows:
- Job ID
- Time Created
- Taken By
- Job Status
- Date(s) and Time(s) allocated to the job (only when the Job Status is Booked)
The customer notification emails are sent when Save is pressed, and only when the Job Status has been changed.
Only contacts with a valid email address can be selected to receive a job notification email. Contacts without a valid email address will be displayed in the selection area in red, strikethrough text.
Custom Email
To send an email based on a predefined template to a customer contact, select the required template from the drop-down list.
Pressing the email (envelope) icon to the right of the drop-down list will display the Send Email pop-up window.
Please see the Support Centre article Email Templates (Settings) for further information relating to the creation of email templates.
If the email icon is pressed prior to selecting a template, the Send Email pop-up window will open with a blank email body. If required, a template can then be selected.
CallBack
CallBacks relating to the current Job can be viewed, created, modified or deleted in this section.
Please see Support Centre article, CallBacks, for further information.
CT-Sign (optional)
The CT-Sign option enables the technician to acquire the customer's signature and obtain answers to predefined questions on a mobile device when the Job has been completed (also known as sign-on-glass).
The appropriate CT-Sign template for the job should be selected from the drop-down list; this will enable the technician to access the CT-Sign document via their mobile device when the Job has been completed.
When the Job has been saved, the CT-Sign preview (magnifying glass) icon will be displayed to the right of the CT-Sign template drop-down list. Pressing the preview icon will display the selected CT-Sign template (if any) in a preview window. The CT-Sign preview is not for live use; information entered into the preview document cannot be saved.
For further information about CT-Sign Settings, please refer to the following articles:
Data Sheets
To assign a data sheet to the Job:
- Select a required data sheet from the dropdown list
- Press the + (plus) icon adjacent to the dropdown list
The data sheet is added to the field:

Multiple data sheets can be added to a Job, by repeating the above process.
To remove a data sheet from the Job, press the trashcan icon (visible in the previous image).
Related and Upload Documents
Documents relating to this Job are displayed in this field.
To upload a new document, or to select an existing document, press the Upload (cloud) icon, to display the Related Documents pop-up window.
See Support Centre article, Related and Upload Documents, for further information pertaining to this feature.
Materials Used
There are two aspects to this field:
- Recording Materials Used (entered into the displayed fields)
- Related Expenses (accessed by pressing the expenses icon)
Recording materials used

The name of materials used and the cost of those materials can be recorded in the respective fields. To add another item, press the + (plus) button. To remove an item, press the - (minus) button.
Related Expenses
This option is related to the Expenses and Reimbursements feature. Press the icon to display the New Expense pop-up window:

Enter details of the expense as required, and press Add to confirm.
A user will only see their own expense entry.
Related Photos (maximum of ...)
Drag and drop an image file onto, or press Browse to select image files to add. Pressing Add confirms the attachment of the images. Related photos are accessible in the Job's Related Documents field.
Pressing the Preview (magnifying glass) icon adjacent to the Related Photos field, presents the Job Photos pop-up window, providing the ability to review and remove job photos.
The maximum number of photos allowed, and the folder into which photos are stored, are specified in Jobs Miscellaneous (Settings), Maximum number of photos that can be uploaded from a job.
IMPORTANT: Photographic images can vary in size from a few kilobytes, up to several megabytes, depending on the image source, camera type, etc. Please be aware of the image sizes that are being uploaded, and monitor the size of files in the document folders to ensure that excessive storage allocation is not being used unnecessarily.
Date/Time Job Finished
Enter the date and time for the Job completion into this field.
If the Job's status is currently Booked, and the Date/Time Finished has been provided, the Job's status will be automatically changed to Closed.
A Job cannot be closed until at least one Job Note with Chargeable Time or Non Chargeable Time has been added. Please see the below sections; Adding a Job Note, Chargeable Time, and Non Chargeable Time.
Action Buttons
- Save - Saves any changes made to the Job detail.
- Print - A pop-up window will be displayed, providing options for printing a Job Card. The options displayed in this window will vary depending upon the web browser that is being used.
- Conversations (only visible if enabled on your CommTrak) - view Conversations or start a new conversation.
- To Accounts - This is a shortcut to the customer's Accounts screen.
- Sign - This option opens a pop-up window displaying the CT-Sign document, for the customer to complete and sign. Typically, this option would only be selected by a Technician using a mobile device on the customer's premises.
A CT-Sign template must be selected for the Sign option to work; please see CT-Sign field information, above.
Job Notes
Viewing Job Notes
When viewing the details of a Job, the New Note and All Notes sections are displayed in the section below the Job details.
All Job notes are displayed in this section in reverse-chronological order (i.e. most recent at the top):

Adding a Note to a Job
Notes can be added to a Job at any time, in the New Note section of the Job screen.
A Job cannot be closed until at least one Job Note with Chargeable Time or Non Chargeable Time has been added.
The following fields are available when adding a note:
Email Customer
If a copy of the note should be emailed to the customer, place a tick in this field, and select the required contact from the drop-down list located to the right of the Email Customer field.
Other Email
If a copy of the note needs to be emailed to someone who is not a customer contact, place a tick on the Other Email box and enter a valid email address into the Enter email field located to the right of the Other Email tick box.
Multiple email addresses can be entered, separated by commas.
Called Customer
This field is for noting that the person creating the note has spoken to the customer. This is for reference only; no action occurs when the Called Customer box is ticked.
Staff
The name of the CommTrak user who is entering the note and to whom any productivity activities will be assigned (see the next field, Activity / Time Spent, for additional information).
The default is the currently logged-in user.
Activity / Time Spent
To add chargeable or non-chargeable time to a Job, select the activity and duration using these fields.
Refer to Productivity Activities - Adding Productivity to a Note, for detailed information about use of this feature.
Timer
Start, pause or stop a timer for this job.

See the article Productivity Timers for further information about this feature.
Time Totals
This read-only field displays:
- cumulative durations for each Chargeable and Non Chargeable time added to the Job via notes
- percentage of time verified by Accounts Department
Jobs are marked as Verified by the Accounts Department, using the Productivity Report.
New Note
Enter the text of the note. Typically, the note text would relate to the progress of the current job or may contain information that may be useful to either the customer or other CommTrak users who have an interest in the job.
The New note field must be populated with some text if any other field in the New Note section has been modified (i.e. if a new note is being added).
If the note field is empty and the Activity and Time Spent fields have been populated, the New note text will be populated with the name of the Activity. This autofill feature must be enabled in General Miscellaneous Settings.
Save the Note
Pressing Save (in the pinned section at the bottom of the screen) saves the Note.
Editing a Previous Note
Previous notes can only be edited under the following conditions:
- User must have permission to edit notes
- Note must not have been sent as an email
- Note has no chargeable or non-chargeable time allocated
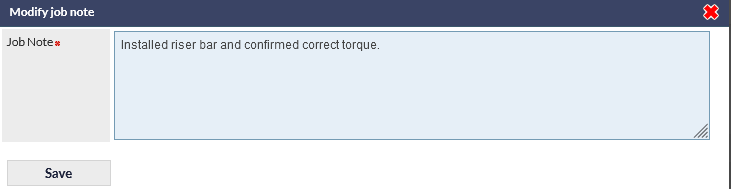
To modify a previous note, press the edit (pencil) icon, displayed to the right of the note header (visible in the following image):

The Modify job note pop-out window is displayed, and the note can be edited:
When the modified note is saved, details of the date / time and user who edited the note is appended:
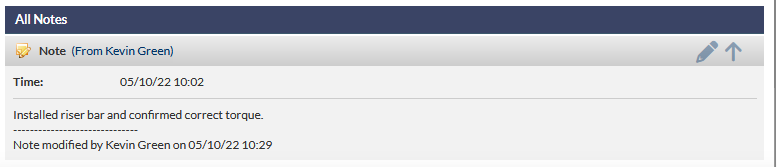
Only the details of the most recent edit are retained. i.e. if the same note is later edited, only the date / time and user name for the most recent edit are displayed.
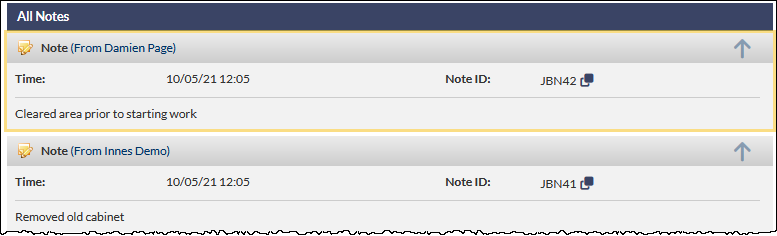
Job Note ID / Links
Each Job Note is assigned a unique ID and a link (URL), which can be copied and shared with other CommTrak users within your organisation.
The unique Note ID is displayed in the header of each note, as highlighted in the following example image:

Pressing the copy link icon (adjacent to the Note ID, highlighted in the previous image) copies the Note's unique URL into your device's clipboard. The link can be shared, for example, via email or third-party messaging application such as MS Teams, etc.
When using a Job Note URL (e.g. by pressing it when received in a third-party messaging application), the Job screen is opened in a new browser tab, and the window automatically scrolls to the relevant note.
The linked note will be highlighted with a yellow border, as shown in the following image:
The highlighted border enables rediscovery of the linked note whilst scrolling through a long list of notes, as the linked note will remain highlighted until the browser tab is updated or closed.