
Related and Upload Documents
Uploaded documents pertaining to a Customer are stored, and can be managed, in the Documents tab of a Customer or Lead.
In addition to using the customer's Documents tab to upload and manage documents, several CommTrak modules (e.g. Leads, Tickets, Jobs) include a Related and Upload Documents field, which enables the user to designate documents as being related to the current item, and to upload additional documents.
In a Ticket window, the Related and Upload Documents field is only visible when the Ticket has been allocated to a Customer. See the Support Centre article Creating / Modifying a Ticket for more information about this feature.
When viewing an item in a module that has this feature, the Related and Upload Documents field is displayed:
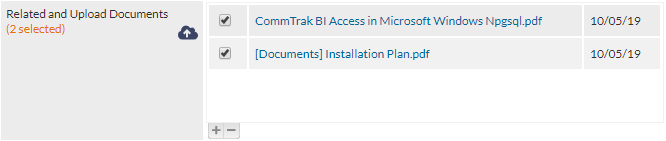
The above image shows an example of a Related and Upload Documents field in a Job, in which two documents have been related to the Job.
The document list contains up to fourcolumns:
- Selected - Untick to unrelate the document from this item. To confirm changes in this column, save the item (i.e. Job, Lead, etc.) after unticking
- Document folder and filename - The folder name (if any) is displayed in square brackets, followed by the filename
- Date uploaded - the date on which which the document was uploaded to CommTrak. Documents are ordered by date and time (time is not displayed).
- Delete - When the current user has document deletion permissions, the delete icon is displayed. When pressed a deletion confirmation prompt is displayed. Upon confirmation, the deletion is immediate and irreversible. Document deletions are logged in the Staff Activity Report.
Below the Related and Upload Documents field label, the number of selected documents is displayed in orange text (visible in the previous image). This enables the user to quickly determine how many documents are related to the current item.
To quickly unrelate a document from the Related and Upload Documents field, untick the item and Save the record (i.e. save the Job, Lead, etc). This does not delete the document from the Customer's document folders; it only removes the relationship between this item (e.g. Job, Lead, etc.) and the document.
The Related and Upload Documents field can be expanded or collapsed by pressing the + or - button (visible in the above image).
Displaying / Downloading a Document
If a document name is clicked, CommTrak will attempt to display the document in a new browser tab. If the document is of a file-type that cannot be displayed in a web browser (or if the user's device is not configured to display that file-type in the browser), the document will be downloaded to the user's device using the browser's download feature.
If a document is displayed in the browser tab, it can typically be downloaded using the browser's download tools. For example, if the document is an image, when on a desktop device, right-click the image in the browser and select the browser's download image option or, if a PDF is displayed, use the browser's download PDF option.
Upload / Relate / Unrelate a Document or URL
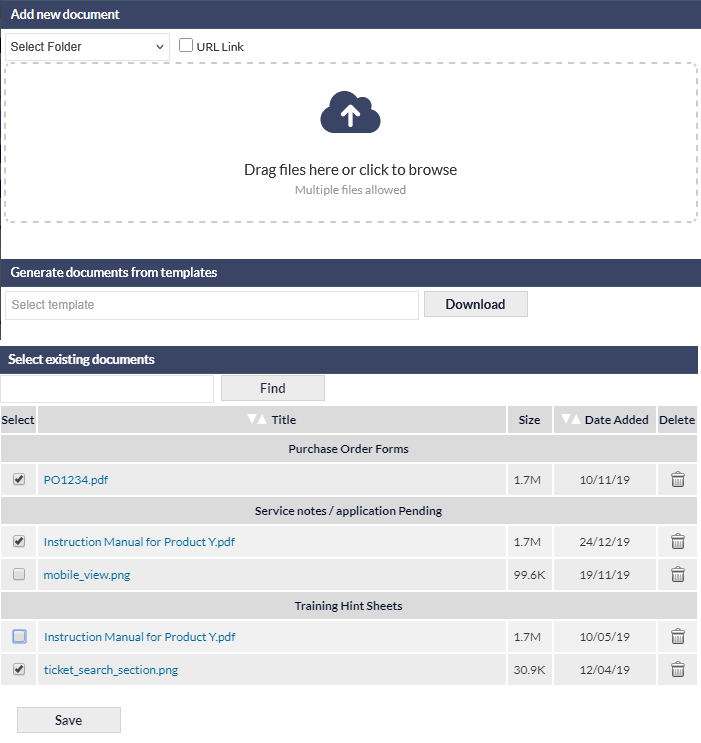
To upload, relate or unrelate a document, or to relate a URL, click the cloud icon adjacent to the Related and Upload Documents field (visible in the previous image). The Related Documents pop-up window is displayed:
Upload and Relate a Document
In the top section of the Related Documents pop-up window, entitled Add new document:
- Optionally select a folder from the drop-down list; if no folder is selected the file will be stored in the Unclassified folder
- Either drag and drop the required document file(s) onto the file dropzone, or select the required file(s) by clicking the dropzone to display the file browser. Multiple files can be dragged-and-dropped on the dropzone in a single drag-and-drop action, or multiple files can selected in the file browser
- Click Add to confirm the file(s) upload, or click the red cancel (X) icon (top-right of the pop-up window) to close the document upload window.
For more information about the file upload features, please refer to the Document Upload Features article.
Large files may take a several seconds to upload; do not leave the screen whilst files upload. File upload progress is displayed so you can monitor the upload.
Once uploaded, the file(s) will be displayed in the Select existing documents section of the pop-up window, and will be ticked automatically to designate that they are related to the current item (Lead, Job, etc).
Click Save or the red cancel (X) icon (top-right of the pop-out window), to return to the record. Cancelling the pop-out window after completion of uploading files, does not cancel the upload.
Document folders are managed in Customer Settings; see the Support Centre article Document Folders (Settings).
Relate a URL (web link)
In addition to uploading and relating documents, it is also possible to relate a URL (a clickable web link). Once a URL has been related, it is treated in the same manner as a document (i.e. the item can be clicked, unrelated, deleted, renamed).
To specify a URL (rather than uploading document), click the URL Link option (visible in the following image) to display the URL and Description fields:

Both the URL and Description fields are mandatory.
Enter or paste the URL (which must be a valid link, including a protocol, such as https://), provide a Description, and press the Add button.
- Pressing Add will relate the URL.
- Press Save or the red cancel (X) icon (top-right of the pop-out window), to return to the record.
Please refer to the later sections in this article, that pertain to documents, as they also apply to URLs.
Relate / Unrelate a Document
Documents are automatically related at the time of upload, as described in the earlier section, Upload a Document. This section describes how to:
- relate a document that was previously uploaded and not related
- unrelate a currently-related document
Relate a Previously-Uploaded Document
In the bottom section of the Related Documents pop-up window, entitled Select existing documents, place a tick next to each document that is to be related to the current item, and press Save.
Unrelate a Previously-Related Document
In the bottom section of the Related Documents pop-up window, entitled Select existing documents, remove the tick next to each document that is to be unrelated, and press Save.
Documents can also be unrelated by unticking the document within the Related and Upload Documents field and saving the record; i.e. it is not required to press the cloud icon to unrelate documents.
Document List Features
The Select existing documents features include:
- Find feature to locate documents for which the name (or part of the name) is known; enter the search text and press Find
- Documents are organised into folders, and the folders are ordered alphanumerically
- In each folder section, documents are ordered by date and time (time field is not visible)