
What's New February 2020
We're off to a flying start with our first release of 2020, which contains numerous new features and updates.
Video presentations of all the new features in the February 2020 release are now available.
Projects / Project Reports
- Project Reports NEW
- Time Based Progress Fields NEW
- Labour Assignment Fields NEW
- Username Displayed in 'Date Added' Field Update
- Remuneration Values on Project Budget Tab NEW
- Project Due / Task Due Dates Available in Overdue Alarms NEW
- Project Classification Field Added NEW
- To-Do Items now have a Reference Number Update
- Shared Components for Grouped Customers NEW
- Project Task Time Now Entered Into Textbox CHANGE
Tickets
- Selection of Multiple Statuses on Active Tickets Screen Filters NEW
- Escalation Rules now Account for Weekends CHANGE
- Ticket Note Attachments - Save / View / Download NEW
Email Marketing
Leads & Quotes
- Leads Fields Data Sheet Mandatory Option NEW
- Grouping and Hiding (Folding) Line-Items in Quotes NEW
- Significant Enhancements for Export of Quotes to PDF NEW
Workflow
- Workflow Notification Refinements Update
- Deleted Workflow Groups Filtering on Active Workflow Cases Screen CHANGE
- 'Expected Delivery' Placeholder in Workflow Email Template Update
- Workflow Case - Related and Upload Documents NEW
Customer Reports
- 'Customer not using selected equipment' Criterion Added to Customer Reports NEW
- 'Service Provider' Criterion Added to Customer Reports NEW
Automatic Emailing of Reports
Data Sheets
Projects
Project Reports
The Projects module now has Reporting features, accessible via Reports > Project Reports:
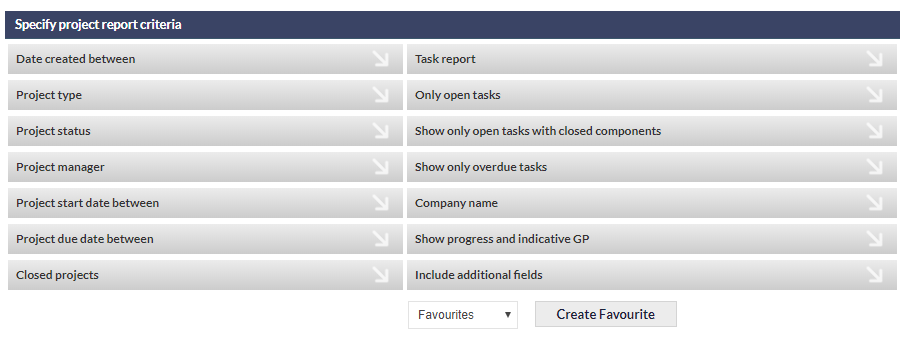
There are minimum criteria requirements for producing Project Reports, i.e. at least one of the following criteria must be specified before a report can be produced:
- Date created between
- Project type
- Project manager
- Project start date between
- Project due date between
Failure to specify at least one of the above criteria will result in the report presenting the following message: Not enough information provided to perform the search. Try again?
Time Based Progress Fields
A new field section, Timed Based Progress, has been added to the Project's Main Info section:
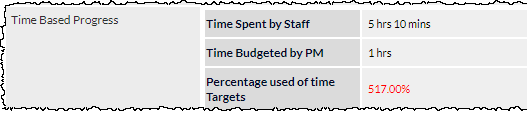
These fields allow for an immediate comparison of time budgeted by the Project Manager, to the actual time that staff have spent on activities (as recorded in related Jobs and Tickets).
The Percentage used of time Targets indicates how under or over budget the time allocation is. In the above screenshot, it can be seen that the Project Manager allocated 1 hour to the project, but the actual time recorded for Jobs and Tickets, is over 5 hours; an over-budget time allocation of more than 500%.
Labour Assignment Fields
A new field section, Labour Assignments, has been added to the Project's Main Info section:

This field shows a table of Labour Units that have been allocated to the Project (derived from accepted Quotes in Leads that are associated with the Project).
In the above screenshot, it can be seen that a single quote (QT13728), has three lines assigned to Labour, (totalling 15 Labour Units). The following image shows a single line item in the quote from which one set of Labour Units has been derived. We can see that the 6 Labour Units, shown in the above Conversion to ISDN line, can be found as a Labour item in the quote extract shown below:
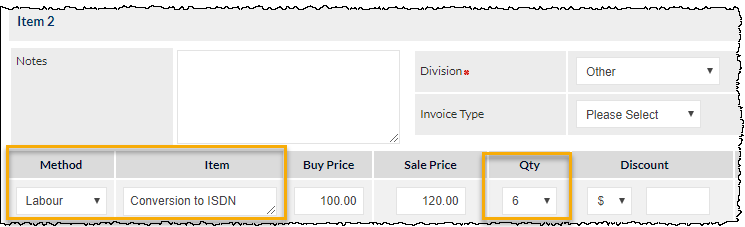
Note that the Labour Assignments are referred to as Labour Units, not Labour hours; this is to account for fixed price items. For example, an audit may be quoted as a single Labour Item with a fixed price, and is thus a single Labour Unit.
Username Displayed in Date Added Field
The Project's Date Added field now displays the name of the user who created the Project.
Remuneration (Rem) Values on Project Budget Tab
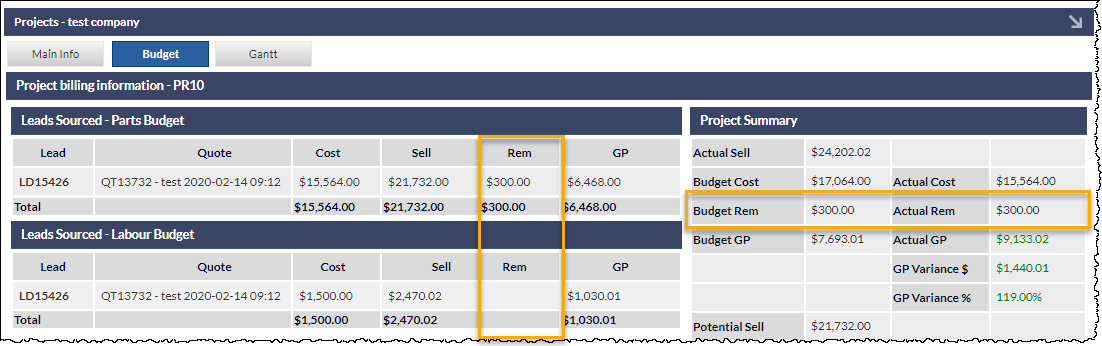
Where a Remuneration (Rem) value as been provided for Quotable Non-Hardware items that have been added to a quote, the Rem values will be displayed in the Project's Budget tab:
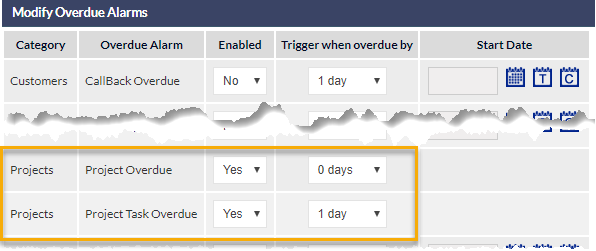
Project Due / Task Due Dates Available in Overdue Alarms
The Project Due Date and Task due dates can now be added to Overdue Alarms. The Project Manager will see the alarm for an overdue Task (not the person to whom the task was allocated).
For further information about the configuration of Overdue Alarms, please see the following CommTrak Support Centre articles:
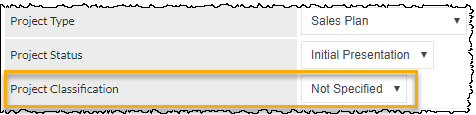
Project Classification Field Added
The Project Classification field provides a method of identifying or classifying projects. For example, a Project might be classified as Enterprise, Complex, Simple, etc. The default selection is Not Specified.
Classifications can be added or edited in Settings > Project Settings > Project Classifications.
Field labels can be modified if required. If the default field label of Project Classification does not meet your organisation's requirements, it can be renamed; please see CommTrak Support Centre article Labels & Strings (Settings) for information relating to the configuration of labels in CommTrak.
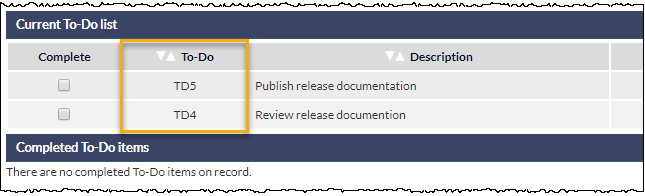
To-Do Items now have a Reference Number
When adding a To-Do item, it will automatically be assigned a reference number; the default reference prefix is TD.
Shared Components for Grouped Customers
When a Project exists for a Customer that is part of a Customer Group, components from other customers within the same group can be added to the Project.
In the following example, Hospital Central and Hospital Dynamics have separate Customer records, and they have previously been allocated to the same Customer Group.
The screenshot below shows the Add Project Component pop-out window for a Project associated with the customer Hospital Dynamics (1 in the screenshot):
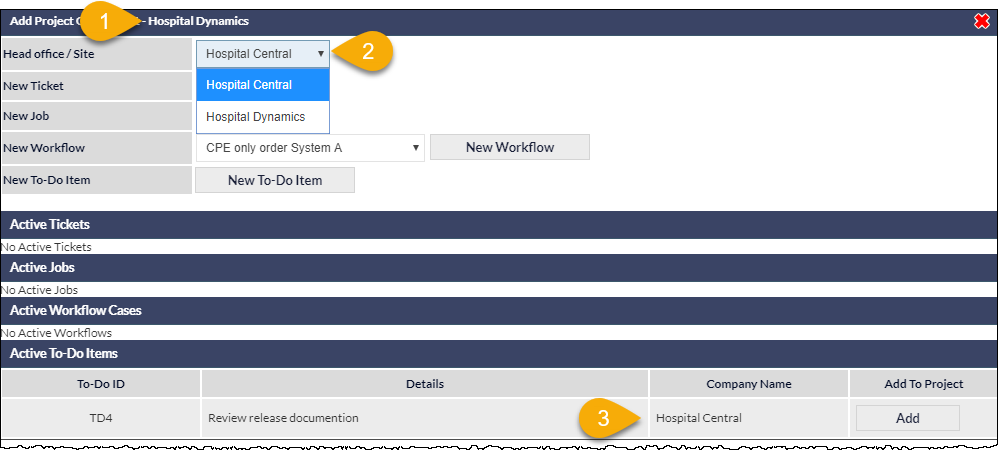
To add a new component for a different customer within the same Customer Group, select the customer name from the drop-down list (2 in the screenshot), then click the relevant new component button (e.g. , , etc). The appropriate screen will be displayed for adding the component (Ticket, Workflow, etc), and the new component will automatically be related to the Project.
In the above image, it can also be seen that existing components from other customers within the same Customer Group can be added to the Project; in this case a To-Do item, TD4, which is associated with the Customer record for Hospital Central (3 in the above screenshot).
Please see the following CommTrak Support Centre article for related information:
Customer Groups (Settings) - for configuration of Customer Groups
Customer Screen, More Info section - for assigning a Customer to a Customer Group
Project Task Time Now Entered Into Textbox
When adding a new Task to a Project, the Task Budget (time allocated to the task) is now entered manually, as hours and minutes:
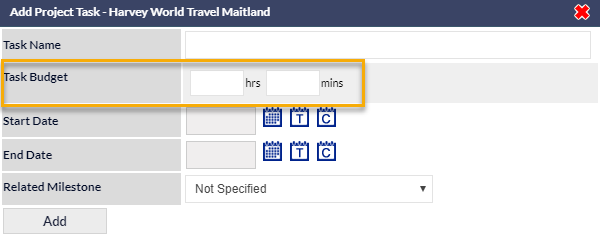
Previously, the Task Budget was entered via drop-down lists, which resulted in limiting the maximum number of hours that could be entered.
Tickets
Selection of Multiple Statuses on Active Tickets Screen Filters
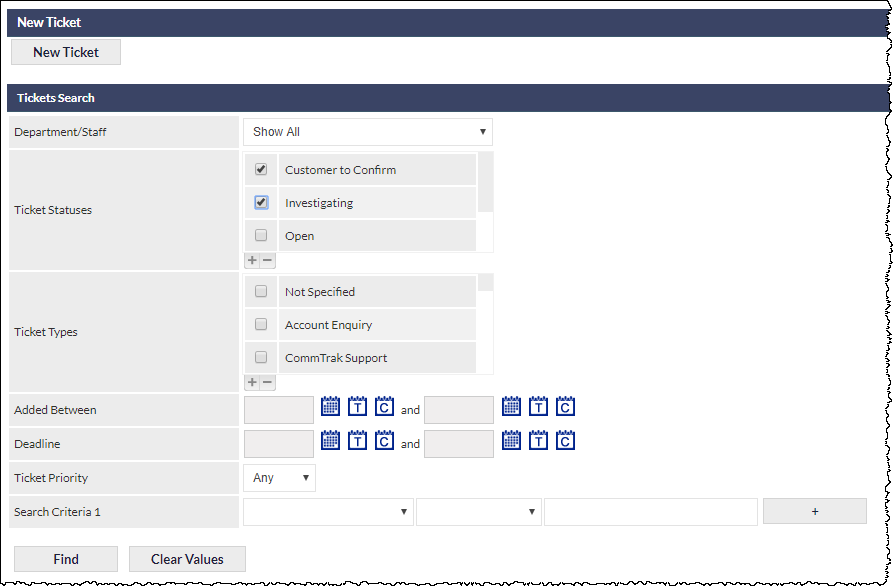
Multiple Ticket Statuses can now be selected on the Active Tickets screen.
The following image shows an example in which the Customer to Confirm and Investigating statuses have been selected. Clicking will update the Active Tickets section displayed at the bottom of the Active Tickets screen (not visible in the below image), to display only Tickets with the selected Statuses (and taking into account any other search filters that may have been specified).
For further information about filtering and viewing the Active Tickets list, see the CommTrak Support Centre article, Active Tickets Screen.
Reminder: Custom Ticket Statuses are configured in Ticket Statuses (Settings).
Ticket Note Attachments - Save / View / Download
When a customer replies to a Ticket with an email containing attachments, the attachment can be saved to Documents, viewed in the browser, or downloaded, as follows:
- To save to Customer Documents, click the Save icon next to the attachment (1 in the image below). The Save Document pop-up window will be presented; select a folder and click the Save button.
- To view the attachment in the browser window, click the name of the document (2 in the image below). If the browser is capable of displaying the document (e.g. PDF, image file), it will be displayed in a new browser tab. If the document cannot be displayed in the browser, it will be saved to the user's device using the browser's file-download feature.
- To download the document to the device, click the name of the document (as seen in the image below). If the browser is capable of displaying the document (e.g. PDF, image file), it will be displayed in a new browser tab; the document can then be saved using the browser's features (e.g. right-click the image and select the save option). If the document cannot be displayed in the browser, it will be saved to the user's device using the browser's file-download feature.
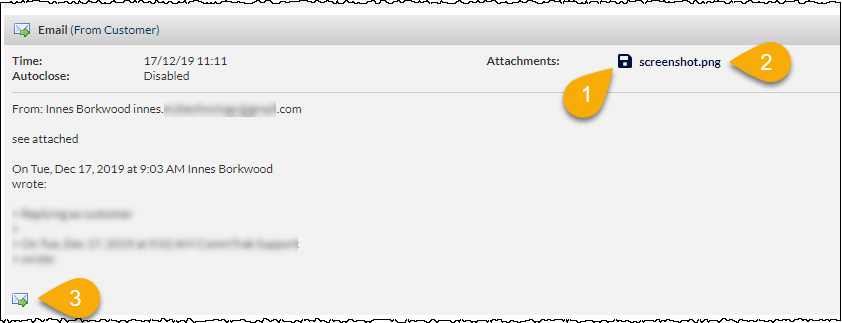
The above image shows:
- Save icon - save to Customer Documents
- Filename - click to display in browser / save document to device
- Forward icon - Forward the contact's reply to the currently-signed-in user's inbox (e.g. Outlook). This is an existing feature, but highlighted as a reminder that this feature is available.
Escalation Rules now Account for Weekends
Ticket Escalations now take weekends into account when determining dates for the escalation email notifications.
Ticket Escalations are not displayed on the Ticket screens; see the CommTrak Support Centre article Ticket Escalations (Settings) for further information about this feature.
Email Marketing
Email Marketing Summary in Contact Notes
When viewing Customer Notes, it is now possible to view a summary of the email that was sent to the customer. Clicking the Information icon, in the note header, presents a pop-out window containing the email message summary.
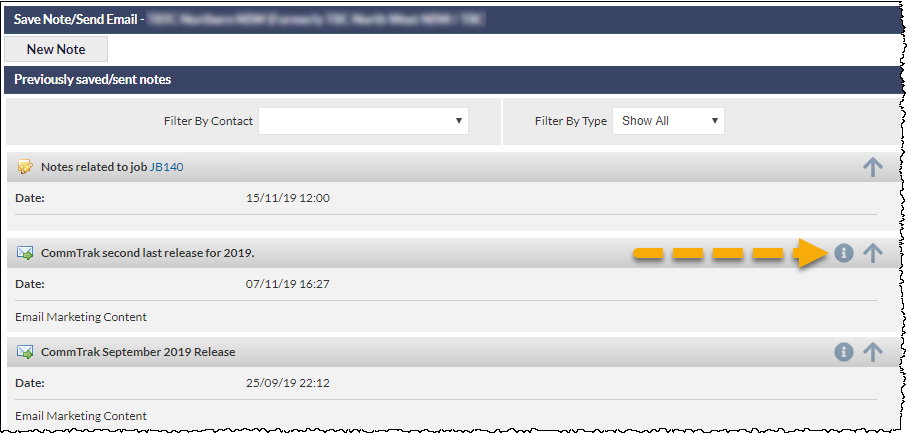
The following image shows an example of the pop-out window that is displayed when the Information icon is clicked.
Please note that the Email Marketing Summary is intended to show which template was used, therefore placeholders will not be populated.
Emailing Marketing Lists from CommTrak Reports
The following CommTrak Reports can now be exported to Email Marketing:
- Customers
- Leads
- POS (only POS records linked to a customer can be exported)
The following screenshot shows an extract from the Customer Report screen, with the Export to Email Marketing button highlighted:
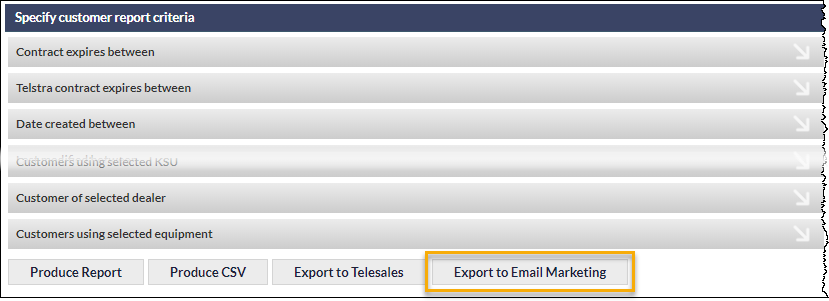
When the Export to Email Marketing button is clicked, a pop-out window is displayed:
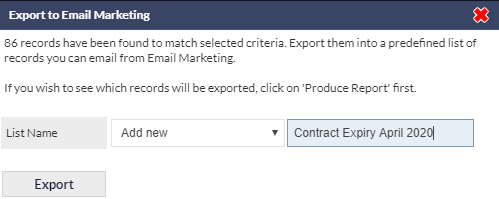
Either enter a new List Name or select an existing list (if any exist) from the drop-down field. In the above example, a new list named Contract Expiry April 2020 will be created.
When is clicked, the list will be exported to the Email Marketing module.
It is important to ensure that the exported list contains the expected number of records; this can be seen in the message displayed in the pop-out window (in the above example, 86 records will be exported). To cancel the export, click the red X (top-right of the pop-out window).
Using the Exported Email Marketing List
In the Email Marketing module, select the required list from the List Name column, and click Search:
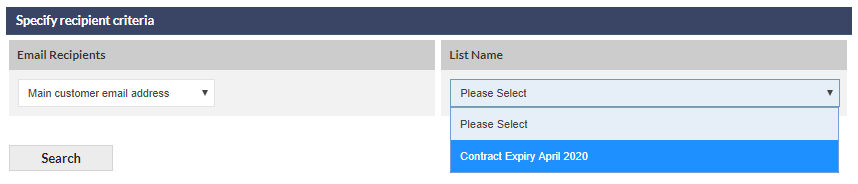
The Email Marketing options will be presented, as usual, with the recipients' details displayed at the bottom of the screen.
The required email template can now be loaded or created, and the marketing email can be sent.
Leads & Quotes
Leads Fields Data Sheet Mandatory Option
It is now possible to specify that a Data Sheet must be added to a Lead, prior to making the Lead successful.
If a Data Sheet has not been added to a Lead, and the Lead has its Status set to Successful (and Save is clicked), the following pop-up message will be displayed:
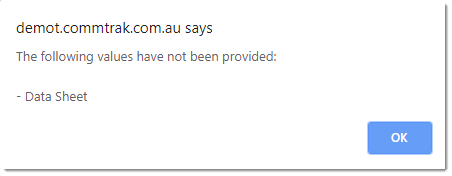
The user must add a Data Sheet prior to changing the Lead Status to Successful, and saving the Lead.
Please see the CommTrak Support Centre article, Leads Fields (Settings), for information relating to the configuration of this feature.
Grouping and Hiding (Folding) Line Items in Quotes
When adding a line item to a quote, the line item can be designated as a hidden item. Hidden items do not appear on printed (PDF) quotes, and the price of the hidden item is added to the price of the immediately-previous, non-hidden item on the quote; this is referred to as folding line items.
Multiple consecutive quote line items can be designated as folded, and the total price of those consecutive folded items will be added to the immediately-previous, non-folded line item. This feature is intended to enable the provisioning of quotes which contain bundles of items which are quoted for as a single item.
Please note that the following screenshot has been modified for this CommTrak Support Centre article; for reasons of space and clarity some fields have been removed:
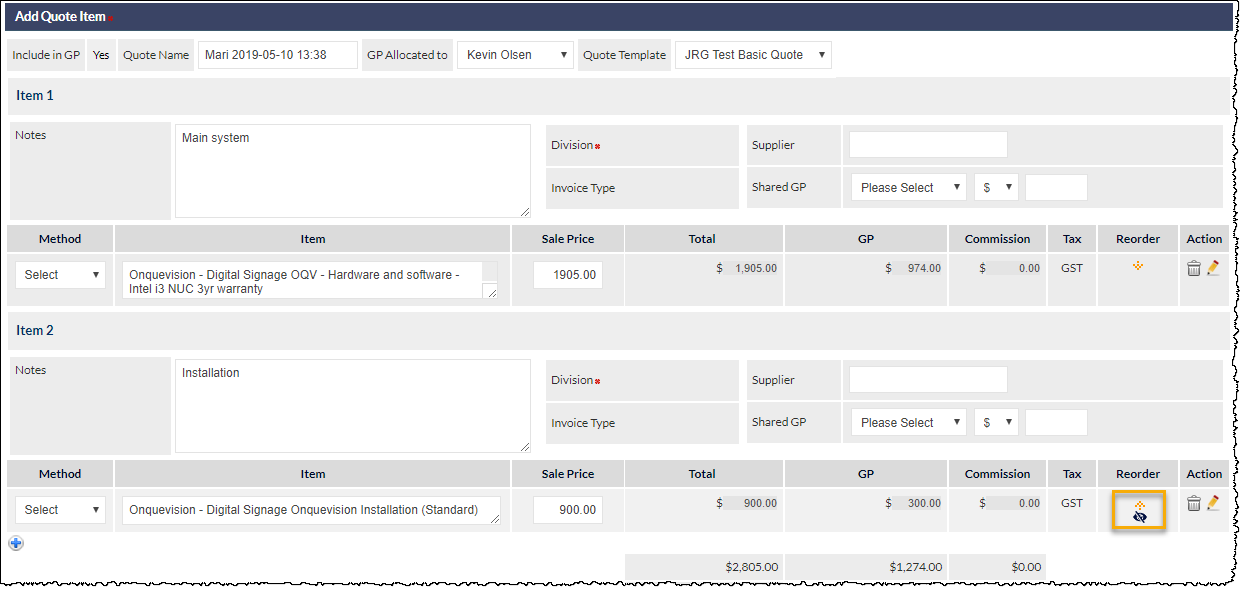
The above screenshot shows a quote with two line items ('Main system', and 'Installation').
The highlighted area shows that Item 2 ('Installation') has been folded; the eye icon has a cross through it. This designates that the item will not be displayed as a line item on the quote, but the sale price information for this item will be folded-up into the previous line (i.e. there will be a single line item on the quote with the price showing the total of line items 1 and 2).
Clicking the eye icon toggles between the item being folded (or not) with the previous item.
The first item on a quote cannot be folded, therefore, if the reorder icons (orange up /down arrows) are used to move an item to the top of the quote, the item will be unfolded, and the eye icon will not be displayed (as can be seen in the above image).
Significant Enhancements for Export of Quotes to PDF
The CommTrak PDF Engine and Quote Templates have been substantially enhanced to provide the following:
- Consistent headers and footers
- Accurate line item flow over page breaks
- Quote orientation (landscape / portrait)
Existing Quote Templates will continue to function as they did previously, so no action is required if your Quote Templates currently meet your requirements.
If you wish to take advantage of the new features, please contact CommTrak Support, and we will be pleased to provide templates upon which you can base your Quote Templates.
Please note that use of these advanced Quote Template features requires significant knowledge of HTML and CSS, and we recommend that you use the services of a professional designer, or contact CommTrak Support; we will be pleased to quote for template development.
Workflow
Workflow Notification Refinements
A number of refinements have been made to the way in which CommTrak sends Workflow Task email notifications:
- Workflow Task notification emails are now sent only when at least one Task has been marked as being completed (i.e. a Task is ticked) prior to clicking Save. Previously, CommTrak sent Workflow reminder notification emails upon every press of the Save button on the Workflow screen. This would cause notifications to be sent, even when no additional Workflow Tasks had been marked as completed.
- An email notification is sent when a previously Cancelled Workflow is Reactivated.
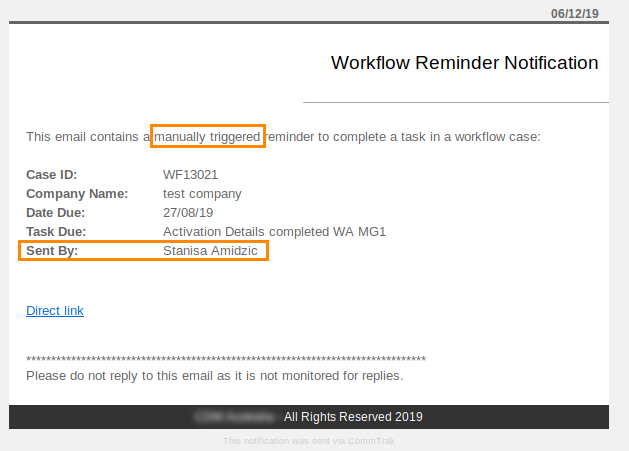
- Workflow notification emails now identify whether the notification was triggered automatically or manually; an example is shown in the following image:
Deleted Workflow Groups Filtering on Active Workflow Cases Screen
When a Workflow Group is deleted in Workflow Settings, any active workflow cases of that Workflow Group type will still appear on the Active Workflow Cases screen, and can be filtered using the features in the Workflow Filter section. If there are no active workflow cases for a group type that has been deleted, the name of the Workflow Group will no-longer be displayed in the filters on the Active Workflow Cases screen.
Previously, when a Workflow Group was deleted in Settings, it was visible on the Active Workflow Cases screen, but could not be filtered.
Please see the following CommTrak Support Centre articles for additional information about these features:
'Expected Delivery' Placeholder in Workflow Email Template
Workflow Email Templates now include a placeholder for the Expected Delivery date.
Please see the following CommTrak Support Centre articles for additional information about the use of Workflow Email Templates and Template Placeholders:
- Workflow Email Templates (Settings)
- Email Template (Settings) - includes implementation of Placeholders
- Workflow Case Screen - includes use of Email Templates
Workflow Case - Related and Upload Documents
Documents can now be related directly to a Workflow Case; the Related Documents field has been updated to Related and Upload Documents.
When a document has been related directly to the Workflow Case, it is displayed with tick-box adjacent to the name of the document. When a document is associated via a related Lead (or other module item, such as a related Workflow), the document is displayed with the item number adjacent to the name of the document (clicking the Lead number will display the related Lead).
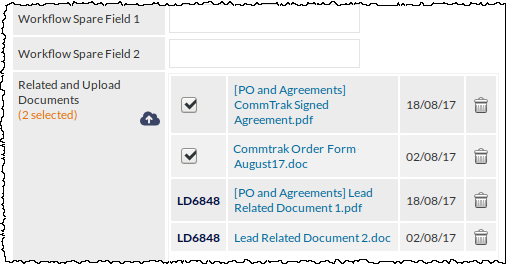
The above image shows an extract from the screen of a Workflow Case, with two documents that are related directly to the Workflow Case, and two documents that are related to the Workflow Case via a related Lead.
Please see the CommTrak Support Centre article, Related and Upload Documents for further information about this feature.
Reports
'Customer not using selected equipment' Criterion Added to Customer Reports
An additional criterion, Customer not using selected equipment, has been added to the Customers Report, as highlighted in the following image:

Used in conjunction with the Customer using selected equipment criterion (shown at the top of the above image), this new option provides a powerful tool for identifying a very specific segment of customers for targeting via sales, Telesales, Email Marketing.
In the above example, the report result would show all customers who are using 'M2 Other', but which are not using 'M2 FCM'.
'Service Provider' Criterion Added to Customer Reports
An additional criterion, Customers with selected service provider, has been added to the Customers Report, as shown in the following image:
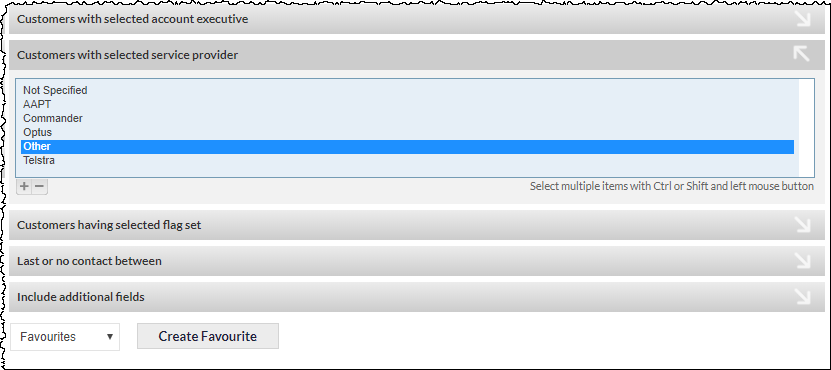
A reminder of some existing features when selecting Report criteria:
- Criteria must remain in the expanded state to be effected in the Report, i.e. if you select a criterion, then collapse the selection, it will be ignored in the Report.
- Typically, multiple items can be selected in Report criterion. In the above image, only one item is selected (Other); but multiple non-consecutive or consecutive items can be selected by using the Ctrl or Shift key, respectively, in conjunction with the left mouse button.
- If the Report screen displays the Include additional fields section (the bottom criterion in the above image), you can expand the section and select additional fields to be included in the Report.
When using the reporting module, consider the number of results that are required in context of the required report. For example, when generating a list of customers for a sales person to contact, a list of 100-200 results may be appropriate, as this is a manageable number of calls for a sales person to make within a specified period. If generating an Email Marketing report, a list of 1000+ customers may be appropriate. If a report generates too many results, refine the report by adjusting the selected criteria to present a more targeted list.
Automatic Emailing of Favourite Reports
When a Favourite Report is added or reloaded, the user is presented with an option to email the Report to themselves at a specified interval.
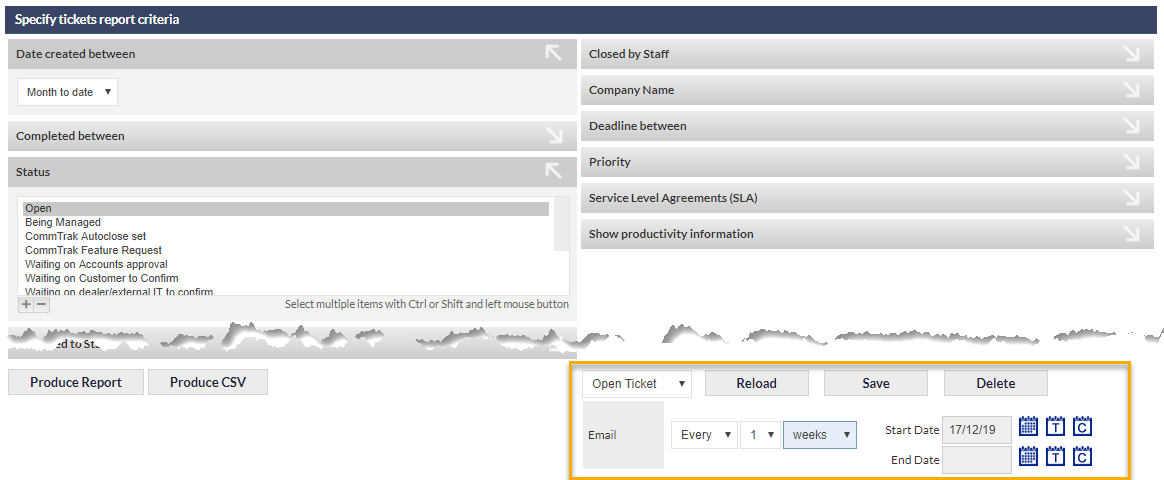
When the Every option is selected in the Email field drop-down list, the interval options are presented (Every 1-9 days, weeks, months, years), as highlighted in the above image.
The user can also specify:
- Start Date - the date on which the automatic emailing of the Report should start (defaults to today's date)
- End Date - the date on which the automatic emailing of the Report should end (default is blank; i.e. the Report will be emailed indefinitely)
The Report will be emailed to the currently-signed-in user until:
- The End Date is reached
- The user deletes the Favourite Report
- The user's CommTrak account is deactivated
Automatic emailed Reports are sent at midnight on the due date of the Report; the Report is presented as a CSV attachment to the CommTrak notification email. The email notification contains a Direct Link which, when clicked, will display the relevant Report screen in a new browser tab (assuming the user is signed-in); this is useful as a shortcut to edit or delete the Favourite Report.
Please see CommTrak Support Centre article Standard Reports (Favourite Reports heading), for more information about Favourite Reports, including the new automatic emailing feature.
Automatic Emailing of Custom Reports
The automatic emailing feature has also been added to Custom Reports.
Users who have the permissions required to create and modify Custom Reports can now optionally specify the frequency at which they wish to have the Report emailed automatically:
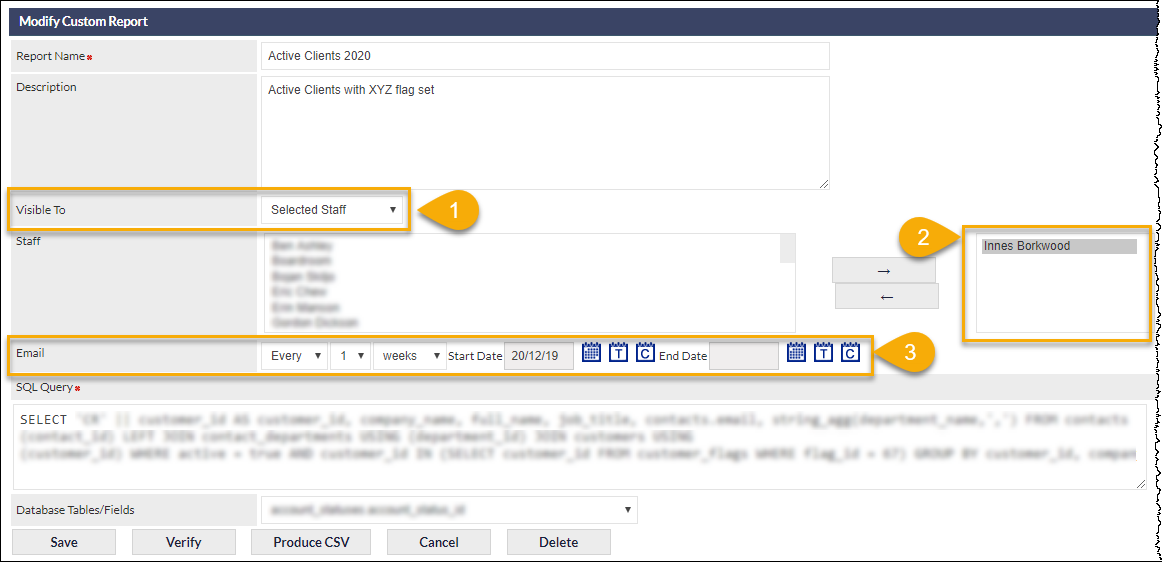
To enable automatic emailing of Custom Reports, when creating or modifying a Custom Report:
- In the Visible To field, specify Selected Staff
- Add one or more Staff names to the staff list
- Specify the interval, the Start Date and (optionally), the End Date (and Save the Custom Report)
Automatic emailed reports are sent at midnight on the due date of the report; the Report is presented as a CSV attachment to the CommTrak notification email. The email notification contains a Direct Link which, when clicked, will display the relevant Report screen in a new browser tab (assuming the user is signed-in).
See CommTrak Support Centre article Custom Reports for more information about this feature.
Data Sheets
Emailing Data Sheets from Leads and Projects
Data Sheets can now be emailed to a contact directly from a Lead or Project:

Clicking the Email icon (highlighted in the above image) displays the Save / Send Note pop-out window, from which an email can be sent to a contact.
The Data Sheet link will only be sent with the email if an Email Template containing the %LINK% placeholder is used; therefore the template must be configured in advance. See CommTrak Support Centre article Email Templates (Settings), for further information about creating Email Templates and using Placeholders.
Data Sheet Email Templates are configured in Settings > Data Sheet & CT-Sign Settings.
Job-Related Data Sheet Placeholder Updates
The following changes / additions have been made to placeholders for Job-Related Data Sheets:
- general_description placeholder has been renamed to job_description, to match the field name on the Job screen. Note: existing templates with the deprecated general_description placeholder will continue to function correctly, but we recommend using the job_description placeholder for new templates, and updating existing templates to use the job_description placeholder for consistency.
- equipment_info placeholder has been added
- tech_list placeholder has been extended; dates are only shown if Job Status is Booked