
Workflow Case Screen
This article refers to the Workflow Case screen, which shows the details of a single Workflow Case for a specific customer. For information pertaining to the Active Workflow Cases screen (a list of all active Workflows for all customers, which can be filtered based on various criteria), see Support Centre article, Active Workflow Cases Screen.
The Workflow Case screen displays all information pertaining to a single Workflow case. A Workflow case can be one of:
- Active Workflow Case - A Workflow Case that is currently in progress
- Previous Workflow Case - A Workflow Case that has been completed (all Tasks have been marked as complete)
- Cancelled Workflow Case - A Workflow Case that was cancelled prior to completion
The following information is available in the top section of the Workflow Case screen:
Click the following image to see a larger version.
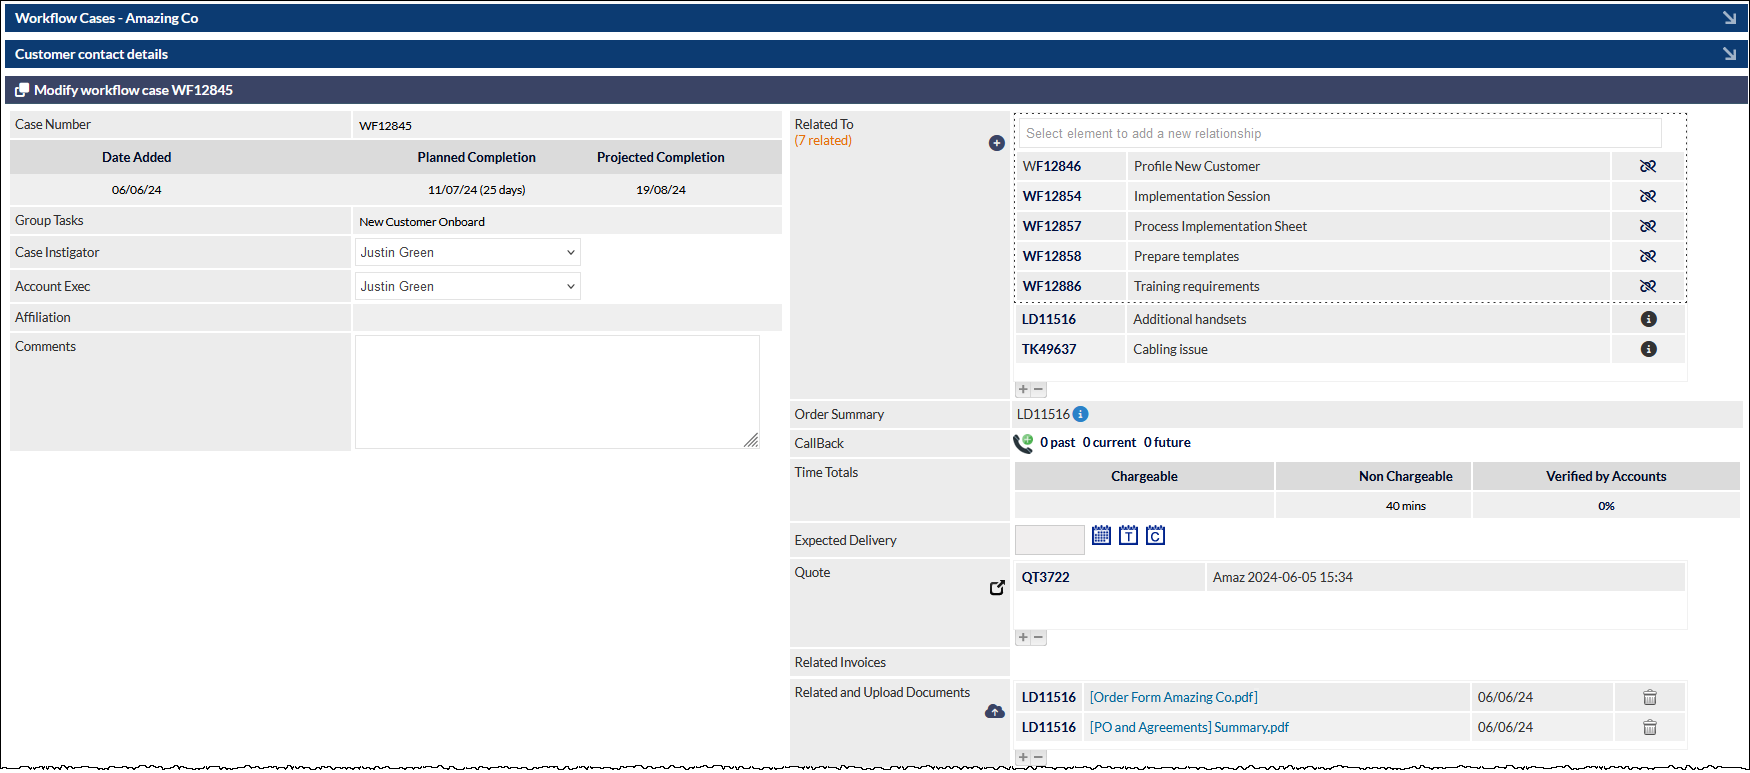
Case Number
The unique ID for this Workflow Case.
Date Added
The date that this Workflow Case was created.
Planned Completion
The date on which this Workflow Case is/was due to be completed, as calculated at the time the Workflow Case was started. The number of work days required for the completion of the Workflow is specified in parentheses, immediately after the Planned Completion date.
Projected Completion
The date upon which this Workflow is expected to be completed, based upon the current status of the Workflow.
Group Tasks
The name (type) of the Workflow Group.
Case Instigator
The person who instigated the Workflow. This field can be updated by selecting the required Case Instigator name from the users shown in the dropdown list.
Specifying a different Case Instigator will ensure that all tasks allocated to Case Instigator, in a Workflow Task's settings, will be allocated to the newly-selected user.
Sales Rep
The sales rep for the Customer.
Specifying a different sales rep will ensure that all tasks allocated to Sales Rep, in a Workflow Task's settings, will be allocated to the newly-selected user.
Affiliation
The affiliation assigned to this Customer (if any), as specified on the Customer's Main Info screen.
Comments
Comments relating to this Workflow Case.
The Comments field is typically used for notes relating to the Workflow as a whole - notes can be added to individual tasks if required. See the section Workflow Task Columns, Notes, below, for further information.
Related To
Other Customer records that are related to this Workflow are listed, or can be selected, in this section. Addition records (e.g. related Workflows, Tickets, etc.) can be related to the current Workflow by clicking the plus icon in the field label.
For comprehensive information about the features in the Related To field, see the Common Features, Records, article for further information.
Tip: To view a list of the customer's unrelated Workflow Cases, click the plus icon and enter the letters wf into the search field.
This will filter the customer's active records to display only Workflow Cases as shown in the following example image:

Order Summary
If a Lead is related to the Workflow, and the Lead contains a Quote, clicking the Order Summary information (i) icon displays a pop-up window containing order summary details.
CallBack
CallBacks relating to this Workflow can be viewed or created using the links and icon in this section. Please see the Common Features, CallBacks article for further information.
Expected Delivery
The Expected Delivery date can be updated using the calendar icons adjacent to this field.
Related Workflows
Other active Workflow Cases for the current Customer are listed in this section. A tick can be placed next to any Workflow Case ID to designate that it is related to the current Workflow Case.
Workflows that were started from a branch in the current Workflow are automatically marked as being related to the current Workflow (and vice versa).
Related Workflows are reciprocal links.
Workflow Spare Fields (Optional)
CommTrak allows for the configuration of up to three spare fields, which may be displayed and labelled as required.
Data entered into any of the three spare fields can be searched; see Search Workflows heading in the Support Centre article Active Workflow Cases Screen for additional information about searching these fields.
The spare fields are displayed below the Related Workflows field, and the names of the field will depend on the configuration.
The three spare fields are searchable using the Search field located on the Active Workflow Cases Screen.
Visibility of Workflow Spare Fields is configured in Workflow Miscellaneous (Settings). The Workflow Spare Fields labels can be configured in General Settings > Labels & Strings.
Related and Upload Documents
This field enables the user to access, view or upload documents that are related to the Workflow.
For further information about this feature, please see the Support Centre article Related and Upload Documents.
When a document is related to the Workflow via a related Lead, the Lead ID is shown adjacent to the document name instead of a tick-box. To disassociate the document from the Workflow, click the Lead ID link, and unrelate the document in the Related and Upload Document field on the Lead screen.
Workflow Task Columns
The following columns in the Workflow Case screen enable the user to update and interact with a specific Workflow Task:

Status
Click the tick-box in the Status column to update the status of a Task. If the tick-box is currently empty, clicking it changes the status of the Workflow Task to 'completed'. If the box is currently ticked, clicking it will change the status of the Workflow Task to 'rejected'.
See the section, Rejecting a Workflow Task, below.
Case Task
Description of the Workflow Case Task or, if the item is a Workflow Branch, a description of the Branch and display of the Branch icon.
Info
A link to an optional Task Hint or Document, as specified in the Workflow Task settings.
Clicking the information (i) icon will either display a pop-up window containing the text of the task hint or, if a link has been provided to an item in the Document Library, the relevant item will be displayed in a new browser tab (or downloaded to your device, if the document cannot be displayed in the browser).
Done by
If the task has been completed:
The name of the user who completed the Task is shown in this column.
If the task has not been completed:
The name(s) of the assigned user(s) or the assigned Workflow Department is displayed in brackets:

Clicking the Reassign Task icon (highlighted in the previous image), allows for the selection of a different staff member or Workflow Department.
If the assignee has previously been changed from the default, we can also reset the assignee to the default staff member or department as designated in the Workflow Task settings by selecting the Default option at the top of the dropdown list:

Selecting an entry in the dropdown list immediately applies the reassignment (Clicking the Save button is not required).
When a Workflow Task is reassigned, an information icon (adjacent to the reassignment icon) is displayed indicating that at least one reassignment has been applied to the task. The following image shows that the task has been reassigned to Kevin Green in the Accounts Team:

Clicking on the information icon (visible in the previous image) presents the Workflow case task assignment history pop-up window, which shows all reassignments that have been applied to this task:

Time / Date
For uncompleted Tasks, the date that the Task is due will be displayed. If the user has the required permissions, the due date can be delayed by clicking the calendar icon located to the right of the date.
When delaying a Task, all users associated with the Workflow Case (i.e. users to whom Tasks are allocated, the Case Instigator, and Sales Rep), will receive an email notification. Email notifications will also be sent to users associated with related Workflow Cases.
For completed Tasks, the time and date that the task was completed will be displayed.
Timeline
If completed late, the number of days by which the Task was overdue is displayed in red. If completed prior to the due date, the number of days by which the Task was completed early is displayed in green. If the Task was not overdue or completed early, this field is blank.
Notes
Notes can be added to a Workflow Case Task by clicking on the Add new task note (notepad) icon in the Notes column. The first few characters of the most recent note will be displayed in the Notes column, and a clock icon will be displayed next to the notepad icon. Clicking the Show all task notes (clock) icon will display the Task Notes history window, which contains the full text of all notes added to this task.
Task notes are also listed chronologically in the Previously saved / sent notes section at the bottom of the Workflow Case screen.
WIP
If a Workflow Task is a 'work in progress', but has not yet been completed, it can be marked as such by clicking the pushpin icon in the WIP column. When clicked, the pushpin icon will change to the eyeball icon, and the Workflow Task's Status colour will change to blue.
If the WIP icon was clicked in error, clicking the eyeball icon will revert it to the pushpin icon.
Marking a task as a WIP is purely a visual cue to advise other users that the designated user has seen the Task and is aware that it is due.
Remind
For Tasks that have not yet been completed, clicking the notification icon in the Remind column will send a reminder email to the user designated to complete the Workflow Task. When clicked, the user is prompted to enter a reminder reason, which will be sent in the notification. If one or more notifications have been sent, a clock icon will be displayed next to the reminder icon; clicking the clock icon will display a history window containing details of previously-sent Task reminders.
If an email template has been assigned to this Workflow Task, an email icon will be displayed in this column. Clicking the email icon will display the Send Email window, pre-populated with the template content. The user should specify the email recipient(s), subject, and attach files as required. The content of the email may be manually edited if required, or a different template can be selected from the Template dropdown list. The user must click at the bottom of the email window to confirm sending of the email message.
If more than one email template has been assigned to the Task, the user must manually select the required template.
Email Templates are configured and associated with Workflow Tasks in Settings > Workflow Settings > Email Templates.
Delete
Clicking on the trashcan icon in the Delete column removes the specified Task from the current Workflow Case.
Only users with the required permissions can delete Workflow Tasks
Deleted Workflow Tasks cannot be reactivated; the Task information is permanently deleted from CommTrak.
Best Practice Recommendation:
Do not delete Workflow Tasks!
It is recommend that, when a Workflow Task is not required in an active Workflow Case, an appropriate Task note is added, and the Task is marked as having been completed. This will provide a reference, for historical purposes, as to why the Workflow Task was not required for this Workflow Case.
Data Sheets
Data Sheets can be directly added to a Workflow Case. The Data Sheets section is located immediately below the Case Tasks within a Workflow:

Select the required Data Sheet from the dropdown list, and press the Add button (visible in the previous image).
The selected data sheet will be presented on screen and can be modified as required, or saved as-is for later completion, by pressing the Add button in the data sheet.
Once added, the data sheet is added to the relevant data sheet folder (for example, System Info in the following image):

Click on the folder to expand it, which will show available data sheets:
The standard data sheet features, identical to those available on the customer's Data tab, are displayed.
Data Sheets that have been created within a Lead to which the Workflow Case is related, are still displayed in the Data Sheets field. For example, the Order Request data sheet visible in the following image was created in the related Lead:

This is a convenience feature that provides one-click access to data sheets that have been generated within a related Lead.
For more information about the extensive data sheet features, refer to the Data Sheets section of the Data Screen article in the Support Centre.
Action Buttons
- Save - saves changes made in the Workflow Case screen.
- Reassign - opens the Reassign workflow case tasks pop-up window:
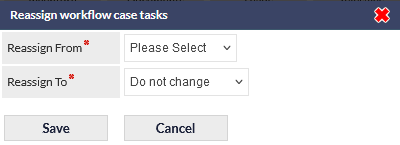
This feature reassigns all uncompleted tasks that are currently assigned to a staff member to another staff member.
Select the current assignee's name in the Reassign From dropdown list. Select the new assignee's name from the Reassign To dropdown list. Press Save to confirm (the reassignments are assigned immediately) or Cancel to close the pop-up window without making any changes.
- Cancel (only visible if requires permissions are assigned to the current user) - upon confirmation, the Workflow Case is cancelled, and is added to the Customer's list of Cancelled Workflow Cases. A list of the Customer's cancelled Workflow Cases can be viewed by clicking the Workflow tab at the top of the Customer record. Cancelled Workflow Cases can be reactivated by viewing the cancelled workflow case, and clicking Reactivate.
Only users with the required permissions can cancel Workflows.
Best Practice Recommendation:
- Prior to cancelling a Workflow, update the Workflow's Comments field to include the reason for the cancellation.
- Conversations (only visible if enabled on your CommTrak) - view Conversations or start a new conversation.
- Reactivate (only visible if the Workflow has previously been cancelled)- upon confirmation, the Workflow Case is reactivated and the assignee of the next due task is notified via email.
- Delete - upon confirmation, the Workflow Case is deleted.
Only users with the required permissions can delete Workflow Cases.
Deleted Workflow Cases cannot be reactivated. When deleted, all Workflow information is permanently deleted from CommTrak.
Best Practice Recommendation:
- Cancel a Workflow case instead of deleting it. Cancelled cases can be viewed in the customer's Workflows tab
- Limit Workflow case deletion permissions to Supervisors
- Only deleted Workflow cases as a special exception, once the need for deletion has been confirmed.
- Use the Staff Activity Report to find details of deleted Workflow cases.
- To Accounts - This is a shortcut to the customer's Accounts screen.
Workflow Duration
Upon the instigation of a Workflow Case, the Planned Duration is calculated automatically, based on the instigation date and the allocated duration of each Task within the Workflow.
When the Workflow is instigated, the Planned Completion and Projected Completion dates will be identical.
Planned Completion
The Planned Completion is the date upon which the Workflow should be completed, based on number of days that are required to complete the Workflow.
The Planned Completion date for a Workflow will never change; it is the benchmark for the completion of all the Tasks.
Projected Completion
The Projected Completion is the date upon which the Workflow is expected to be completed, based upon the number of days allocated to the completion of any remaining (uncompleted) Tasks in the Workflow.
The duration of a Workflow can change under the following circumstances:
- A Task is overdue or completed early
- The due date of a Task is manually changed whilst the Workflow is active
Rejecting a Workflow Task
If a Task has been marked as complete, but is later deemed to have been incorrectly marked as complete, the Task can be rejected by unticking the Status box for the relevant task in the active Workflow Case screen.
The user who has rejected the task will be presented with the Reject Task pop-up box, which contains the following fields:
Reject Reason (mandatory)
Select the reason for rejecting the Task from the dropdown list.
The list of options in the dropdown list can be modified in Settings > Workflow Settings > Workflow Task Rejection Reasons. See article, Workflow Task Rejection Reasons (Settings), for more information.
Return To (mandatory)
Specify the user to whom the rejected Task should be reassigned. The default is the user who originally completed the Task.
This feature is intended to manage situations whereby the user who originally completed the Task is unable or unavailable to complete the rejected Task (e.g. they may be on leave).
Details
Enter the reason for rejecting the Task. For example, 'No signature on customer contract'.
Clicking Save confirms the rejection. The user allocated to completing the rejected Task (or the user to whom the Task is being returned) will receive an email notification containing details of the Task rejection.
Viewing Task Rejection Details
To view the Task rejection details, either:
- Hover over the Status column of the rejected Task; the rejection details will be displayed in a pop-up window
or
- Locate the rejected Task in the Previously saved / sent notes section at the bottom of the screen.
Workflow Task Notification Emails
Workflow Task notification emails contain the following information:
Case ID
The unique ID of the Workflow Case
Company Name
The name of the Customer to which the Workflow relates
Due Date
The date the Task is due
Task Due
A description of the Task to be completed
Direct link
A clickable link, which will open the relevant Workflow Case screen in the user's browser.
Workflow Cases
A summary of all Workflow Cases for the current customer can be viewed without leaving the current Workflow Case screen.
To view the Workflow Cases, expand the Workflow Cases section by pressing the arrow, rightmost in the section header, highlighted in the following image:

The section will expand to show all Workflow Cases for the customer, including closed and cancelled cases:

The Workflow Case details remain visible below this section (i.e., scroll down to view the Case Tasks, etc).
The Workflow Cases section can be collapsed by pressing the arrow in the section header again.
When a Workflow Case is viewed, the Workflow Cases section is always presented in its collapsed form.
Customer Contact Details
To view the customer and main contact details, expand the Customer contact details section by pressing the arrow, rightmost in the section header, highlighted in the following image:

The section will expand to show the company and main contact details:

The previous screen image has been cropped for legibility; please view a Workflow Case screen to see all available fields.
The Workflow Case details remain visible below this section (i.e., scroll down to view the Case Tasks, etc).
The customer details section can be collapsed by pressing the arrow in the section header again.
When a Workflow Case is viewed, the Customer contact details section is always presented in its collapsed form.
For detailed information pertaining to the functionality of the Workflow Case screen, refer to the following Support Centre article: