
Data Screen
This article describes the features located on the Data tab, which is located at the top of the Customer Screen.
Data Sheets must not be used to collect nor store personal, identifiable information. Locking a Data Sheet prevents further editing only, and does not disable the Data Sheet's shareable URL.
The Data screen consists of two sections:
- Add new data sheet
- Data sheets
Add new data sheet Section
This section enables the user to:
- Add a new Data Sheet, based on an existing Data Sheet Template
- Manage Portal Templates; determines which Data Templates are available in the Customer Portal
Add a new Data Sheet
To add a new Data Sheet to the Customer record, complete the following steps:
- Select the required Data Sheet from the drop-down list; the blank Data Sheet will be displayed
- Complete the Data Sheet fields as required
- Click Add to save the Data Sheet (it will now be available in the Data sheets section)
When adding a Data Sheet, it is always presented as an inline form, even if it has an associated HTML template; an HTML form is only displayed when later modifying a Data Sheet.
The following screenshot shows an example of a Data Sheet (named System) that has been selected, but not yet added. The example Data Sheet contains three text fields, and one drop-down selection field:
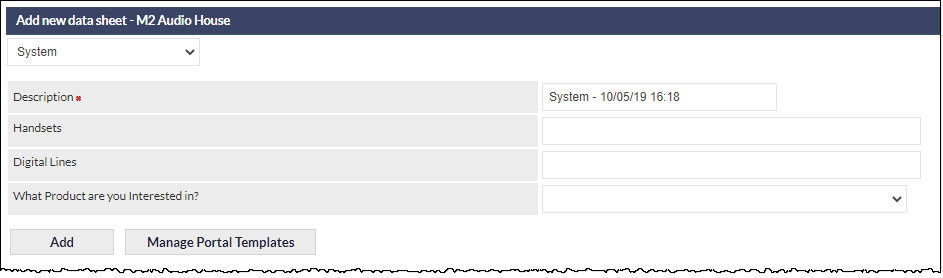
Description Field (mandatory)
The first field in every Data Sheet is always Description, which is a mandatory text field. By default the Description field is pre-populated with name of the Data Sheet, and the date and time at which the Data Sheet was created. The Description field can be edited to contain any text, and we recommend that your organisation, or team, agrees upon a standard protocol for the contents of the field, as this is the only searchable field in a Data Sheet.
The contents of the Data Sheet Description field can be searched in the Data sheets section.
Mandatory Fields
Mandatory fields on Data Sheets are designated by a red asterisk adjacent to the field name. If the Add button is clicked prior to completing a mandatory field, CommTrak will display a notification message advising which fields must be completed.
Data Sheet ID
A sequential item ID is automatically assigned to a Data Sheet when it is added, e.g. DS23.
The Data Sheet ID can be searched for in the CommTrak Search Dashboard.
Manage Portal Templates
By default, Data Sheet templates cannot be accessed via the Customer Portal; they must be allocated to customers in the Portal settings:
Clicking opens a new browser tab at the relevant settings screen. Please refer to Support Centre article Portal Data Sheet Templates (Settings), for further information pertaining to the allocation of Data Sheet templates to customers.
Data Sheets
This section lists all Data Sheets that have been created for this customer.
If viewing this section in a module (e.g. Telesales Opportunity, Workflow Case), only the Data Sheets related to the current module are displayed.
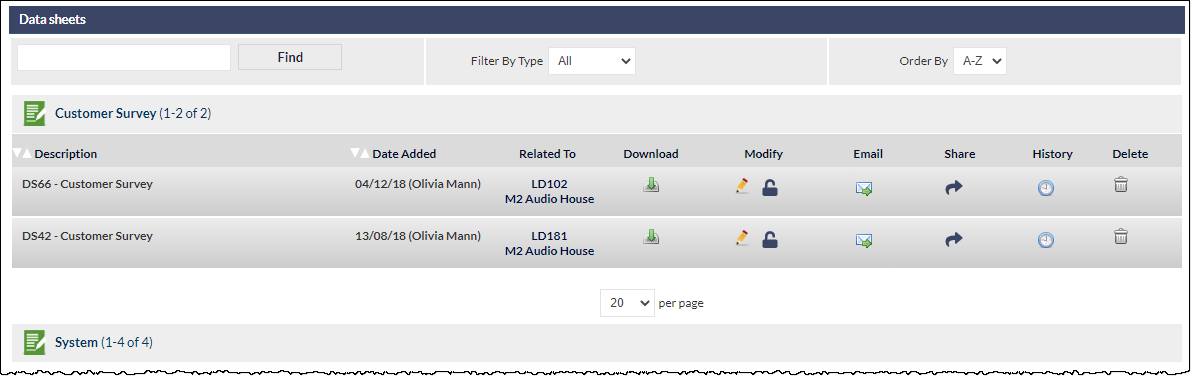
The following screenshot shows an example Data sheets section:

Each row represents a folder containing Data Sheets of a specific type. In the above example, only two types of Data Sheet have been completed ( Customer Survey and System).
Each folder displays the number of Data Sheets available in the folder (based on the filter selections, if any).
Viewing Data Sheet Folder Contents
Click anywhere on a folder to expand it and show the contents (multiple folders can be expanded). The following screenshot shows the example Customer Survey folder expanded (containing two Data Sheets, DS66 and DS42):
When expanded, the user can specify how many Data Sheets to show per page, using the per page drop-down list (visible in the above image).
For each Data Sheet the following columns are displayed:
Description
The Data Sheet's Description field. This field is mandatory for all Data Sheets, and the content of this field is searchable using the Data Sheet Find feature.
The Description field is always preceded by the unique Data Sheet ID number. The Data Sheet ID can be searched for in the CommTrak Search Dashboard.
Date Added
The date upon which the Data Sheet was added to the Customer record.
The name of the CommTrak user who added the Data Sheet is shown in brackets.
Related To
The ID of the item with which the Data Sheet is associated. In the above example screenshot, DS66 is related to Lead number LD102. The item number is a link, which can be clicked.
Download
Clicking the download icon will download the Data Sheet to the user's device, as a comma-separate value (CSV) file, which can subsequently be opened in an appropriate application (e.g. Microsoft Excel).
Modify
This column contains two icons:
- Edit
- If the Data Sheet is an inline form, a pop-up window containing the Data Sheet fields will be displayed.
- If the Data Sheet is associated with an HTML template, the Data Sheet will be opened in a new browser window.
- Lock / Unlock - Toggles the Data Sheet between being locked and unlocked. When locked, editing of the Data Sheet is disabled (the Edit icon is hidden), and the Data Sheet cannot be emailed, nor the link shared (the respective icons are hidden).
When locked, the Data Sheet can still be viewed by anyone who already has a copy of the URL.
Displays the Send Note / Send Email window, with the Send Email option selected.
This feature is intended to enable the user to email a message containing a URL link to the Data Sheet, so the Customer contact can easily access and complete the Data Sheet. When the recipient clicks the URL in the email, the Data Sheet will be presented as a web page, which can be saved, submitted or printed.
Prior to sending the email, the user must select an appropriate email template, which has been predefined to contain a link to the Data Sheet's URL. The URL link must be the %LINK% placeholder, and it must have been added to the email template; it cannot be added at the time the email is sent. If an appropriate template is not selected, the email recipient will not receive a link to the Data Sheet.
For further information about creating email templates, and adding placeholders, please see Support Centre article, Email Template (Settings).
The Data Sheet URL is a CommTrak web address containing a unique token that provides access to the Data Sheet; no password is required, thus the URL should only be shared with those who are permitted to access the Data Sheet.
Share
Clicking the Share icon copies the Data Sheet URL into the device's clipboard. For example, if using Windows, the URL will be copied into the Windows clipboard.
The URL can subsequently be pasted into, for example, an email or other messaging system, to share with a colleague or Customer contact.
Pasting the URL into a web-browser address bar will present the Data Sheet as a web page, which can be saved, submitted or printed.
The Data Sheet URL is a CommTrak web address containing a unique token that provides access to the Data Sheet; no password is required, thus the URL should only be shared with those who are permitted to access the Data Sheet.
History
When the History icon is clicked, a pop-up window containing a list of the Data Sheet activity is presented.

The fields presented in the History window are as follows:
- Activity - the activity that was logged (Add data sheet, View data sheet, Email data sheet link, etc.)
- Done by - the username of the person who completed the action (blank if the action was completed by an external user, i.e. via a Data Sheet URL)
- Date/Time - the time of the activity
- Accessed from - where the Data Sheet was accessed; either CommTrak (for a signed-in CommTrak user), or External (when the access was by an external user, i.e. via a Data Sheet URL)
- IP Address - the IP address of the network that accessed the Data Sheet.
- Location - the geo-location of the browser when a document was signed. This requires the signee to have agreed to share their location when prompted.
- Recipients - the email address of recipients of the Data Sheet URL link (i.e. sent using the Email feature)
- Document - if the submitted Data Sheet has been signed and saved (thus generating a PDF document), this field displays a link to the signed PDF file
- File Size - if the submitted Data Sheet has been signed and saved (thus generating a PDF document), this field displays the PDF file-size.
Delete
Clicking the Delete icon presents a dialog box requesting confirmation prior to deleting the Data Sheet. Confirming deletion irrevocably deletes the Data Sheet.
Deletion of Data Sheets is permission based; by default, only Supervisor role can delete Data Sheets.
Once deleted, a Data Sheet cannot be recovered.
Viewing Data Sheet Contents
To view the contents of a Data Sheet within a folder, click the description; the Data Sheet will expand to display all fields:
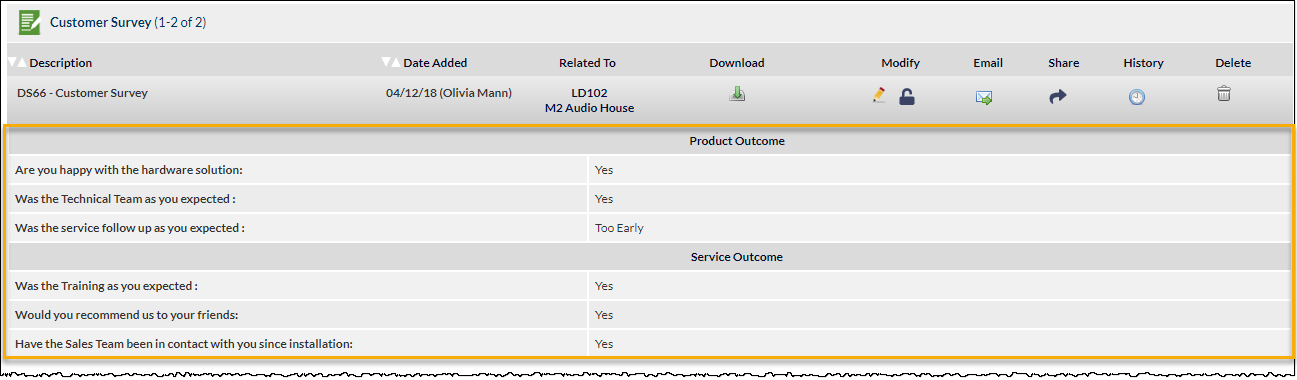
In the above screenshot, the Data Sheet fields are highlighted in orange.
Data Sheet Filters & Sorting Options
The filtering and sorting options are displayed at the top of the Data sheets section:

The following filters and sorting options are available:
Find
Enter the search text into the field to the left of the Find button. Only the Description field is searchable.
Clicking Find filters the list of folders to show only those which contain Data Sheets where the Description field contains the searched text.
To clear the search, delete the text from the search field and click Find.
Filter By Type
This option filters the list of Data Sheets, based on the module in which the Data Sheet was completed.
By default all Data Sheets, regardless of which module was used to collect the data, will be displayed.
Other options available in this filter are:
- CallBacks
- Customer
- Leads
- Jobs
- Projects
- Telesales
- Tickets
Order By
Sorts the Data Sheet folders alphanumerically or reverse-alphanumerically.