
Notes & Emails
Customer notes and emails can be created or viewed by clicking the Notes tab at the top of any Customer screen.
The New Note and New Email shortcut buttons are also pinned to the bottom of the Customer and Lead screens.
The purpose of customer notes is to maintain a history of general interactions with the customer. A note consists of a subject and optional note body. Notes pertaining to a Lead should be added to the relevant Lead.
The notes module is also used to send emails to contacts; emails sent from CommTrak are stored as notes, so all customer interactions can be recorded efficiently.
Notes Screen
The Notes screen displays general notes and emails for a Customer.
Individual Lead notes are not displayed in the Notes tab. When a Lead is converted to successful, if there are any notes for the Lead, a single reference note will be visible in the Notes tab. The reference note is time-stamped according to the most recent Lead note, and a link to the Lead is included in the note header.
New notes or emails can also be created from this screen by clicking the New Note or New Email buttons.
The notes list can be filtered By Contact or By Type, using the respective drop-down lists that are located at the top of the Previously saved/sent notes section.
By Contact
To filter the list by contact, select the contact's name from the By Contact drop-down list.
By Type
To filter the list by the type of note, select the appropriate note-type from the By Type drop-down list. The types of note are:
- Show all (default)
- SMS Message
- Contact Note
- CallBack
- Jobs
- Leads
- Outgoing Calls
Adding a Note
Contact notes are primarily intended to record quick notes about a communication with a contact, that require no further action, but may be useful for later reference.
Click the New Note button to display the Save Note/Send Email pop-up window.

The pop-up window has two tabs; Contact Note and Email:
Contact Note
The Contact Note has two fields:
Subject (mandatory)
Enter the subject for the note or, if the note is very short, enter the whole note into the Subject field.
Note
Enter optional note body text into the Note field. The text in this field can be formatted using the tools at the top of the text area. For example, notes can have bullet points and coloured, or highlighted text.
Click Save/Send to save the note.
An Email Note can be used to contact customers via email; the email is sent from the currently-logged-in user's email address (configured in My Details).

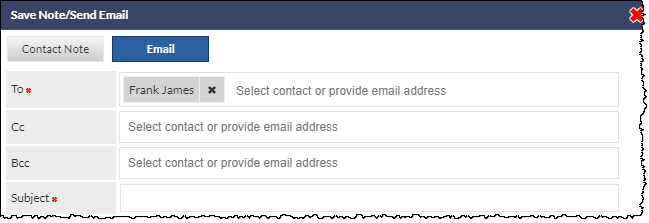
To send an email, click the New Note button to display the Save Note/Send Email pop-up window. This window has two tabs; Contact Note and Email. Click the Email tab.
If the Send Email pop-up window was displayed by clicking on a New Email button, located on the Main Customer screen and the Lead screen, the Email tab will be selected by default.
Complete the following fields as required:
To (mandatory)
The email address of the recipient.
See the section Entering / Deleting an Email address, for information relating to the entering, selection and deletion of email addresses.
Cc
If you wish to copy the email to additional recipients, use this field.
Cc'd email recipients will see the email addresses of the main (To) recipients, and all Cc'd recipients.
See the section Entering / Deleting an Email address, for information relating to the entering, selection and deletion of email addresses.
Bcc
If you wish to 'blind copy' the email to additional recipients, use this field. Either select a contact from the drop-down list, or enter an arbitrary email address in the text box located to the right of the drop-down list. Multiple email addresses can be entered, separated by a comma.
The email address of a Bcc'd recipient will not be visible to any other recipient of the email. Bcc'd recipients can see the email addresses of the main (To) recipients, and all Cc'd recipients.
See the section Entering / Deleting an Email address, for information relating to the entering, selection and deletion of email addresses.
Subject (mandatory)
The subject of the email.
Copy to Sender (default No)
If this option is set to Yes, the sender of the email (i.e. the currently logged-in user) will received a copy of the sent email in their email client (e.g. Outlook).
Signature
The signature to be used for this email. The default signature is specified in User Settings, but may be changed per email as required.
Template
If an email template is required, select it from the drop-down list and click to load the selected template.
Upon clicking Refresh button, a dialog box will be displayed requesting confirmation of the template change. If confirmed, the entire content of the body will be replaced.
Email templates for customer notes can be created and modified in Customer Settings.
Note
The Note is the body of the email; it is not mandatory but is recommended, as it unusual to send an email without any content.
The formatting tools above the Note area can be used as required; for example, to change the text colour, insert tables or images.
Attach files
One or more files can be attached to the email
Methods of locating / attaching a file are available in a drop-down list below the email body:
- Search - if you know the name, or part of the name, of a document that has been stored in the CommTrak Document Library, you can enter the name and click search. A list of matching documents (if any) will be displayed. Click the + icon next to the required documents to attach the item.
- Select- This option presents a drop-down list of documents in CommTrak Document Library and customer's documents. Select the required document, and click the Attach button.
- Upload- Either click Choose Files, and select the required files from the presented file browser (multiple files may be selected), or drag-and-drop a file onto the grey box in which the Choose Files button is located, and click Upload. This procedure may be repeated to drag-and-drop multiple files.
When the email is sent, a note containing a link to the email, is added to the customer record.
Click the Save/Send button to send the email.
Entering / Deleting an Email Address
The following documentation refers to the To field, but also applies to the Cc and Bcc fields.
To select an email address, click the text area of the To field to display the drop-down list (i.e. click on the Select contact or provide email address hint):

To select multiple email recipients, click in the blank area of the To field; the drop-down list of Customer contacts and Staff will be displayed again.
Manually Entering an Email Address
To manually enter an email address, click on the Select contact or provide email address hint, and type the email address. To confirm the manually-typed email address, press the semi-colon (;) key on the keyboard, or
Viewing Contact Details Summary
After selecting a recipient, clicking on the box containing their name will display a summary of the contact record:

Removing a Recipient
To remove a recipient from the To field, click the X icon, displayed to the right of their name.