
What's New October 2022
Announcements
General
- Mandatory Field Highlighting Update
- Settings Displayed in Alphabetical Order Update
- Main Menu, Customer Tabs and Summary Panel Customisations REMINDER
Leads / Quotes
- Enhancements to SaS Settings Update
- Drag and Drop Quote Line Items New
- Moving Leads Between Customer Records New
Tickets / Jobs
Jobs Settings
Announcements
CalDAV Calendar Synchronisation No Longer Supported
The ‘CalDAV’ utility, previously provided as an option for synchronising your CommTrak calendar with your Microsoft 365 Outlook calendar, is no longer supported and has been disabled.
Calendar synchronisation is available via Microsoft 365, which provides improved functionality and does not require a third-party Outlook add-in. Once enabled, synchronisation of your CommTrak calendar with your Microsoft 365 calendars will occur automatically across your devices via the cloud!
We advise that each user should delete the CalDAV calendar entry in their CommTrak settings, and authorise Microsoft 365 calendar synchronisation for their account.
Please refer to the following Support Centre articles:
-
Microsoft 365 Integration (Settings) (to be configured by your CommTrak administrator if not already activated)
-
Delete an Existing CalDAV Calendar Entry (mandatory for each user where CalDAV synchronisation was previously configured)
-
Outlook Calendar Synchronisation (Microsoft 365) (to be completed by each user in their CommTrak settings)
The CommTrak / Microsoft 365 Integration must initially be configured by your CommTrak administrator prior to being available to CommTrak users. Once the integration has been configured, each user must update their own settings to enable their own Microsoft 365 calendar synchronisation (and disable the CalDAV synchronisation as appropriate).
General
Mandatory Field Highlighting
In May 2022 we announced the ongoing rollout of mandatory field highlighting. This update has now been completed, and mandatory highlighting of fields now applies throughout the whole of CommTrak.
If an attempt is made to create or save a record, any incomplete or invalid fields are highlighted so they can easily be located and corrected:

For more information about this feature, please refer to the following Support Centre article:
Settings Displayed in Alphabetical Order
All Settings in CommTrak are now displayed in alphabetical order:

There is no change to Settings functionality, other than the order in which they are listed.
Main Menu, Customer Tabs and Summary Panel Customisations
A reminder that each user can customise both the CommTrak Main Menu and the tabs across the top of each Customer screen to modify the order in which items are displayed, and whether or not they are permanently on view or available via the expandable area.
Don't forget that there have also been several Summary Panel customisation updates over the past year or so.
Main Menu Customisation
To customise the CommTrak Main Menu, press the edit (pencil) button adjacent to the Home option (which is always displayed at the top of the menu).

For detailed information about these settings, please see the Main Menu article.
Customer Tabs Customisation
To customise the Customer tabs, press the edit (pencil) icon located after the final tab.

For detailed information about these settings, please see the Customer Tabs (Customer Screen) article.
Summary Panel Customisation
We encourage users to customise the Summary Panels displayed on the CommTrak home screen. Each user can arrange, hide and display Summary Panels to suit the requirements of their role.
 For more information about Summary Panel features and customisation, please refer to the following Support Centre article:
Leads and Quotes
The following new / updated features are now available in the Leads and Quotes modules.
Enhancements to SaS Settings
Updates have been made to the terminology of some elements within the SaS (Services & Software) features in the Leads/Quotes module, and some enhancements have been made to simplify and aid in the configuration of SaS items.
Customer Subscription
The Type field has been renamed to Customer Subscription and now has the option of either Yes or No.

- Selecting Yes is the equivalent of the previously available option Item without buy price
- Selecting No is the equivalent of the previously available option Item with buy price
When Customer Subscription is set to No, all fields and options remain as they were for the previously available option Item with buy price.
When Customer Subscription is set to Yes, the following updates and enhancements have been implemented:
Customer Price
The field label Customer Price replaces the previous label of Customer Cost:

The default for Customer Price remains as inc tax, which is typical for consumer products, and the option to select ex tax is still available.
It is vital to ensure that the Customer Price you enter is accurate according to the inc / ex tax option.
It is important to note that, regardless of the tax selection for Customer Price, the Revenue is always entered as ex-tax, as indicated in the Revenue field label (visible in the previous image).
Buy Price
An additional option, Buy Price (ex-tax), has been implemented:

If Buy Price is unticked (default), the Contribution to GP (visible in previous image) must be specified by selecting a percentage from the dropdown list (default 100%).
If ticked, a Buy Price must be entered and Contribution to GP is updated automatically:

GP Shown in Dashboards
The GP Shown in Dashboards option functions as previously, but it is important to ensure that the appropriate selection is made for the current SaS item:

Please see the following Support Centre articles for detailed information and an example of using Services & Software:
Drag and Drop Quote Line Items
Quote line items can now be re-ordered using drag-and-drop.
A drag handle is visible rightmost on each line item's header:
 Press and drag the handle up or down as required, then drop (release) the item when it is in the correct position.
After dragging-and-dropping line items, the Save button must be clicked to update the Quote.
The following article is a comprehensive overview of all the features available when editing a Quote:
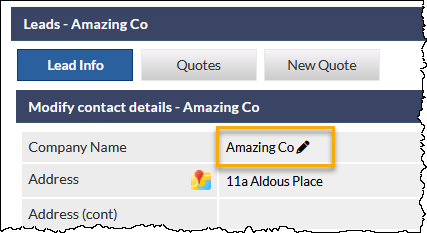
Moving Leads between Customer Records
Leads can now be moved between Customer records.
Examples of the need to move a Lead include:
- Lead has been associated with the incorrect Customer
- Lead has been created with an incorrectly spelt Company Name
If a Lead can be moved, the edit (pencil) icon is displayed adjacent to the current Company Name in the Lead:
 Prerequisites for Moving a Lead
- Current user must have the Allow users to delete leads permission
- Lead must not be related to another CommTrak component (e.g. Job, Ticket, etc)
- Lead must be active (i.e. it must not have a status of Successful or Unsuccessful)
We strongly advise reading the following Support Centre article to fully understand the ramifications of moving a Lead to a different Customer, as there are some limitations as to which data can be moved with a Lead record:
Tickets / Jobs
Editable Job and Ticket Notes
Ticket and Job Notes can now be edited subject to specific conditions:
- User must have permission to edit notes
- Note must not have been sent as an email
- Note has no billable or non-billable time allocated
To edit a note for a Ticket or Job, press the edit (pencil) icon, displayed to the right of the note header (visible in the following screenshot):

The Modify note pop-out window is displayed:

Edit or add to the text as required and press Save.
The note is updated to include the amendment, and details of the date / time and user who edited the note is appended:

Only the details of the most recent edit are retained, i.e. if the same note is later edited, only the date / time and user name for the most recent edit are displayed.
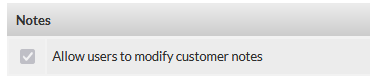
Required Permission
All default roles, with the exception of Contractor-type roles, have permission to edit notes by default.
 Job Settings
 Job Settings
The following setting has been added for Jobs:
Maximum Number of Technicians Per Day
This feature determines the maximum number of technicians who can be allocated to a Job per day, in the Time/Date field of a Job.
Settings > Jobs Settings > Miscellaneous > Maximum number of technicians that can be allocated to a job per day
 Previously the maximum was 5, but it can now be set from 1 to 20, with 5 being the default.
Reminder: You can also specify limits for several other options in the Miscellaneous Job Settings, such as Earliest job start time and Maximum allocated number of hours per job for technician. Configuring these settings to appropriate limits for your organisation can speed up entry of such fields.