
Creating / Modifying a Quote
One or more Quotes can be created for a Lead and, when a Lead has its status changed to Successful, one or more of those Quotes may be specified as being Accepted by the Customer.
For more information about making a Lead successful, and specifying Quotes as being accepted, see the article Lead Screen.
In this article, the phrase printed quote also pertains to visual representations of the quote, such as PDF files.
Creating a New Quote
A new quote can be created by pressing New Quote whilst viewing a Lead:

Viewing / Modifying a Quote
Existing Quotes can be viewed by pressing Quotes whilst viewing a Lead:
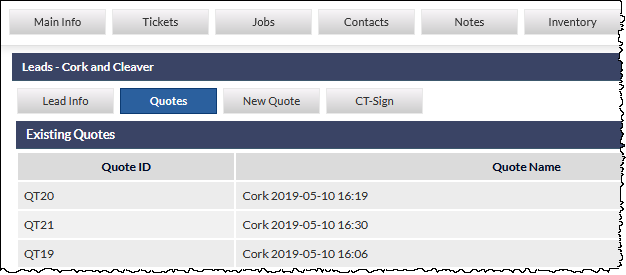
If only a single quote exists for the current Lead, the quote details will be displayed immediately, otherwise, the quotes (if any) will be listed as shown in the previous image, and pressing on a quote row will display the quote details.
Quote Fields & Features
Include in GP
If this is the first quote for the Lead, this field is set to Yes, and is read-only; it is mandatory for at least one quote (if there are any) to be included in the GP calculations for the Lead. For subsequent quotes for the same Lead, the default selection is No, but can be changed to Yes, either at the time of the quote creation, or if later editing the quote.
In summary, multiple quotes can be included in the Lead GP calculations, but a minimum of one quote (if there are any) must be included in the GP.
When a Lead has its status set to Successful, one or more quotes can be specified as being Accepted by the Customer. See article Lead Screen for further information about changing the Lead's status, and accepting quotes.
Quote Name
The Quote Name is generated automatically, but can be edited at any time.
The default generated quote name consists of the first four characters from the company name, followed by the date and time of the creation of the quote.
GP Allocated to
This field determines to which user the GP will be allocated for reporting purposes, and defaults to the name of the currently logged-in user; it can be changed at any time. Updates to this field are recorded, and the latest change (time and name of user who changed it), is displayed adjacent to the field.
Quote Template
A Quote Template must be specified prior to saving the quote.
See article Leads Quote Template (Settings) for information pertaining to the creation and modification of quote templates.
A Quote Template can be previewed by selecting it from the drop-down list and pressing the Preview (magnifier) icon.
The template preview is displayed in a separate browser window, and is intended to provide an indication of the quote layout, with included placeholders shown where text and calculations would be presented on the printed version.
The Quote Template preview should not be confused with the Quote Preview feature, which displays a preview of the quote, populated with line items and calculations. See the Quote Action Buttons section below for further information about the Quote Preview.
Quote Line Items
At least one line item must be added to each quote, and the fields for each line item are as follows:
Notes
Free-form text area to record optional notes pertaining to this line item.
Division (mandatory)
The Business Division to which this line item will be assigned for reporting purposes.
Depending on the method used for selecting the line item, the Division field may be populated automatically, as this information can be pre-configured for individual Inventory Items, and also for Favourites. If the field is not populated automatically, a Division must be selected from the dropdown list. For further information about the Business Division settings for Inventory Items, see the following articles:
Invoice Type
Optionally select a pre-defined invoicing method.
See article Leads Invoice Types (Settings).
Supplier
Optionally select a pre-defined Supplier.
This field is not displayed prior to the selection of the line item, and is not displayed for item names entered using the Type method.
See article Inventory Suppliers (Settings).
Shared GP
The name of another CommTrak user with whom the GP will be shared. The method of sharing (i.e. $ or %) and the value (numeric) should be specified using the dropdown menu and text field adjacent to the Shared GP field.
If the method is changed between $ and % after the value has been entered, the value field will be reset to zero. This behaviour is intentional to avoid accidental entry of a percentage as a dollar amount (and vice versa).
Line Item Details
Method
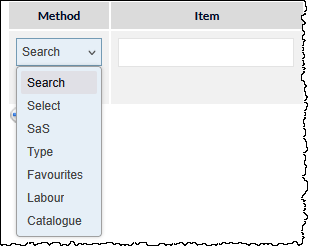
Each line item must be specified using a Method chosen from the dropdown list:
Search
This is typically the fastest way to enter an existing item if at least three consecutive characters of the item description or manufacturer name are known.
In the Item column, start typing the name of the required product or service (or the manufacturer name); a minimum of three consecutive characters from anywhere in the item (or manufacturer) name must be entered to locate a match. Matching items will be displayed in a dropdown list. Select the required item to populate the Item field:

The Search option matches with items from Inventory Items and Services & Software (SaS).
- Inventory Items (Settings)
- Services & Software (SaS) items are configured in Settings > Leads Settings > Services & Software (SaS).
Select
Select the manufacturer from the dropdown list presented in the Item field, then select the required product or service from the presented list to populate the Item field.

SaS (Services & Software)
Select the required service or software from the dropdown list presented in the Item field.

Please refer to the following articles for additional information relating to the use and configuration of Services & Software (SaS) features:
Type
Manually enter a description of the product or service to be quoted.

Favourites
Favourites are predefined collections of one or more Inventory Items.
Select the required Favourite from the dropdown list presented in the Item field to add all items from that Favourite into the quote.

This feature provides for the easy selection of multiple, related items (for example, a predefined selection of a phone system, handsets, and related accessories). During configuration of Favourites, each item must have the Business Division defined, which means that the Division field for any items in a Favourite collection will automatically be populated.
During configuration of a Favourite, it can be specified as a Personal Favourite (available only to the person who created the Favourite), or as a Company Favourite (available to all staff).
See article Leads Quote Favourites (Settings) for information pertaining to the creation and configuration of Favourites.
Labour
Select the required Labour item from the dropdown list presented in the Item field, to all items from that Favourite.

The Labour dropdown list is populated from Services & Software (SaS) items that have been specified as Labour items, and also from items in the Labour Matrix:
- Services & Software (SaS) items are configured in Settings > Leads Settings > Services & Software (SaS)
- Labour Rates Matrix (Settings)
Catalogue
This option is only available when at least one supplier catalogue has been imported into CommTrak.
Supplier catalogues can be imported per supplier in Leads Settings > Supplier Catalogues.
The catalogue option provides for searching supplier catalogues for products:
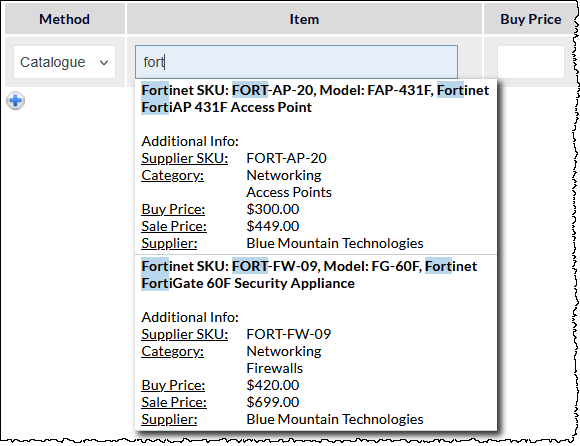
To select a product from a supplier catalogue:
- Select the method Catalogue in the quote line item
- In the Item field enter a minimum of three characters from one of the following product criteria:
- Manufacturer
- Supplier SKU
- Model Number
- Description
- Category Name
- Subcategory Name
- Matching results are displayed in a dropdown list (visible in previous image). Matching characters are highlighted for visibility, other then when the characters are located in Category or Subcategory.
- Select the required product from the list to add the details to the quote line item

- When Buy Price and Sale Price are provided for a product, those prices will be populated automatically when the product is added to a quote
- When Buy Price only is provided for a product, the Sale Price will be calculated automatically, based on the default Markup specified for the catalogue when it was imported
- If no Buy Price is included for a product, both Buy Price and Sale Price will be zero when the product is added to a quote, and the prices must be entered manually at the time of quoting.
Markup
The Markup for each line item can be adjusted when quoting, and the Sale Price will be recalculated accordingly based on the Buy Price:
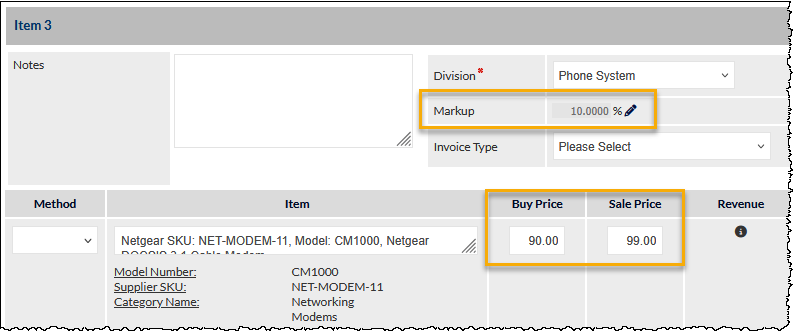
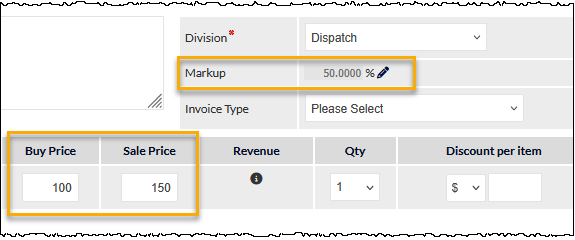
When a Buy Price and Sale Price are entered into a new line item, the Markup is calculated automatically when the Save button is pressed.
In the following example image, a Buy Price of $100 and a Sale Price of $150 have been entered, and the Markup has been calculated automatically upon pressing Save:
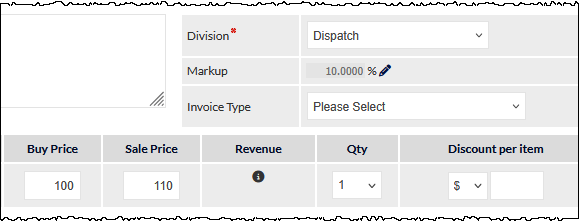
If either one of or both of the Buy Price or the Sale Price are subsequently modified, the Markup calculation will adjust automatically - the Buy Price and Sale Price will not be modified automatically, by default.
To demonstrate this, in the following image, only the Sale Price has been modified (to $110), and the Markup percentage (which is read-only by default) has adjusted accordingly (to 10%):
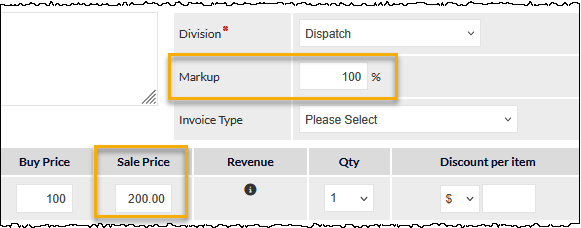
To modify the Markup, press the pencil icon, which changes the Markup field to be editable.
The Markup percentage can now be edited, and this will update the Sale Price in real-time. In the following image, the Markup percentage has been changed to 100%, and the Sale Price has automatically updated accordingly, based on the Buy Price:
Whilst the Markup field is editable the Buy Price can also be modified, and this will cause Sale Price to be updated based on the new Buy Price and the current Markup percentage. Similarly, whilst the Markup field is editable the Sale Price could can be modified and this will cause Buy Price to be updated based on the new Sale Price and the current Markup percentage.
Other Line Item Fields
Buy Price
Depending on the method used to select the item, this field will be populated automatically if a buy price was specified in the related settings. If the Buy Price field is not automatically populated, the figure must be entered manually.
Sale Price
Depending on the method used to select the item, this field will be populated automatically if a sale price was specified in the related settings. If the Sale Price field is not automatically populated, the figure must be entered manually.
Qty (default 1)
Select the quantity of the item to be supplied.
Discount per item
The type of discount (i.e. $ or %) and the value (numeric) can be specified using the dropdown menu and text field.
This field is always converted to a dollar value. I.e. if a percentage is specified, and the quote is saved and reloaded, the Discount per item will be recalculated as the dollar value and displayed as such.
If the discount method is changed between $ and % after the value has been entered, the value field will be reset to zero. This behaviour is intentional to avoid accidental entry of a percentage as a dollar amount (and vice versa).
Total (read-only)
The calculated total value of the line item, based on the Sale Price, Quantity and Discount.
GP (read-only)
The calculated GP of the line item, based on the Buy Price, Sale Price, Quantity and Discount.
Commission (read-only)
The calculated commission based on the values for this line item, as specified in the Inventory.
Tax
Unless the Type method was used to select the line item, this will be a read-only field containing either GST (sales tax applied) or FRE (free of tax), as specified in the settings for the item.
If the Item description was entered manually (i.e. using the Type method), this field will be displayed as a dropdown menu, enabling the user to specify the tax type (GST or FRE), with a default of GST.
Action
The following icons are displayed in the Action column for each line item:

Delete (trashcan) - Delete the current line item. A pop-up dialogue box will presented, asking the user to confirm the deletion of the line item. The line item will be completely removed from the quote upon confirmation, and cannot be recovered.
Change Selection (pencil) - Reset the line item; all fields for this line item will be cleared or set to the default option. Line items that have been entered with the Type method cannot be reset.
Display / Hide (eyeball) - display or hide the line item; if hidden, the line item will be 'rolled-up' into the previous visible item. Refer to the following section for further details about this feature:
Displaying and Hiding Line Items (Price Consolidation)
Prior to using this feature, it is important to understand the ramifications of hiding line items, and how doing so affects the prices displayed on a printed quote.
By default, the second and subsequent line items in a quote will have an eyeball icon displayed in the Reorder column. This indicates that the line item will be visible in the printed quote.
Pressing the eyeball icon in the Action column hides the line item in printed quotes, and includes the sale price of the hidden item in the previous visible line item.
When a line item is hidden, the eyeball icon is displayed with a strike-through, as shown in the following image:

Hidden line items are always visible whilst editing a Quote; the line item is only hidden in the printed Quote.
When multiple, consecutive line items are hidden, they are all consolidated into the previous visible line item.
Example:
There are three line items as follows:
- Item A, with a sale price of $4,000
- Item B, with a sale price of $2,000
- Item C, with a sale price of $1,000
Hiding Item C will consolidate its sale price with Item B, resulting in the printed quote displaying two line items:
- Item A, with a sale price of $4,000
- Item B, with a sale price of $3,000
Item B will be displayed with a sale price of $3,000, because the sale price of Item C ($1,000) has been consolidated with the original sale price of Item B (which was $2,000).
With Item C already hidden, if Item B is also hidden, the resulting printed quote will display only Item A:
- Item A, with a sale price of $7,000
Item A now displays a sale price of $7,000, because the sale price of both Item B and Item C have been consolidated with the original sale price of Item A (which was $4,000).
This feature is demonstrated in the What's New in February 2020 video (starting at 5:50) (this link will open in a new tab).
Adding a Line Item
To add a line item, press the plus icon:

The plus icon is either displayed below the last line item or, if there are no line items, it will be displayed immediately below the Include in GP field.
Changing the Position of Line Items
If there is more than one line item in the quote, the items can be re-ordered by dragging and dropping line items as required.
A drag-handle is visible rightmost on each line item's header:

Click and drag the handle up or down as required, then drop (release) the item when it is in the correct position.
After dragging-and-dropping line items, the Save button must be clicked to update the Quote.
If a hidden item is dragged to the top of the list of line items (i.e. to become Item 1), it will no longer be a hidden item, as the first item in a Quote must always be visible. For further information about hidden line items, refer to the earlier section in the article, Displaying and Hiding Line Items (Price Consolidation).
Quote Action Buttons
The quote action buttons are pinned to the bottom of the Quote screen:

When a quote is first created, only the Save button is displayed.
Save
Saves the quote.
Mandatory fields must be completed prior to saving the quote. Please see the section (in this article) entitled, Mandatory and Invalid Fields, for further information and guidance about identifying and updating mandatory and invalid fields.
When there are unsaved changes to the main line item fields within the quote (i.e. changes to the fields: Method, Item, Buy Price, etc), the Save button text is shown in a red font (as shown in the previous image).
After a quote has been saved for the first time, the following (previously hidden) action buttons will be displayed:
Quote Body
The features available vary depending upon the type of Quote Template selected:
Standard (Basic) Template
If a Standard (basic) template has been selected, the quote is displayed in the CommTrak HTML editor, and the text and layout of the quote can be edited and saved.
Changes to the text and layout will affect the current quote only, and will not affect the template.
Template Toolkit or Library Template
If a Template Toolkit template has been selected, the following fields are displayed for editing:
- 9 x customisable Quote Paragraphs
- Warranty field
The Quote Body fields, Templates, and customisation for Template Toolkit templates are documented separately. For further information, refer to the following articles:
Preview
This presents the quote in a pop-up browser window to enable the user to review the details prior to presenting to the client.
The quote can be printed by pressing Print at the bottom-left of the quote preview; the browser's print tools will be presented.
Go
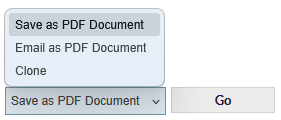
Save as Document
Email as Document
Pressing Go with this option selected presents the standard CommTrak email pop-up window, with a PDF file of the quote attached.
When the email pop-up window is displayed, the CommTrak standard email features are available, as described in the article, Notes & Emails.
Clone
Clones the current quote. When the Clone option is confirmed by pressing Go, the Clone quote options pop-up window is displayed:

The available fields are:
Include in GP (Yes/No) - determines if the cloned quote's GP will add to the GP for the Lead,
Quote Name - the source quote's name is used with a version number appended. The example in the previous image shows that V2 has been appended to the original quote's name.
Press the Clone button to confirm - the newly-cloned quote is displayed for modification as required.
Delete
Deletes the current quote; a confirmation dialogue box is presented prior to the deletion of the quote.
Other Quote Features
Quote Options
Quote Options are accessed by pressing the expansion arrow, displayed rightmost in the Quote section header. The Quote Options section can be expanded and collapsed as required, and is always displayed in its collapsed state when selecting a quote for viewing.
The Quote section header is only visible after a quote has been saved for the first time (i.e. it is not initially visible when the New Quote option is selected).
For detailed information about the Quote Options, see article Quote Options.
Attributes (for SaS Items)
In addition to the calculable fields for each line item, additional information, referred to as Attributes, may optionally be added to each SaS item, either as predefined attributes when configuring the SaS items (in settings), or as ad hoc attributes whilst adding the line item to the quote.
Attributes allow for the inclusion of ad hoc items that are not included in the quote calculations, and they consist of an Attribute Name and a Value field.
Up to eight Attributes can be specified per quote line item, and they are displayed immediately below the description of the selected line item.
Attributes values are for reference only, and are not used in any quote calculations.
The following image shows a quote line item for Training, which has two Attributes valued at $200 and $1200 respectively, neither of which will be included in the quote calculations:

The following image is an extract from an example of a basic quote template containing two line items, the last of which (Training) has two attributes:

Note that the values assigned to the two Training attributes (valued at $200 and $1200) are not included in the Price column.
This feature and related settings are demonstrated in the What's New in February 2020 video (starting at 19:23) (this link will open in a new tab).
Mandatory and Invalid Fields
When saving a Quote, it will be checked for mandatory and invalid fields before any data is saved.
If any fields are not populated correctly, a warning banner will be displayed advising you to correct those fields.
You must correctly populate mandatory and invalid fields, otherwise your changes cannot be saved.
Mandatory Fields
When the Save button is pressed, if there are any mandatory fields which have not been populated, they will be highlighted with a red border:

You must correctly populate all mandatory fields with valid data prior to saving.
Invalid Fields
Price fields can contain only numbers (including valid decimals); you must not enter other characters such as currency symbols or text.
If invalid characters are entered into a price field, the text will be displayed in red as you type. The following image shows the Sale Price field with invalid data (lower case letter 'L' has been mistakenly entered):

If a price field contains invalid characters, and the Save button is pressed, the field will be highlighted with a red border and the characters will be displayed in red, as shown in the following image:

You must correct all invalid fields prior to saving.
Quote Item Groups
Quote Items can be arranged into groups with headings as shown in the following image, which shows three groups - Components, Accessories and Delivery:
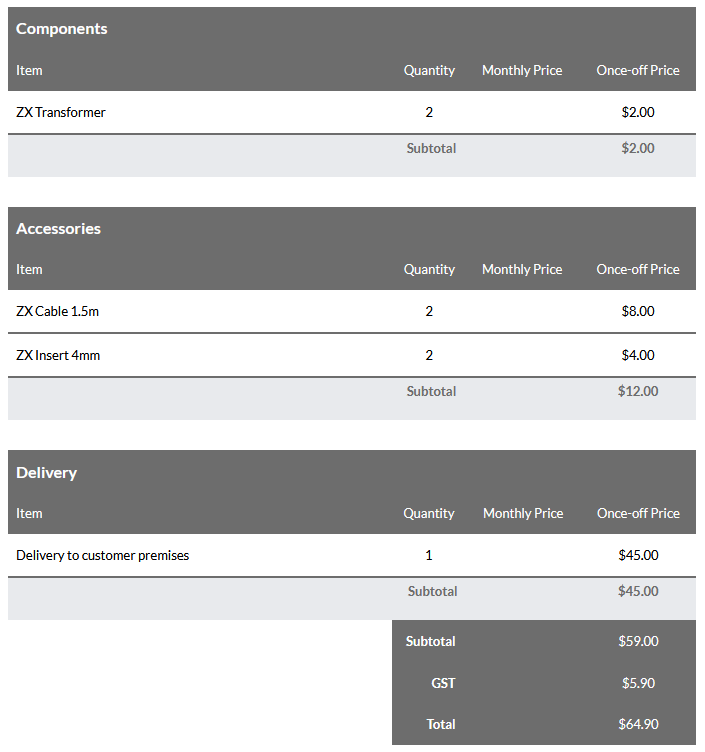
Please refer to article Quote Item Groups for more information about using this feature.