
What's New March 2025
Dashboard Hub - major new feature
- Dashboards Hub - major new feature
Quotes
- Supplier Catalogues - major new feature
- Quote Item Percentage Markup
Settings
- Supplier Catalogues settings
- Inventory Suppliers Setting Renamed to Suppliers
- Drag and Drop in Ticket and Workflow Department Settings
- Search Staff Names in Ticket and Workflow Department Settings
- Clone Department in Ticket and Workflow Department Settings
Contracts
Jobs
To-Do
Dashboards Hub
The Dashboards Hub is now available, providing a centralised location for custom dashboards and tables using data from any source within CommTrak. This new module enables users to access key business insights in a structured and efficient manner.
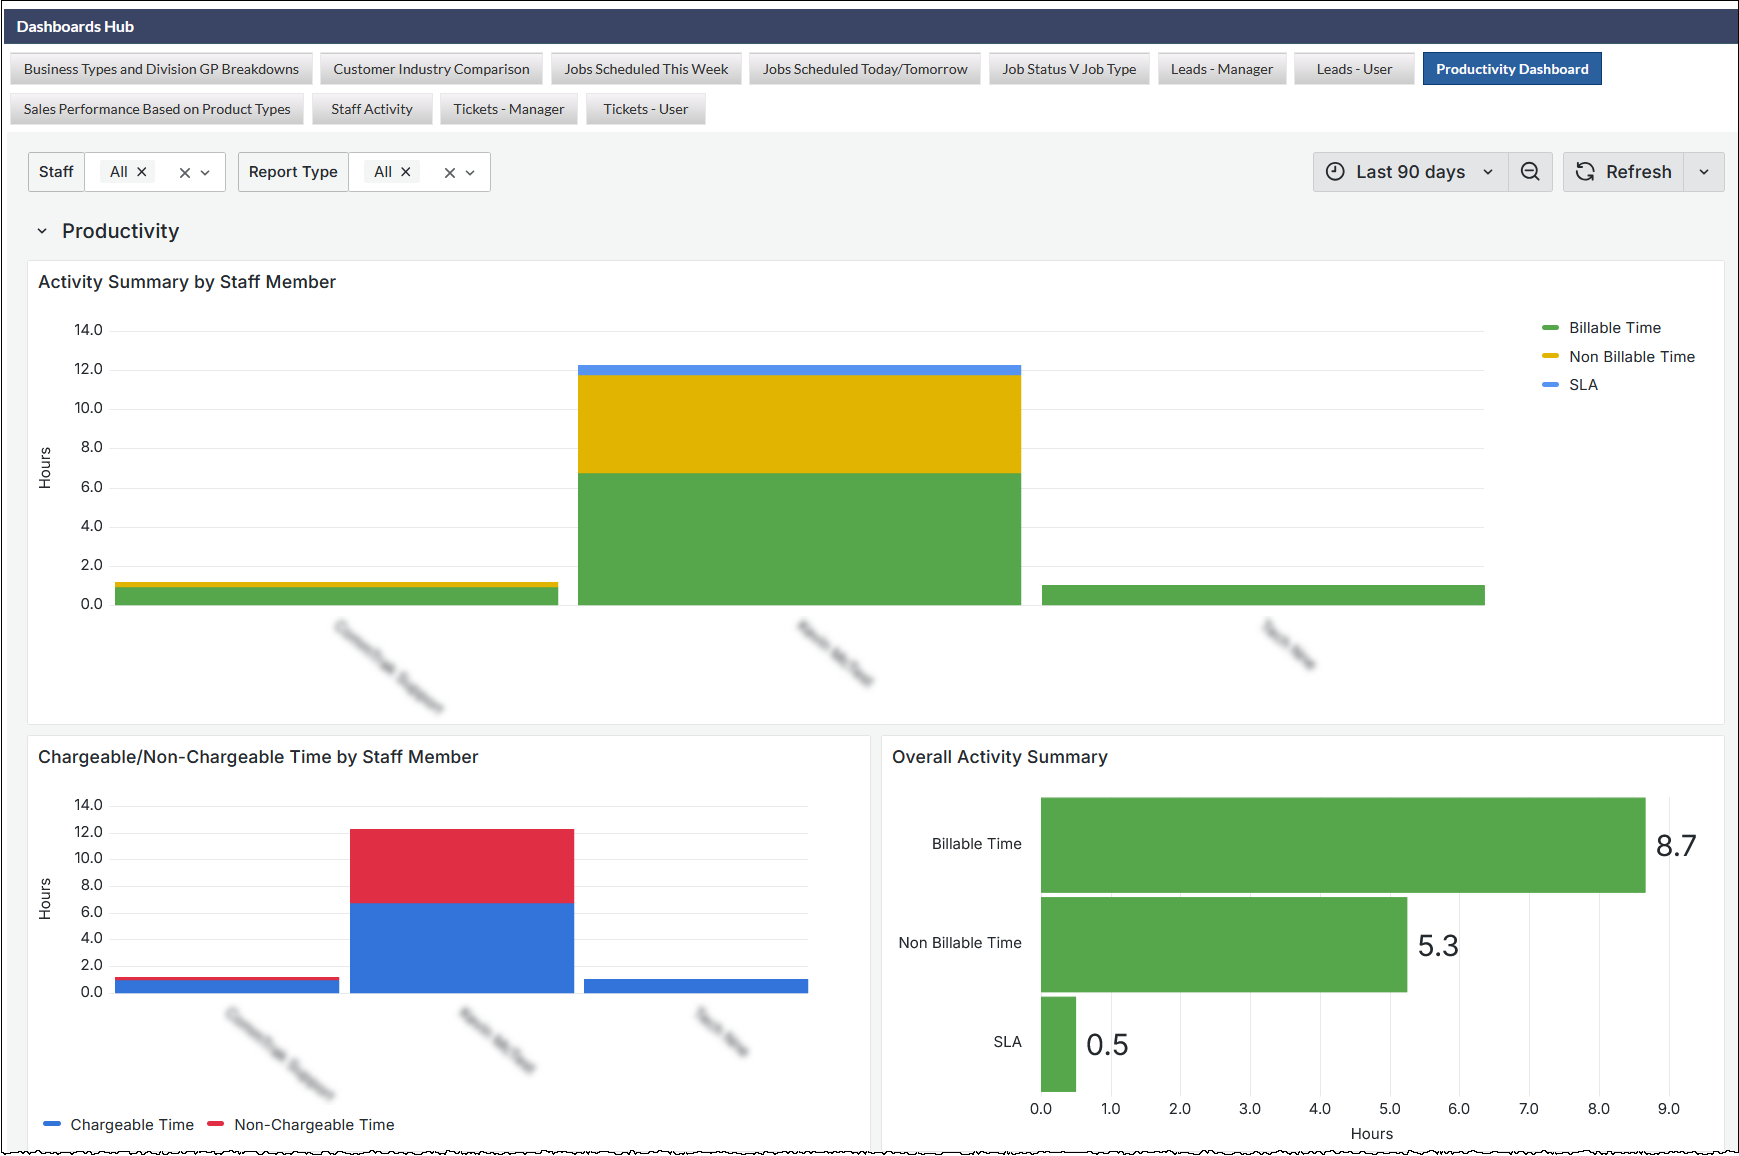
Press on the previous image to display in full-size
Key Features
- Customisable Dashboards – Configure dashboards to display the most relevant business metrics.
- Comprehensive Data Access – Retrieve information from any data table within CommTrak CRM for a complete overview.
- Real-Time Insights – Access up-to-date data to support informed decision-making.
- Increased Efficiency – Automate reports and quickly review key performance indicators (KPIs).
Access and Permissions
Initially, only Supervisors will have access to the Dashboard Hub. Supervisors can grant access to other staff members through the User Settings:
Settings > User Settings > Dashboards Hub Access
Free Access for 6 Months
Users can explore example dashboards at no cost for six months from this release. Feedback on usability and preferred data insights is encouraged to support further enhancements.
If additional dashboards or reports are required, please contact support@commtrak.com.au to discuss customisation options.
Quotes
Supplier Catalogues
The Supplier Catalogues feature has been introduced, allowing for the import of supplier product catalogues into CommTrak. This enables seamless quoting for any item in a catalogue within the CommTrak Quotes module.
- Supplier product catalogues can be imported in Settings > Leads Settings > Supplier Catalogues.
- Once imported, a catalogue's products can be added directly to a quote without requiring the creation of an inventory item or manual entry of product details.
- Streamlines the quoting process by providing direct access to supplier product information.
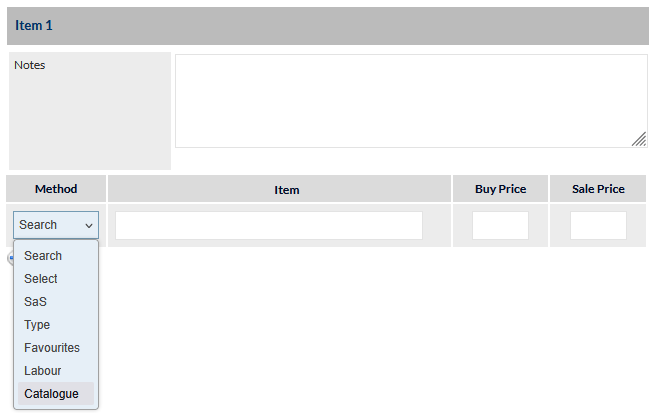
To quote for a catalogue product in a quote line item:
Select Catalogue from the quote Method dropdown list:
In the Item field, enter a minimum of 3 characters from any one of the following catalogue fields:
- Manufacturer
- Supplier SKU
- Model Number
- Description
- Category Name
- Subcategory Name
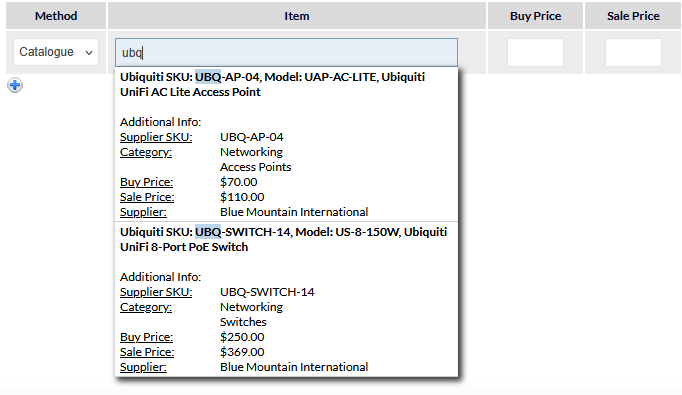
In the previous image, three characters from the Supplier SKU have been typed. The matching results are displayed in a dropdown list.
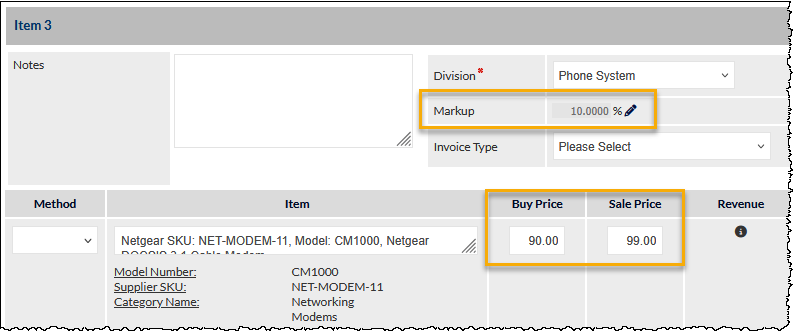
Select a product from the dropdown list to populate the quote line item:

The previous image shows the new line item populated with the product that was selected from the catalogue. The Buy Price and Sale Price have been populated. The Business Division (not shown in the previous image) is also populated automatically based on the catalogue data.
Catalogue Settings
To import a Supplier Catalogue:
Buy and Sales Prices
A catalogue template is provided, and includes columns for Buy Price and Sale Price.
- When Buy Price and Sale Price are provided for a product, those prices will be populated automatically when the product is added to a quote
- When Buy Price only is provided for a product, the Sale Price will be calculated automatically, based on the default Markup, if specified for the catalogue when it was imported
- If no Buy Price is included for a product, both Buy Price and Sale Price will be zero when the product is added to a quote, and the prices must be entered manually at the time of quoting.
For detailed information pertaining to the use of supplier catalogues, and importing of supplier catalogues, please refer to the following Support Centre articles:
- To add a supplier: Settings > Inventory Settings > Suppliers
- To import a catalogue: Settings > Leads Settings > Supplier Catalogues
- Adding a catalogue product to a quote
Quote Item Percentage Markup
The Markup for each line item can be adjusted when quoting, and the Sale Price will be recalculated accordingly based on the Buy Price:
Settings
Supplier Catalogues Settings
Supplier Catalogues settings have been added:
For more information about this feature, please refer to the Supplier Catalogues section in this article.
Inventory Suppliers Setting Renamed to Suppliers
To align with the new Supplier Catalogues feature, The Inventory Suppliers setting has now been renamed to Suppliers:
Settings > Inventory Settings > Suppliers
Drag and Drop in Ticket and Workflow Department Settings
Staff are now assigned to (or removed from) Ticket and Workflow departments by dragging and dropping:
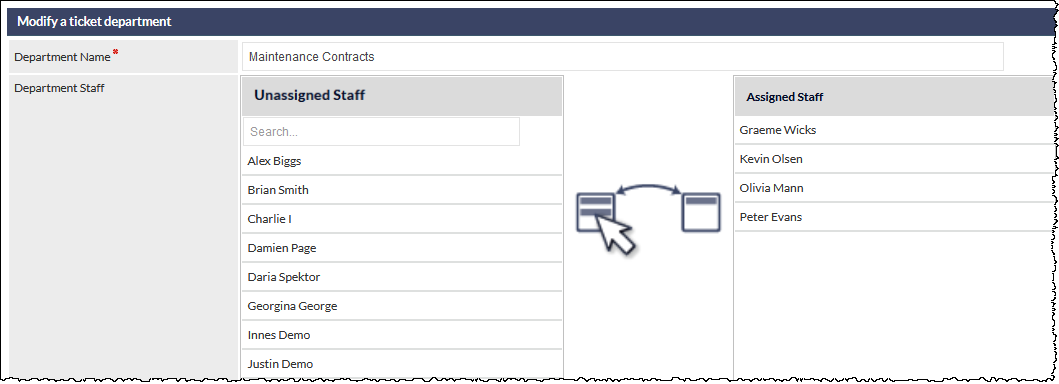
As shown in the previous image, unassigned staff are shown in the left column and assigned staff in the right column. Click and drag a staff name to assign or unassign as required, and press Save to confirm.
Search Staff Names in Ticket and Workflow Department Settings
The list of unassigned staff can be filtered by typing characters into the Search... field (visible in the previous image).
This will filter the Unassigned Staff list to display only staff names that match the search characters, as shown in the following image:
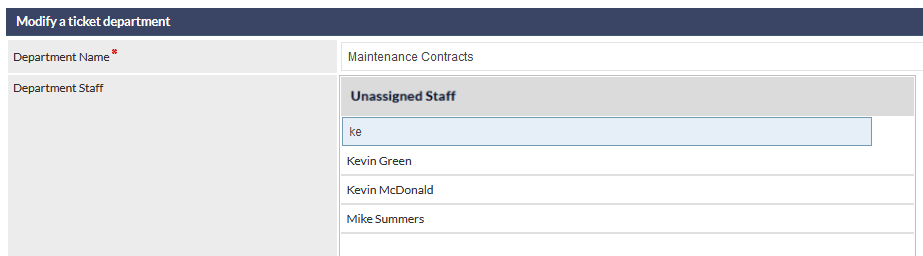
There is no minimum number of characters required, and the matches are made for where the typed characters appear anywhere in the staff name.
The search is not case-sensitive, and any spaces typed into the search field are matched.
Clone Department in Ticket and Workflow Department Settings
When creating a new Ticket or Workflow department, you can clone an existing department. This is useful when the new department includes the same, or mostly the same, staff as an existing department.
To use the Clone Department feature, when creating a new department:
- Select the clone option (i.e. Clone Ticket Department or Clone Workflow Department):

- Enter the new Department Name and select the department to clone:
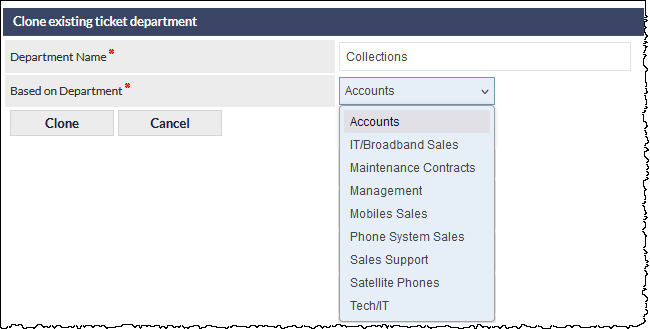
- Press the Clone button to confirm. The new department settings will be displayed, and the staff assignments can be modified if required.
- Press the Save button to confirm any changes.
Please refer to the following Support Centre articles for detailed information pertaining to these new and updated settings:
Contracts
Contract Cancellation Comment and Details
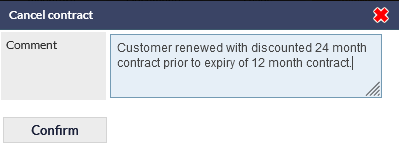
A contract cancellation comment can now be added when a contract is cancelled.
In the customer's Contracts tab, click a contract to display the Contract pop-up window:
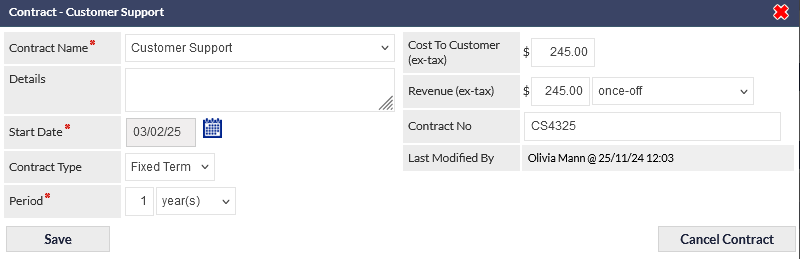
Press the Cancel Contract button to display the cancellation pop-up window, enter the cancellation Comment if required, and press Confirm.
When viewing the customer's Contracts tab, the cancellation details can be viewed by:
- Hovering over the contract's information icon in the Cancelled contracts section:
-


Clicking the contract row in the Cancelled contracts section:
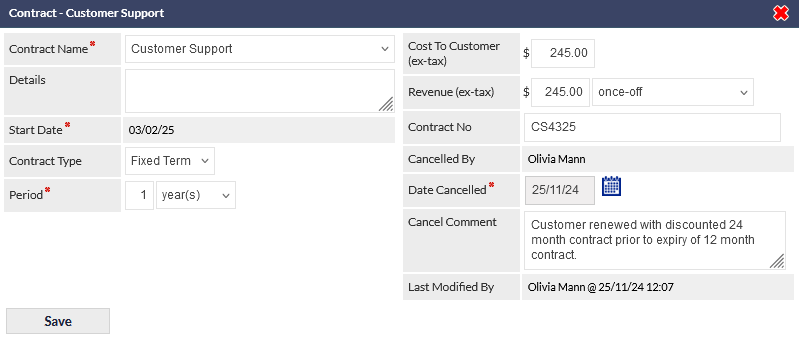
When reporting on cancelled contracts, the cancellation comment is automatically included in the report results.
For more information about contracts and related features, please see the following Support Centre articles:
Jobs
Site Contact Details in Job Emails
Placeholders Site contact details are now available in the Job email templates:
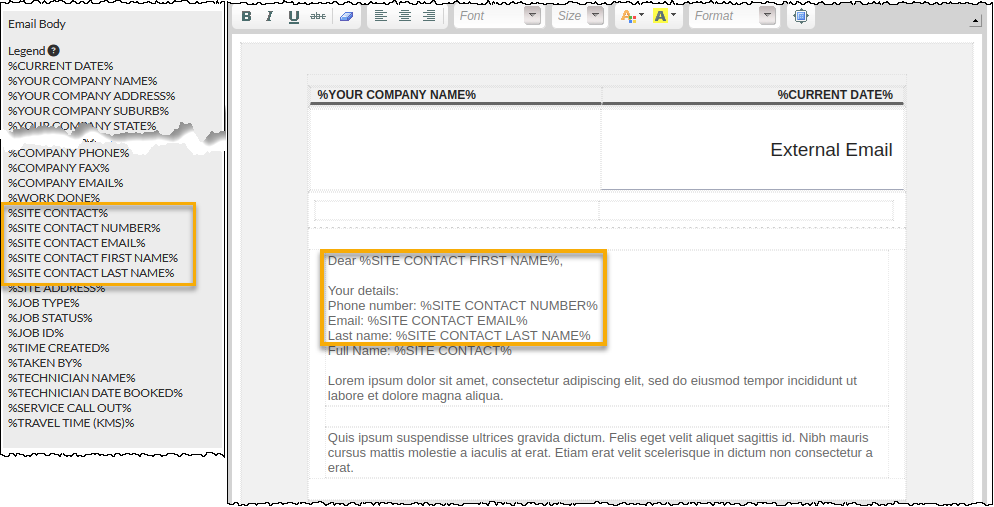
Tip: to copy the placeholder from the Legend section, click the required placeholder to copy it to the clipboard. The placeholder can then be pasted into the email template editor section.
For more information about email notification templates, please refer to the following Support Centre article:
To-Do
Project Relationship Link
To-Do lists now show a To-Do item's relationship to a Project. The following image shows the new Related To column, which contains a link to the related Project.

Within a Project, the related To-Do can be unassigned by pressing the trash can icon (visible in the following image):

The relationship between an unassigned To-Do and a Project can be removed by pressing the Unrelate (broken link) icon in the Project's Related Unallocated Records field:

For more information about the To-Do feature, please refer to the following Support Centre article: