
What's New September 2019
In this article:
Video Presentation of What's New September 2019 (recording of live session 35 mins)
Phasing-out Group Email addresses in Workflow Tasks CHANGE
Home Screen Customisations REMINDER
Search Dashboard Customisations NEW
New Search Criteria Updates
Ticket From Email Spam Management Updates
Maps Feature Update Updates
Bulk Ticket Status Reassignment UpdateS
Data Sheet Multiple Checkbox Selection Update
Leads Screen Updates Update
Video Presentation (recording of live session 35 mins)
The following video presents a summary of all new features and changes in the CommTrak September 2019 release:
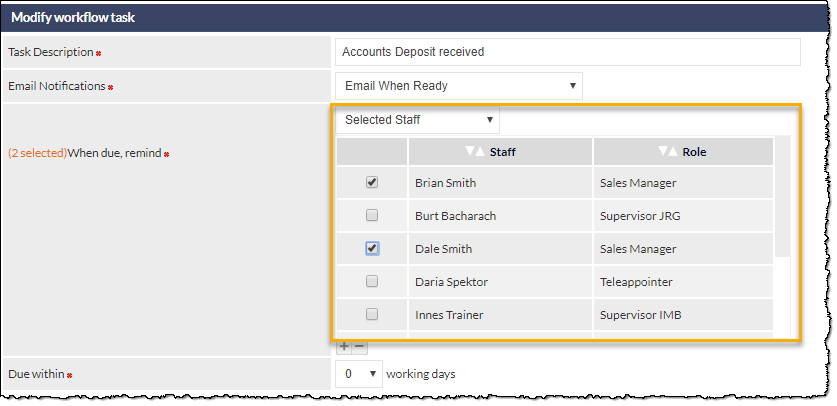
Phasing-out Group Email addresses in Workflow Tasks
The use of specific email addresses for individuals or email distribution groups, for Workflow Task notifications, is being phased-out.
Currently, it is possible to specify email addresses, as highlighted in the image below:

The above option will be phased-out of the Workflow Settings; please use the Select Staff option in the When due, remind drop-down list, to select specific staff-members:
Home Screen Customisations (Reminder)
Don't forget that the following features and customisations are available on the CommTrak Home Screen:
- The CommTrak Main Menu can be pinned and unpinned (see Support Centre article Main Menu).
- Clicking the CommTrak logo at the top-left of the Information Bar, always returns you to the CommTrak Home Screen.
- If the fuel bowser icon is displayed, it means that your CommTrak is running low on storage; ask your organisation's CommTrak Administrator to contact CommTrak Support for assistance.
- Hovering over the Recent History (clock) icon on the Information Bar displays the 15 most-recent company records that you have accessed.The number of items shown can be adjusted from the default of 15, in Settings > Customer Settings Miscellaneous > How many company history entries to show for each staff. This is a global setting.
- Quickly access My Details (your personal settings) by clicking the gear icon; these settings include: Calendar / To Do sharing, email signature, leave application. See article Start Here - My Details for more information.
- Sign-out of CommTrak by click in the Power icon. See the article Information Bar, for more information.
- The warning triangle icon indicates that you have Overdue Alarms. See the article Information Bar, for more information.
- Your organisation's logo, displayed at the top-right of every CommTrak screen, can be configured to be a link to a customer record, typically your organisation's CommTrak record, and is configured in Settings > General Settings > Company Details > Link logo to Customer. This is a global setting.
- The panels, displayed below the Search Dashboard, can be customised as described in the article Summary Panels.
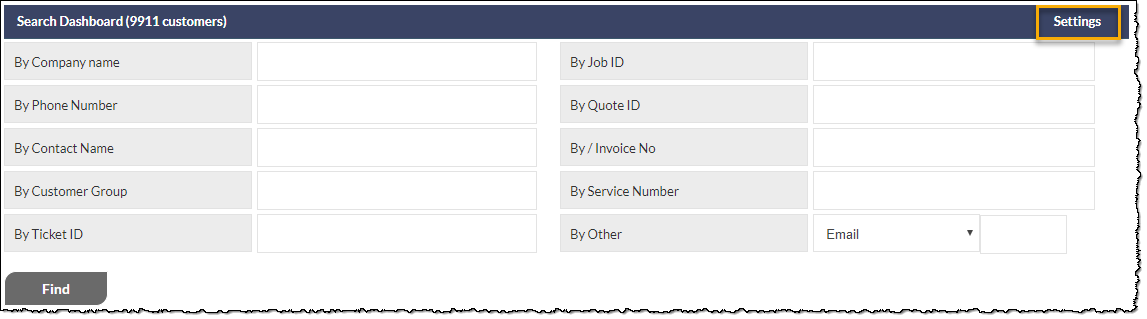
Search Dashboard Customisations
You can now customise the Search Dashboard on the CommTrak Home Screen, to display required search fields in your preferred sequence. Previously, the search fields, and the order in which they were displayed, were static. This is a per-user setting, so each CommTrak user can customise the Search Dashboard to meet the requirements of their daily activities.
The new Search Dashboard Settings link is displayed on the right-most side of the Search Dashboard section header, as highlighted in the image below:
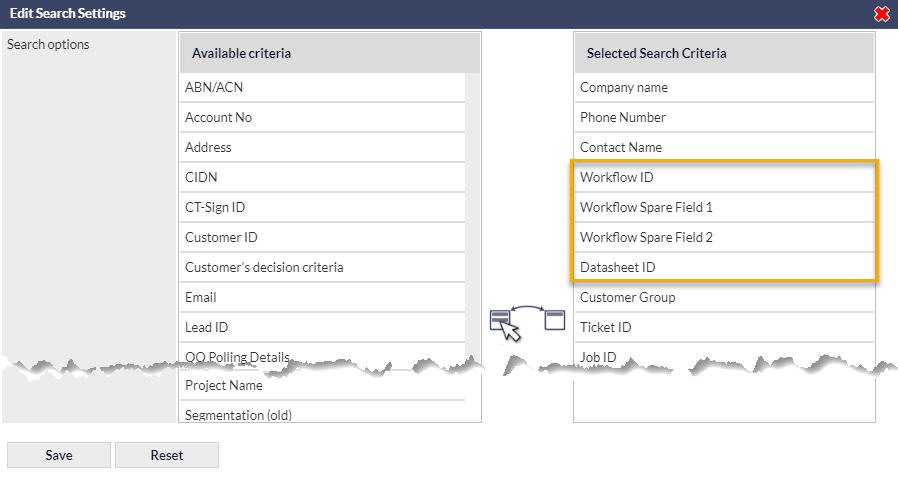
Click the Settings link to display the Edit Search Settings pop-up window, which enables you to drag-and-drop from the available search criteria fields (on the left, in the image below), into the Selected Search Criteria section (on the right, in the image below). In addition to being able to select which search criteria are displayed on the Search Dashboard, you can also specify the order in which the search fields are displayed.
For example, if, in your role, you primarily work with Workflows and Data Sheets, you can customise the Search Dashboard to reflect the importance of searching for those items in your daily activities. The following screenshot highlights three Workflow search criteria, and also the Datasheet ID search criterion, that have been dragged from the left-hand panel, into the right-hand panel, and placed in the desired order:
When the Save button is clicked, after making the above changes, the CommTrak Search Dashboard will be displayed as shown in the following image:

New Search Criteria
The following Search criteria have been added to the Search Dashboard (and can be customised with the new features described above):
- Project ID
- Project Name
- Workflow Spare Fields (updated in August 2019)
- Customer Group (updated feature in this release)
Project ID & Project Name
These two fields can now be added to the Search Dashboard using the customisation features described above.
The CommTrak Projects module is not active by default, and is available on request, after having received training. Please contact CommTrak Support for further information, and to book training.
Workflow Spare Fields
The Workflow Spare Fields, can now be added to the Search Dashboard using the customisation features described above.
Please see What's New August 2019 - Workflow Spare Fields article, for additional information relating to the configuration and use of the Workflow Spare Fields.
Customer Groups Search (updated feature)
The By Customer Group Search field (previously, a drop-down list) now operates in the same manner as a standard CommTrak company search field; start typing the name of a Customer Group, and matching groups (if any) will be displayed in a drop-down list (a minimum of three consecutive characters is required, including spaces). An example result is shown in the following image:
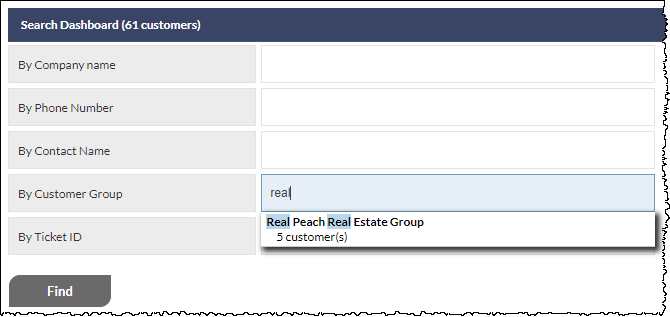
In the above example, the user has typed the word real, which has resulted in matching a single Customer Group. Clicking a group name in the list of results, presents a screen that lists the customer records within the selected group:
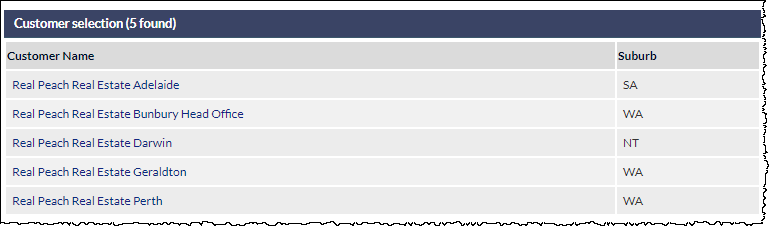
Clicking on any of the Customer names, presents the Customer Screen for that record.
For further information about the Customer Group features, please see the following Support Centre articles:
- Customer Group (Settings)
- More Info section of the Customer Screen article
Ticket From Email Spam Management
Occasionally, spam, or misdirected emails may be sent to an email account that is configured to automatically create CommTrak Tickets. These unwanted tickets are a consequence of external factors, and have previously required manual cancellation for every unwanted ticket that was created.
We have now provided tools to assist you in managing such emails:
- From within a Ticket, block the sender's email address for a specified period (from 1 Hour to Forever)
- Bulk cancel tickets that have already been created (see Bulk Ticket Status Reassignment section, below)
These two features are only available to users with appropriate permissions (including Supervisor role, by default).
Configuration
- Enable the feature: Settings > Ticket Settings > Miscellaneous > Enable ability to ignore ticket email senders to avoid creating new tickets and notes
- Ensure users have the required permissions (as appropriate within your organisation): Settings > User Settings > Staff Roles > Tickets > Allow users to manage ignored ticket sender address
The required permission is assigned to the Supervisor role by default. To assign the custom permissions to other users, please see the Support Centre article Change User Permissions (FAQ).
Use
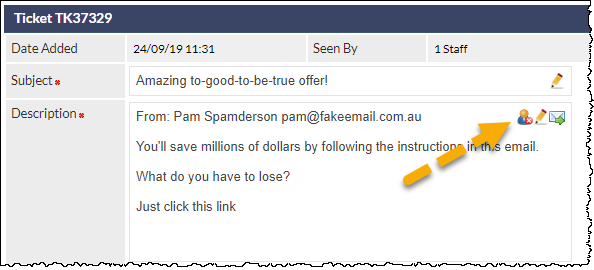
Click the Ignore Sender icon in the Ticket (highlighted in the image below); the icon is only displayed if the ticket was generated from an email, and if the user has appropriate permissions.
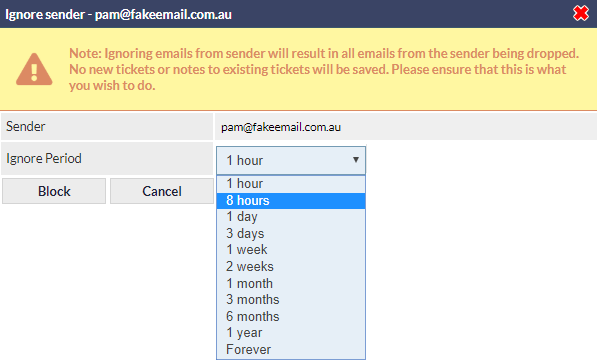
In the resulting pop-up window, review the important warning message, then select the duration for which the sender's email should be blocked (from 1 Hour to Forever), then click Block (or Cancel):
After clicking the Block button, all emails received from the sender's email address will be blocked for the specified duration:
- All the emails from the specified email address are blocked
- The blocked emails are not retained
The current ticket is not deleted, and should be processed as required (typically by cancelling the ticket).
If the sender is already blocked, clicking on the Ignore Sender icon displays the following pop-up window:
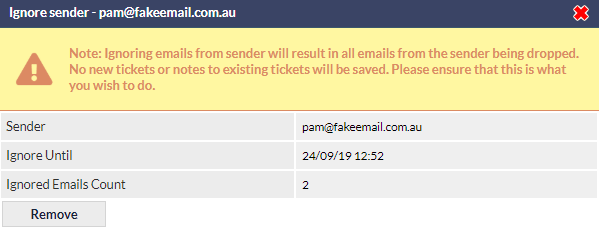
The Ignored Emails Count field denotes the number of emails from the specified email address, that have been dropped since the block was put in place.
Clicking the Remove button immediately cancels the block; all future emails from the specified sender will be received and processed as usual.
Managing Ignored Email Addresses
A list of all ignored email addresses can be viewed and managed in Settings > Ticket Settings > Ignored Senders:
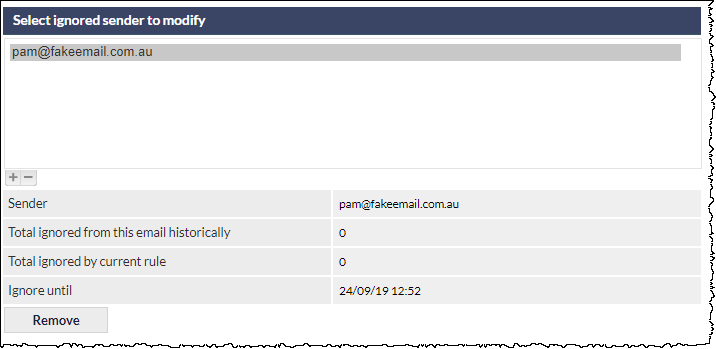
Clicking an email address in the ignored senders list, will display relevant statistics, together with the option to remove the email address from the ignored sender list, as shown in the above image.
Clicking Remove, will immediately remove the ignored sender entry, and future emails from the previously-ignored address will be received and processed as usual.
Bulk Ticket Status Reassignment
This feature is available to users with appropriate permissions (including Supervisor role, by default).
In addition to being able to bulk-reassign Tickets by Department/Staff and Ticket Type, it is now possible to bulk-reassign Ticket Status:

On the Active Tickets screen, display tickets as required, using appropriate search criteria (not shown in the above image), then:
1) Select the tickets for which the Status is to be changed
2) Select the required Status from the drop-down list, and click the adjacent Reassign button
This process is irreversible; there is no undo feature. Please use this feature with care.
Use-cases for this feature include:
- Bulk-cancelling tickets generated from spam emails
- Bulk-updating to an alternative status for administrative purposes; for example, updating multiple tickets to reflect a status of Customer to Confirm
It is not possible to bulk-close tickets; the only statuses available for bulk-reallocation are:
- Open
- Cancelled
- Other custom status (as managed in Settings > Ticket Settings > Ticket Statuses)
Tickets that have had their status bulk-reallocated will have a ticket note added automatically: Ticket status administratively changed.
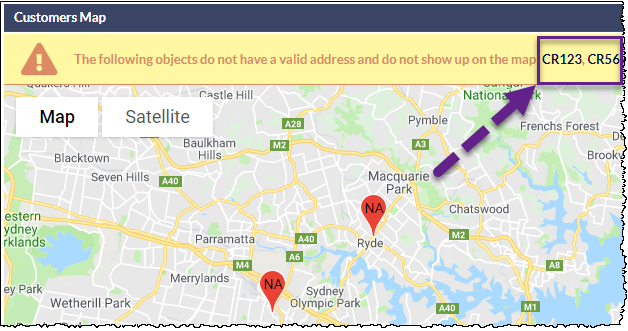
Maps Feature Update
When a Customer, Lead or Job record location cannot be displayed on the map, the warning notification above the map now displays a direct link to the relevant records. Clicking on a record link opens the record in a new tab, enabling the user to update the address information.
An example of record links on the Customers map (i.e. records with insufficient address data), are highlighted in the following image:
For further information relating the CommTrak Maps features, please see the following articles:
- Active Customers Screen - Customers Map section
- Active Leads - Leads Map section
Data Sheet Multiple Checkbox Selection
The available field options when creating a data sheet include:
- Headings
- Text Fields
- Text Area
- Drop down
- Checkboxes
- Checkboxes (multiple) New
- File Uploads
- Date
The Drop down and Checkbox options only allow the selection of a single item, and this may be tiered (or conditional) as required.
We have added a new option which allows for multiple checkboxes to be selected, and these may also be tiered. This allows for a more traditional check-list application.
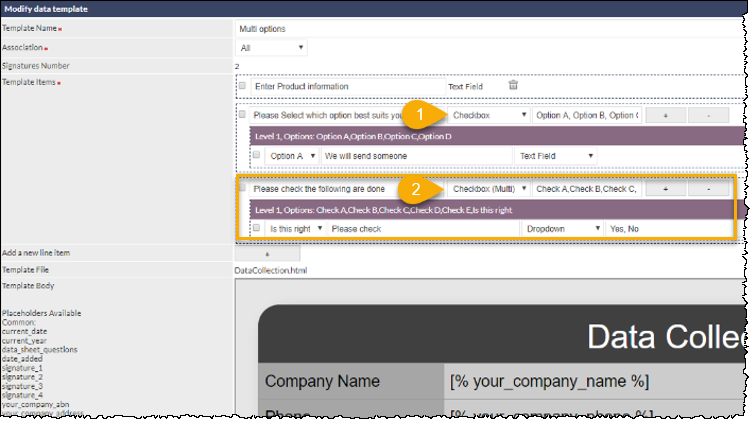
In the image above:
- Checkbox - allows selection of one outcome only
- Checkbox (Multi) - enables selection of multiple outcomes
The Results
The following image shows the datasheet resulting from the above options:
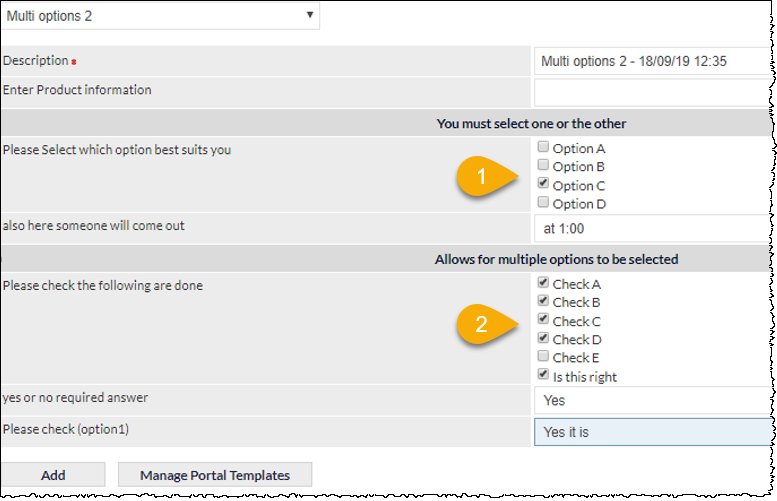
- Only one item can be selected
- Multiple items can be selected
Leads Screen Updates
Two updates have been made to the Leads Screen:
- Search by Teleappointer
- Appointments Column
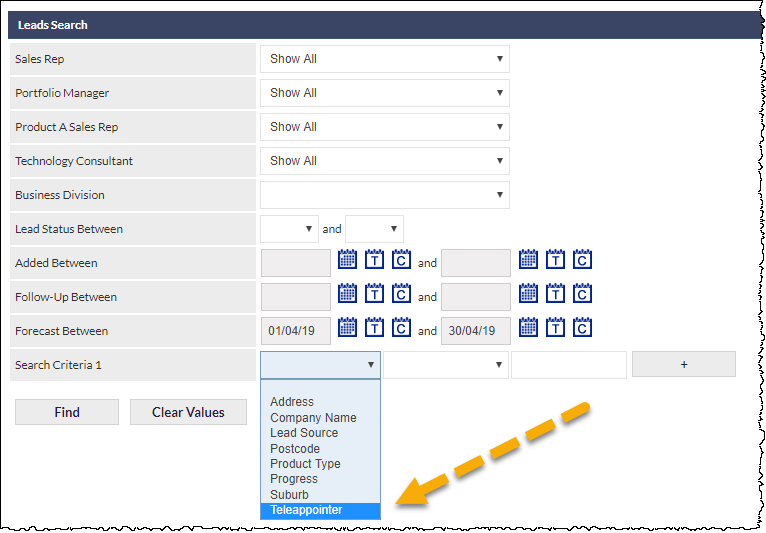
Search by Teleappointer
The Active Leads Screen has an additional search criteria option, enabling the user to filter Active Leads by the Teleappointer who has been assigned to the Lead; this is typically the Teleappointer who created the Lead in the Telesales module:
For further information about the Leads screen, and the Leads Search features, please see the article Active Leads Screen - Leads Search section.
Appointments Column
An appointments column can now be displayed in the list of Active Leads. This is a per-user feature.
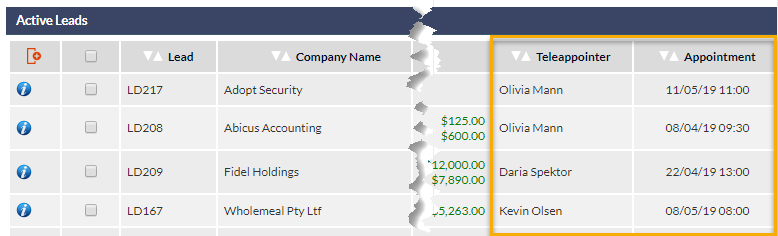
In the above image, we can see that the Teleappointer and Appointment columns have been enabled. Visible columns are selected by clicking the red Select Columns to Display icon (seen top-left of the above image). Clicking the icon opens the Column Setup pop-up window, enabling the user to select which columns will be visible:
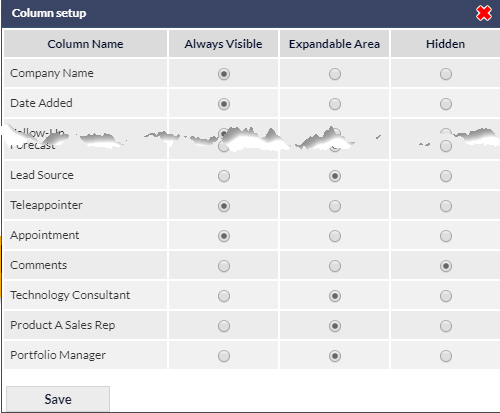
For further information about customising columns, please see the Support Centre article, Column Sorting & Customisation.
When viewing appointment dates and times, please consider that although multiple appointments can be made for a single Lead, only one appointment will be displayed:
- For future appointments, only the next appointment will be displayed
- In there are no future appointments, the most recent historical appointment will be displayed
Job Scheduler / Staff Leave Integration
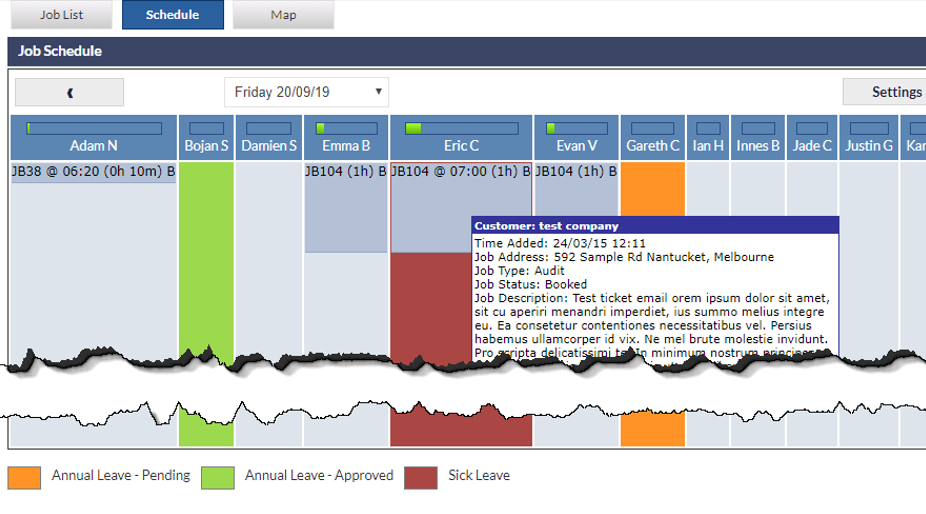
The Job Scheduler has been linked to Staff Leave information (accessed via the My Details icon).
When leave has been requested by, or confirmed for, a Technician, it is displayed in the Job Scheduler with a coloured background:
- Orange - Pending (requested, but not confirmed)
- Green - Approved
- Red - Approved Sick Leave
In the following example image, Eric has a Job assigned to him, however, he is on Sick Leave. Another Technician can be scheduled by dragging-and-dropping within the Scheduler, or by modifying the Job sheet:
Staff leave is also reflected in the staff member's Calendar, and in CallTrak (both accessible from the CommTrak Main Menu).
When a Job is created, if a technician has applied for leave, has leave approved, or is on sick leave, the following warning message will be displayed when attempting to schedule them:
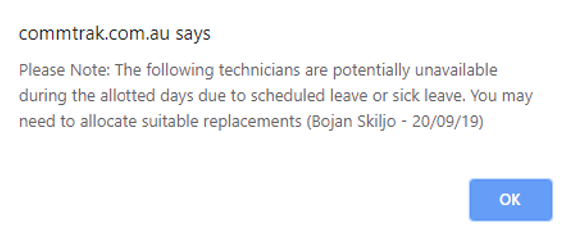
Please note, unless you re-assign the Job, the Job booking will still be saved in the scheduler.