
Invoicing with the Accounts Integration
Create, review and submit invoices in CommTrak using the Accounts Integration with Xero or MYOB, including how to select pending items and send invoices to your accounting system.
The Customer's Accounts screen is only available when the Accounts Integration has been enabled, and where relevant permissions have been assigned to the current user.
Images in this article can be clicked to view the image full-size. The size shown on your screen will depend on your device and browser.
When viewing the Accounts screen, the following tabs are available:

This article explains how to use the following tabs in the Accounts screen:
For further information about the Xero / MYOB tab, please refer to the main Accounts Screen article.
Pending Items Tab
All items that can be invoiced for this customer are listed in this tab. Examples of invoiceable items are:
- Job activities
- Ticket activities
- Quote items
The following screenshot shows the Pending Items Tab selected. In this example, there is a single invoice line item that is a line item from a Quote.
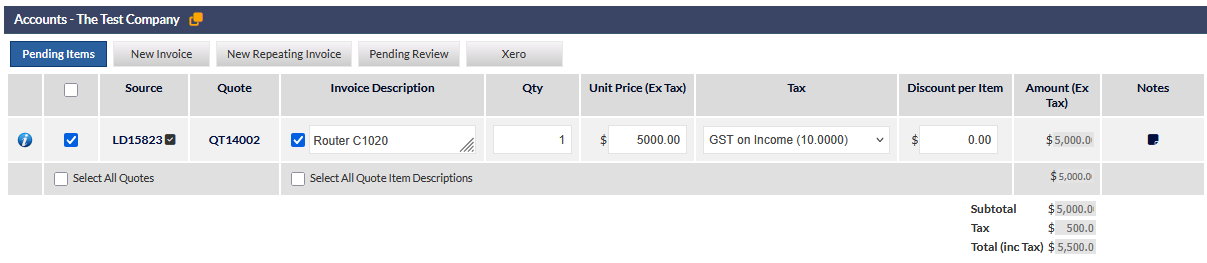
Pending Line Items
Each line item in the Pending Items table has the following features:
Information (i) icon
Pressing the information icon expands the pending line item to show relevant details. For example, in the following screenshot, information pertaining to the Quote is displayed:

Recurring Invoice Items
Recurring invoice items, such as monthly contracts are displayed with a sky blue background:

Invoices can be created for recurring invoice items by ticking the required recurring items (shown in the previous image) and pressing the New Repeating Invoice button.
Recurring invoice items cannot be added to an invoice using the New Invoice button. If the New Invoice button is pressed, and a recurring invoice item has been ticked, a notification will be displayed:
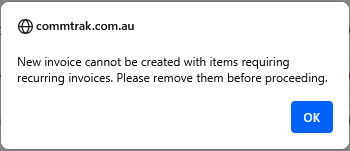
If you need to create a new invoice (i.e. for any selected invoice items that are not recurring), you must untick any recurring items before pressing the New Invoice button.
Source
The Source of the line item. In this example, the source is Lead LD15823. The Lead link can be pressed to open the Lead in a separate browser tab.
Quote
If the source for this item is a Quote, a pressable link to the Quote is shown.
Invoice Description
The description that will be displayed on the customer invoice. Note that this field is displayed as read-only when first displayed.
When the Invoice Description checkbox is ticked, the description becomes editable (as shown in the previous image). This allows for modifying the description as appropriate to ensure that it is correctly displayed on the customer's invoice. This feature can be useful when, for example, the note text for a productivity activity for a Job has been entered by a Technician, and text is not appropriate for an invoice line item.
Once edited, the checkbox can be unticked if desired, which returns the field to read-only, whilst retaining any changes.
Quantity
The quantity of the item to be invoiced.
Unit Price (Ex Tax)
The sale price of the item.
Tax
The tax rate to be applied to this item. The list of tax rates is derived from your accounts application.
Tax rates can be synchronised with your accounts application in CommTrak Settings:
Settings > Accounting Settings > Tax Rates
In the settings, the CommTrak Tax Rate can be set as FRE (no tax) or GST as appropriate, for each synchronised tax rate.
Discount per Item
The dollar value of the discount to be applied per item for this line item.
Amount (Ex Tax) - read only
The total amount payable for this line item
Notes
Press the note icon to add a note to this line item. The Item note pop-up is displayed:
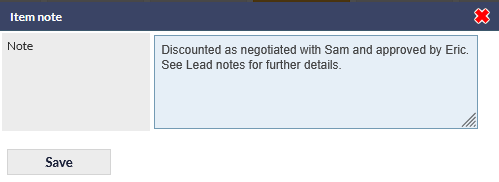
Press Save to confirm the note, press the red Close icon to cancel changes to the note.
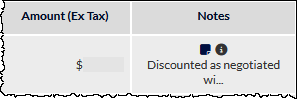
When a note is applied to a line item, the Notes column is updated to display:
- Notes icon - press to edit the note
- Information icon - hover to display a pop-up showing the complete text of the note
- Text of the note - truncated to fit within the field. The text displayed will vary depending on the browser window size.
An example of the populated Note field is shown below:
Other Line Item Features
When there are multiple line items, they are categorised into groups (e.g. Quotes, Jobs, Tickets):

In the previous image, there are multiple Quote line items and a Job line item that have been grouped accordingly.
Select All Items in a Category
Each group includes a Select All [items in category] checkbox. For example, ticking the Select All Quotes checkbox (visible in the previous image), will automatically select all the Quote line items and the Invoice Descriptions for those line items:
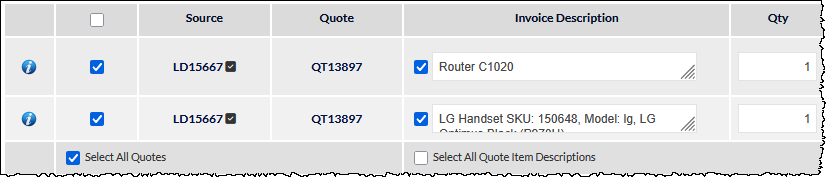
This assists in expediting the selection of items and the editing of the Invoice Description of all items in a category. Note that all the line items have been selected automatically (leftmost checkbox is ticked for all Quote items) and the checkbox for each Quote Invoice Description has been selected automatically.
When all items have been selected in this manner, individual items can be unticked if required.
Select All Item Descriptions in a Category
For each group, there is a Select All [Category] Item Descriptions checkbox:
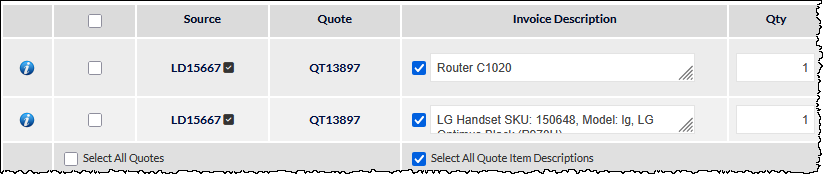
In the previous image, the Select All Quote Item Descriptions checkbox has been ticked. This expedites the selection of editing of the Invoice Description for all items in a category, without also selecting the line item.
Quote Totals
When a line item is selected, the total amount for that line item is included in the Quote Totals calculations:
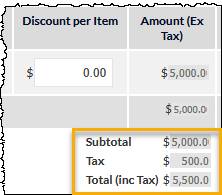
Quote Total calculations adjust automatically according to any changes applied to the selected line items.
Action Buttons (Pending Items)
There are two action buttons pinned to the bottom of the Pending items screen:
New Invoice
Pressing the New Invoice button displays the New Invoice tab and adds selected invoice line items to the new Invoice.
Acknowledge
Pressing the Acknowledge button dismisses the selected items from the Pending Items tab and does not add them to an invoice.
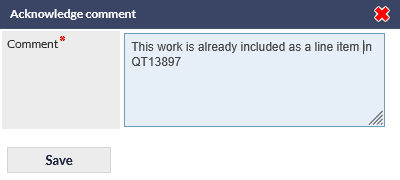
This action is intended to be used in cases when items in the Pending Items tab should not be invoiced. For example, a Technician may have added a Job note with billable productivity time, but that work may already have been included in a Quote. Acknowledging such a line item ensures that the item is not double-billed to the customer.
When the Acknowledge button is pressed, the Acknowledge comment pop-up is shown. This note is mandatory and is applied to all items that were selected prior to pressing the Acknowledge button:
Acknowledged productivity items are marked as Verified by Accounts in the Productivity Report:
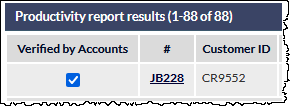
Refer to the Productivity Report article for more details about verified items.
New Invoice Tab
If the New Invoice tab is pressed, the New Invoice screen is displayed without any line items. Line items can be added manually as required.
If the New Invoice screen was reached by pressing the New Invoice button in the Pending Items tab, any line item that was selected in the Pending Items tab will be displayed as a New Invoice line item.
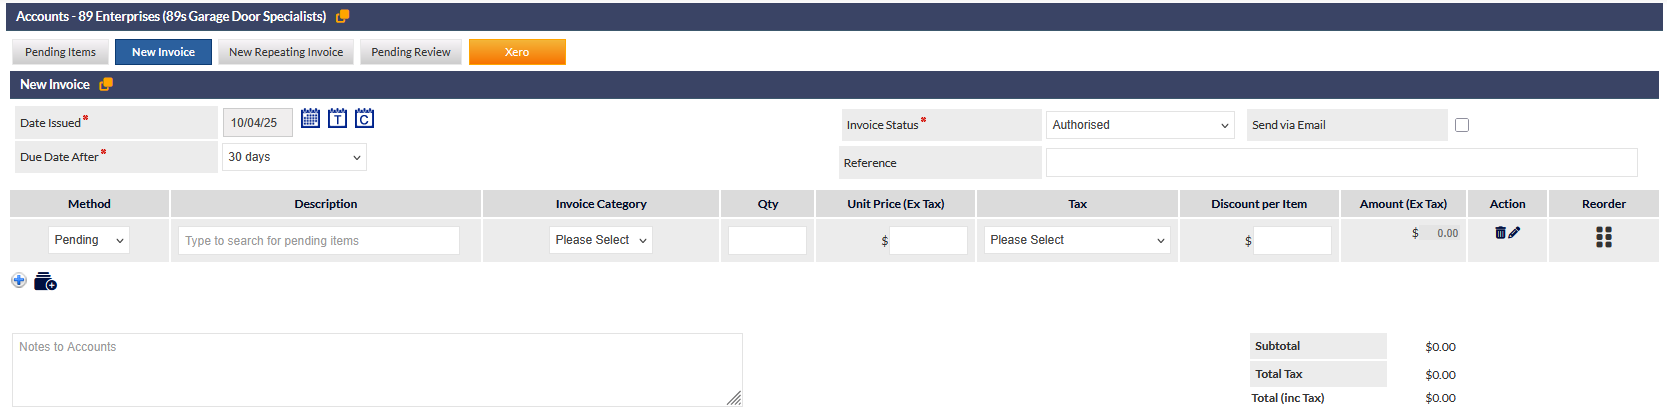
The following image shows the New Invoice screen without any line items:
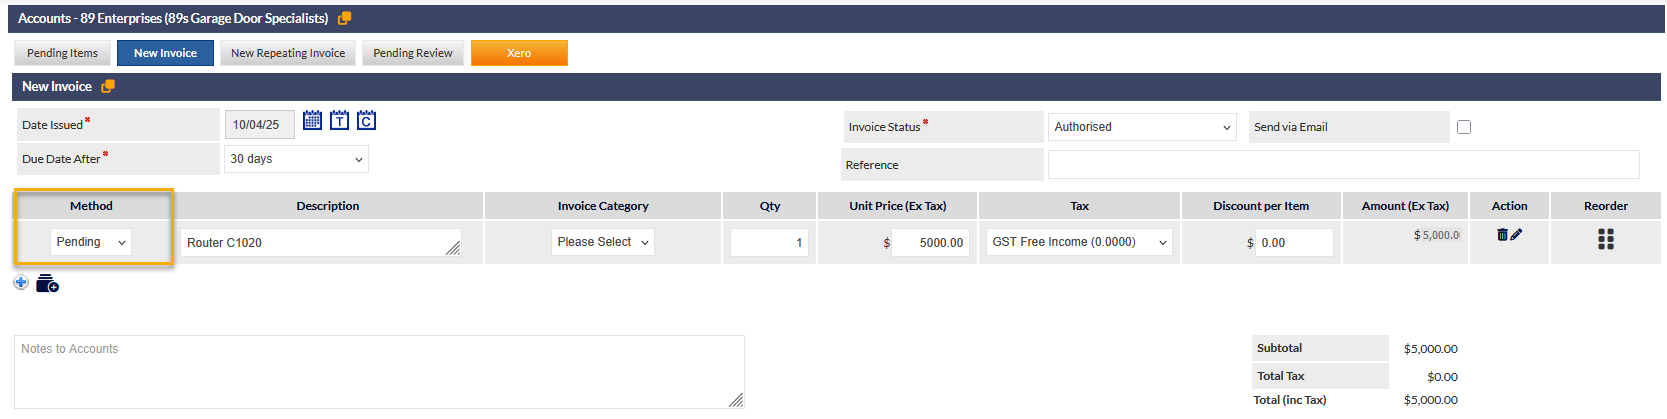
The following image shows the New Invoice screen with a single item. We can determine that this item was sourced by selecting the item in the Pending Items tab and pressing the New Invoice button, because the selection in the Method column for the line item is Pending (shown highlighted):
New Invoice Fields
At the top of the New Invoice screen, the following fields are displayed:
Date Issued (mandatory)
The issue date of the invoice
Due Date After (mandatory)
The number of days after which the invoice becomes overdue.
Select the required number of days from the dropdown list.
The default number of days can be modified in CommTrak Settings:
Settings > Accounting Settings > Miscellaneous > Default number of days invoice will be due from date issued
Invoice Status (mandatory)
Select the required status:
- Authorised - an approved CommTrak user can set the status to Authorised and the invoice can subsequently be submitted
- Draft - the invoice has been created, but not yet approved by an approved CommTrak user
- Submitted - the invoice has been submitted to the accounts software (e.g. Xero or MYOB)
Send via Email (default unticked)
When the invoice is submitted, by using the Send Invoice button, the invoice will be sent via email to the customer.
Reference
A reference number for this invoice.
Deleting Invoice Line Items
To delete an invoice line item, press the trashcan icon, located in the Action column:

You will be prompted to confirm deletion of the item. Press OK to confirm deletion or Cancel to retain the line item in the invoice.
If a deleted line item was sourced from pending items, that item will be returned to the Pending Items tab.
If a delete line item was entered by other means, as explained in Adding Invoice Items, the line will be deleted, and cannot be retrieved other than by adding it again manually.
Adding Invoice Line Items
To add an invoice line item, press the plus (+) icon displayed below the last line item.
The following methods are available:
- Pending
- Xero
- Type
- Labour
- Note
Pending (default)
When the Pending method is selected, the Description field of the line item displays, "Type to search for pending items".
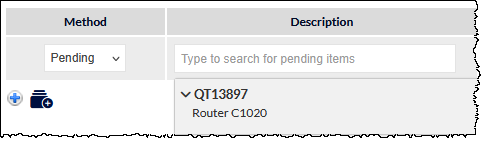
Click inside the Description field to activate the search feature. If there are any pending items, they will be categorised in the displayed dropdown list. The following image shows that there are pending items in quote QT12897:

In this example, pressing on the quote ID expands the section to show all pending items for the quote:
Click a pending item in the dropdown list to add the details into the line item.
Alternatively, rather than clicking the quote ID and the pending item, if you know the pending item description, you can start typing it to filter the list to show matching items. The following image shows that the user has typed the first few characters of the pending item's description, and this has filtered the list to show only matching items:

Click on the pending item to add the details to the line item.
Xero
Select this option to select an item available in your accounts software. A list of items synchronised from Xero will be displayed:
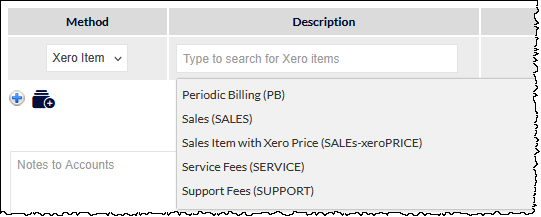
The above list is generated from items that have been synchronised to CommTrak in the Account Settings: Product and Inventory Items (Settings)
If you know the item description, you can start typing it to filter the list to show matching items. The following image shows that the user has typed the first few characters of the accounting software item's description, and this has filtered the list to show only matching items:
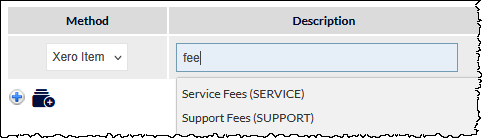
Click on the pending item to add the details to the line item.
Type
Selecting this method changes the line item Description field into a text area area in which arbitrary text can be typed:
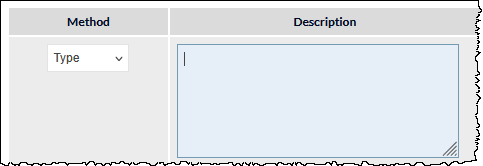
This option is intended for creating ad hoc line items which will be included in the invoice.
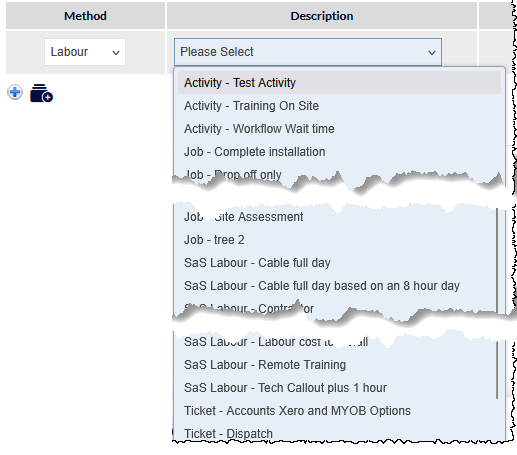
Labour
Selecting this option presents a list of items based on chargeable:
- Productivity Activities
- Job Types
- Ticket Types
- Services & Software Labour
For more information please refer to the following articles:
- Leads Services & Software (SaS) (Settings)
- Productivity Activities
- Productivity Activities (Settings)
- Job Types (Settings)
- Ticket Types (Settings)
Note
Selecting this method changes the line item Description field into a text area field into which arbitrary text can be typed:

Text added to the Description field will be displayed as a text note line item on the invoice. No other fields within a note line item can be edited.
Additional Line Item Fields
Complete the following fields for each line item, as required:
- Invoice Category
- Qty
- Unit Price (Ex Tax)
- Tax method
- Discount per Item
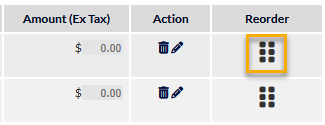
Reordering Invoice Line Items
Each line item has a Reorder column which contains a handle (highlighted in the following image). Click and drag the handle (highlighted in the following image) for a line item to change the order of items in the invoice:
Grouping Invoice Line Items
Multiple line items can be grouped into a single line item, referred to as a Group.
This feature is useful when, for example, the invoice is for a system that comprises multiple components. The multiple components can exist as separate line items within the CommTrak invoice, but when grouped, they are presented as a single line item on the invoice that is presented to the customer.
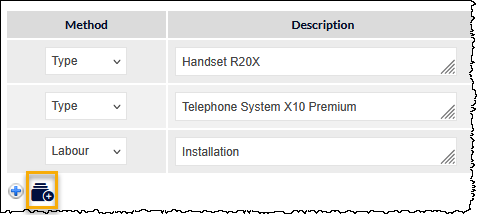
The following example shows three separate line items:

We can group the handset and the telephone system into a single line item on the invoice. Click the Group icon (folders with a plus symbol) below the last line item (highlighted in the following image):
A Group dropzone is displayed below the last line item in the invoice:
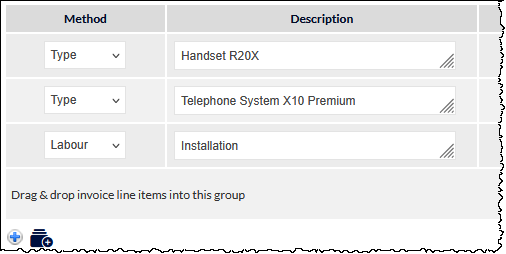
Drag and drop items onto the dropzone to add them to the group. The items are listed below the group's Description text field:
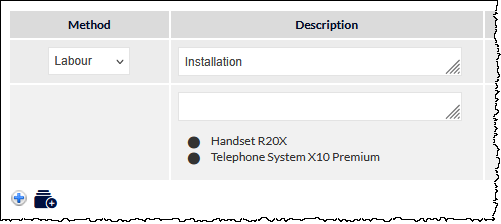
Enter a Description for the group. The group description will be displayed as the line item description for the invoice:
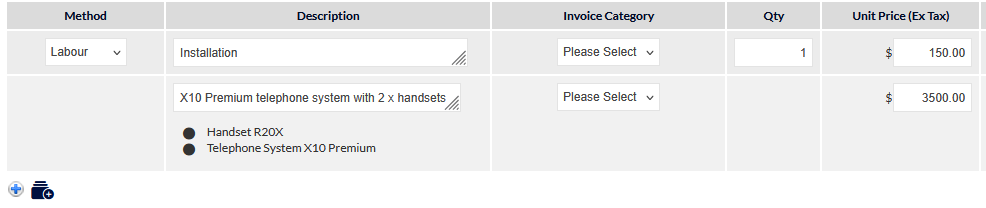
Note that the total Unit Price (visible in the previous image) for the group line item, is equal to the total of all items in the group.
Ungrouping
To ungroup grouped line items, press the edit (pencil) icon in the group's action column. You will be prompted to confirm the ungrouping.
Once ungrouped, the previously-grouped items will be displayed as separate line items.
Delete Line Item or Group
Deletes the line item or group.
You will be prompted to confirm or cancel the deletion. This action is irreversible.
When a group is deleted, all items in the group are deleted from the invoice.
If you wish to retain one or more line items within the group, ungroup the items in the first instance, and delete individual line items as required.
Line items that were sourced from the Pending Items tab will be return to the Pending Items tab. Other items will be deleted and, if required, will need to be added via the Method option when adding a new line item.
Action Buttons (New Invoice)
There are two action buttons pinned to the bottom of the New Invoice screen:
Send Invoice
Pressing the Send Invoice button sends the invoice to your accounting software.
If the Send via Email checkbox (located top-right of the New Invoice tab) is ticked, the invoice will be emailed to the customer immediately.
Send for Review
This feature is typically used when the current user is not authorised to send an invoice.
When the Send for Review button is pressed, the invoice is immediately added to the list of invoices pending review (i.e. located in the Pending Review tab).
See Pending Review Tab for further details about this feature.
Pending Review Tab
If there are any invoices pending review they will be listed in this tab.

To review, modify, delete or send a pending invoice, press anywhere on the row for the invoice.
The invoice will be displayed.
The features available in the Pending Review tab are identical to those found in the New Invoice tab, with the exception of the action buttons that are pinned to the bottom of the screen.
Action Buttons (Pending Review)
Send Invoice
Pressing the Send Invoice button sends the invoice to your accounting software.
If the Send via Email checkbox (located top-right of the Pending Review tab) is ticked, the invoice will be emailed to the customer immediately.
Save
Save any changes that you have made to the current invoice
Delete
Deletes the invoice.
You will be prompted to confirm or cancel the deletion. This action is irreversible.
Line items that we sourced from the Pending Items tab will be return to the Pending Items tab. Other items will be deleted and, if required, will need to be added via the Method option when adding a new line item.
New Repeating Invoice Tab
If the New Repeating Invoice tab is pressed, the New Repeating Invoice screen is displayed without any line items. Line items can be added manually as required.
If the New Repeating Invoice screen was reached by pressing the New Repeating Invoice button, any line item that was selected in the Pending Items tab will be displayed as a New Repeating Invoice line item.
Features for adding, removing, grouping line items, etc., are the same as described in the New Invoice Tab section of this article.
Repeating Invoice Fields

When creating a repeating invoice, the following fields are available:
- Repeat Transaction - the frequency with which this invoice transaction should be repeated
- Next Invoice Date - the date on which the repeat invoicing should start
- Due Date - the date on which the invoice is due to be paid. The following options are available:
- of the following month
- day(s) after the invoice date
- day(s) after the end of the invoice month
- of the current month
- End Date (optional) - the date on which the repeat invoicing will end
- Invoice Status - Select either Save as Draft, Approve, or Approve for Sending
- Reference - an optional reference number for this invoice.