
What's New May 2021
Home Screen Customisation
- Main Menu Update
- Summary Panels Update
- Search Dashboard REMINDER
Customer Screen Customisation & Updates
- Pinned Customer Tabs Update
- Customisable Customer Tabs Update
- Customer Tabs on Mobile Devices Update
- Pinned Special Comments Update
Customer Groups Updates
Job Screen
- Job Screen Pinned Buttons Update
Customer Merge
Customer Import
Customer Portal Settings
Home Screen Customisation
The following areas of the Home Screen can be customised by each user:
- Main Menu
- Summary Panels
- Search Dashboard
When a user customises any of these sections, the settings will be remembered for that user.
Main Menu
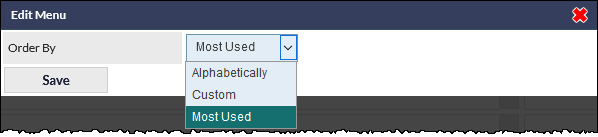
There are three options for customisation of the CommTrak Main Menu:
- Alphabetically
- Custom order and visibility of each menu item
- Most Used (dynamic)
In all cases, the following menu items are pinned in fixed positions:
- Home - pinned to the top of the menu
- Support Centre - pinned to the bottom of the menu

Alphabetically
Menu items are displayed in alphabetical order.
Custom Order and Visibility
Users can specify the order of items in the menu, and whether each item is always visible, or displayed in the expandable area.
Menu items placed in the expandable area can be accessed by clicking the expand (chevron) icon, towards the lower-right of the Main Menu (visible in the previous screenshot). When the icon is clicked, the hidden menu items are displayed and can be selected. Upon clicking an item on the menu, the selected page is displayed, and the items in the expandable area are hidden.
Most Used (default)
CommTrak will adjust the position of each item according to frequency of usage; the most-frequently used items are moved towards the top of the menu.
Most Used is the default option for all users.
Accessing and Using the Menu Display Options
The Main Menu settings can be accessed by clicking the edit (pencil) icon towards the top-right of the Main Menu (visible in the previous screenshot).
The Edit Menu pop-out window is displayed:
 The Alphabetically and Most Used options do not require further configuration, and clicking Save will confirm the selection of either of those items.
Selecting the Custom option presents a further Edit Menu window:
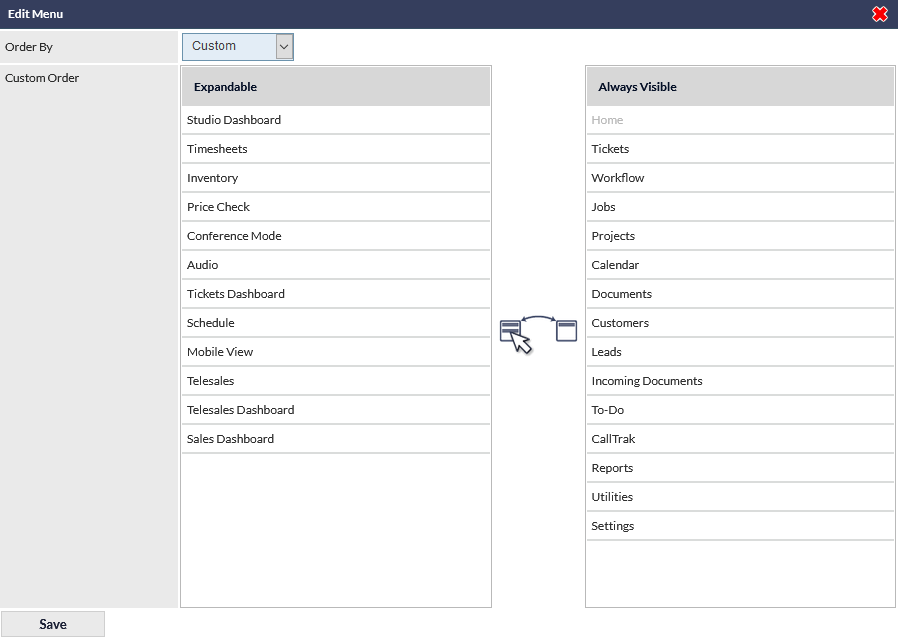 The above window enables the user to select the order in which menu items appear (by dragging them up and down the Always Visible list), and to select which items are held in the expandable area (by dragging them from the Always Visible list, into the Expandable list).
For further information about the menu customisation features, refer to the Main Menu article in the Support Centre.
Summary Panels
In addition to the existing customisation features of the Summary Panels (i.e. expanding, collapsing, location of each panel), additional customisation is now available.
To access the Summary Panel options, click the Settings link, rightmost in the newly-added Summaries section header on the CommTrak Home Screen:
The Edit Summary Settings pop-out window is displayed:
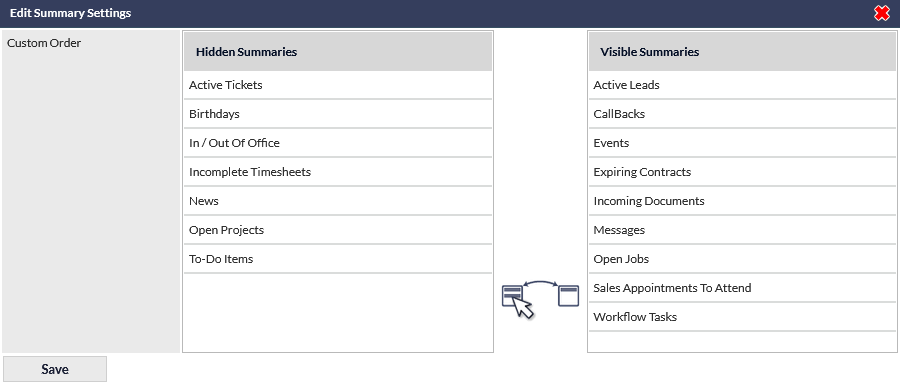
Drag items from the Visible Summaries list, into the Hidden Summaries list, to hide them on the Home Screen.
The position of panels in the Summaries area cannot be modified in the Edit Summary Settings window; to change the position of panels, reposition them by dragging-and-dropping, using the move (compass-points) icon when viewing the panels on the Home Screen.
Hidden Summaries are accessible in the Other Summaries panel, which is always displayed greyed and collapsed, bottom-right in the Summaries section:
 Clicking the expand (arrow) icon, in the greyed Other Summaries panel-heading, displays all the hidden Summaries below the Other Summaries heading:
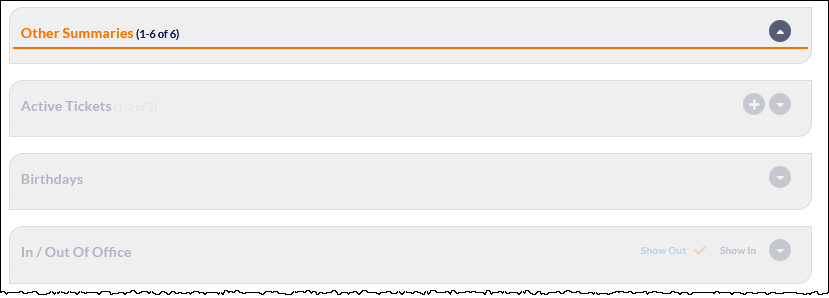 Panels in the expanded Other Summaries area are initially displayed greyed and collapsed; clicking the expand icon for a panel displays the details.
Click the collapse icon in the Other Summaries panel-heading to hide the panels again. Refreshing the Home Screen also hides the panels in the Other Summaries area.
For further information about the Summaries customisation features, refer to the Summary Panels article in the Support Centre.
Search Dashboard
A reminder that the Search Dashboard is customisable by each user:
 Clicking the Settings link, in the Search Dashboard section header (visible in the previous image), displays the Edit Search Settings pop-out window.
See Support Centre article Search Dashboard, for further details about this feature.
Customer Screen Customisation & Updates
There are several updates relating to the CommTrak Customer Screen.
Pinned Customer Tabs
The module tabs at the top of the Customer Screen are now pinned, so they are always visible when scrolling down the Customer Screen:

Customisable Customer Tabs
The order and visibility of customer tabs can now be customised by each user.
There are three options for customisation of the tabs:
- Alphabetically
- Custom order and visibility of each tab
- Most Used (dynamic)
In all cases, the Main Info tab is pinned leftmost of the tabs.
Alphabetically
Tabs are displayed in alphabetical order.
Custom Order and Visibility
Users can specify the order of tabs, and whether each tab is always visible, or displayed in the expandable area.
If there are tabs in the expandable area, they can be made visible by clicking the expand (chevron) icon, that is displayed as the penultimate tab (visible in the following screenshot):
 When the icon is clicked, all hidden tabs are displayed and can be selected. When the screen is refreshed (e.g. after saving, or clicking a tab), the selected page is displayed, and the tabs in the expandable area are hidden.
If there are active items in any module for which the tab is hidden (for example, if the Projects tab is hidden, and there are active projects for the customer), the expand (chevron) icon is displayed with an orange background (visible in the previous image).
Most Used
CommTrak will adjust the position of each tab according to frequency of usage; the most-frequently used tabs are moved towards the left of the screen.
Accessing and Using the Tab Display Options
To customise the tabs, click the edit (pencil) icon, which is always displayed as the last tab item:

The Edit Tabs pop-out window is displayed:

The Alphabetically and Most Used options do not require further configuration, and clicking Save will confirm the selection of either of those items.
Selecting the Custom option presents a further Edit Tabs pop-out window:
 The order of tabs that are Always Visible can be specified by dragging-and-dropping the items in the corresponding list, and items can be placed in the expandable section by dragging-and-dropping from the Always Visible list into the Expandable list.
The order of the items in the Expandable and Always Visible lists is reflected in the order in which the tabs are displayed at the top of the Customer Screen.
Customer Tabs on Mobile Devices
If using a mobile device, hidden customer tabs can be displayed by pressing the hamburger (three lines) icon which is displayed rightmost of the visible tabs:
 The hidden tabs are displayed immediately:
 Pressing the close (X) icon (visible in the previous screenshot), or refreshing the screen, hides the displayed tabs.
Pinned Customer Special Comments
If comments have been entered into the Special Comments field for a customer, the Special Comments banner is now pinned, so it is always visible when scrolling down the customer screen:
 If the text of the Special Comments field contains two or more lines of text, the second line is displayed as faded text (as visible in the above screenshot). Clicking the banner expands it to display all the Special Comments text:
 Clicking an expanded Special Comments banner will collapse it, or, if the screen is refreshed (e.g. after saving), the banner is automatically collapsed.
Customer Groups Updates
The existing Customer Groups feature has received extensive updates, with several new features added, and also a utility to assist with merging duplicate Head Office contacts for Customers within a group.
Please refer to the main Customer Groups article in the Support Centre, for comprehensive information about all Customer Group features; the following refers to updates only.
The Customer Group updates include:
- The ability to select Head Office contacts on any CommTrak screen where a customer contact can normally be selected
- Head Office contacts are displayed on the Contacts tab for each company in a Customer Group
- Head Office contacts are displayed in the Contacts Summary section on the main Customer Screen
- Head Office contacts can access any of their Customer Group's sites in the Customer Portal
- A utility to merge contacts from non-Head Office sites with Head Office contacts, based on matching email address
Selection of Head Office Contacts
There are many screens in which a contact can be selected; for example:
- Sales Contact (Customer Screen)
- Leads Contacts (Leads Screen)
- Email recipients (Customer Notes, Job Notes, Workflow Milestone emails, etc.)
- Ticket Contact (Tickets)
Previously, when selecting a contact in any of the above scenarios, a list of the Customer's contacts was presented. It is now possible to select a Head Office contact from these contact lists.
For example:
When selecting a Sales Contact on a Customer record, rather than only being able to select a Customer Contact, a Head Office contact can be selected:

When specifying email recipients, in addition to being able to specify Customer Contacts and (your) Staff members as recipients, contacts from the Customer's designated Head Office can also be specified as recipients:

Head Office Contacts in Customer Contacts Tab
When viewing a Customer's Contacts tab, the Head Office contacts are also listed:

Head Office Contacts in Customer Screen Contacts Summary
The Customer record Contacts Summary section displays Head Office contacts:

A Head Office contact can only be edited within the Customer record in which it was created, and not from within other Customer records in the same group.
Head Office Contacts Access in the Customer Portal
When provided with access to the Customer Portal, a Head Office contact can access the Customer Portal details for their own Customer record, and for other Customer records within their Customer Group:

Head Office contacts can also create Tickets, for Customers in their Group, with a Head Office contact as the designated Ticket contact.
Merging Duplicate Contacts in Customer Groups
Merging duplicate contacts cannot be reversed; the duplicate contacts across all Customer records in the same Customer Group will be deleted when merged.
Prior to these new Head Office contact features being available, it was typical for users to create multiple entries for the same contact (i.e. the same Head Office contact being added to each Customer within a Group), as this was the only way to enable selection of a Head Office contact's name within another Customer in the same group.
Having duplicate contacts within CommTrak causes various issues, including:
- Being difficult to manage; each duplicate entry needs to be manually updated if the contact's information changes, or requires archiving
- Access to the Customer Portal requires the user to have an email address that is unique across your CommTrak
To assist in resolving these issues, there is now a duplicate-contact merging feature for contacts in Customer Groups. When viewing the Contacts tab for a Customer that is in a Customer Group, in addition to the standard Contact features, the Merge duplicate contacts section is displayed:

The contact merging options differ depending upon whether the Head Office, or another Customer Group member is being viewed; before using this feature, please refer to the Merging Duplicate Head Office Contacts section of the Customer Groups article in the Support Centre.
Job Screen Pinned Buttons
The buttons section on the Job screen has been pinned to the bottom of the screen, so it is always visible when scrolling:

Customer Merge
Merging of Customer records cannot be reversed; there is no undo option! Please ensure that you have read and understood all related documentation before accessing this utility.
There is comprehensive documentation for the Customer merging utilities; please see the Support Centre article, Merge Customers. We strongly advise reading all the documentation before merging Customer records, and to ensure that you are aware of and understand the ramifications of merging Customer records.
There are now two utilities available to assist you with merging Customer records:
- Manually merge customer records (original method)
- Merge multiple customers (new feature)
To access the Customer merging features, select Utilities on the CommTrak Main Menu, and choose the Merge Customers option. The Merge Customers screen is displayed:

The manual merge feature is presented in the top section of the screen, and the options and functionality remain unchanged.
The multiple merge feature requires the Admin Password to be entered (highlighted in the above image), after which, the multiple merge features become available.
Customer Merge Feature Moved to Utilities Menu
The existing Merge Customer Records feature has been moved to the Merge Customers section in Utilities (located in the CommTrak Main Menu), and has been renamed to Manually merge customer records. The functionality of this method of merging Customer records remains unchanged.
This feature is for merging two separate Customer records into a single Customer Record; after the merge has been confirmed, one of the records will be deleted, and only one will remain.
Merge Multiple Customers Utility
This feature enables the merging of multiple Customer records into a single Customer Record.
The CommTrak Administrator password is required to access this feature. When entered, the Merge multiple customers list is displayed:
 Customer records with similar names are presented as a collection; for example, in the above screenshot, the Customer records for Architects, and Architects Pty Ltd (x2) are presented as a collection of three records. Within each collection of matching Customers, one of the records is suggested as the record to keep (highlighted green), and the other matching records are suggested to merge (highlighted red).
The Company Name, Customer ID (CR number), Suburb, Sales Rep and Partition (if enabled on your CommTrak) are displayed for each Customer record; clicking on the Company Name or Customer ID opens a new browser tab displaying the Customer Record, so the details can be checked.
Usage Scores
For each record, a Usage Score is displayed; this is intended to provide an indication of the relative use of this record, which may assist in identifying which record to keep, and which to merge. Hovering the mouse over the information (i) icon presents a pop-up containing more details about the score.
A usage score is an arbitrary measure of the activity for a Customer Record (e.g. number of Contacts, Leads, Documents, etc.) and should only be used as a guide. Do not assume that the usage score is a guarantee of the accuracy of data within a Customer Record; it is recommended that each record should be viewed and assessed prior to merging.
Selecting Which Records to Merge/Keep
Each record in a collection can be allocated to Merge or Keep; only one record in a collection can be allocated to Keep. When a record is allocated to Keep, all other records in that collection will automatically be allocated to merge into the kept record. The Merge box adjacent to any Customer Record can be unticked if the record is to be maintained as a separate Customer Record.
Override (Merging a Single Collection)
To merge a single collection (e.g. to merge only the Architects collection shown in the previous screenshot), click the Override icon for that collection. Upon clicking OK in the confirmation dialogue box, the records in that collection will be merged immediately and irrevocably according to the Merge/Keep selections for each record in that collection.
Bulk Merge
To prevent the merging of a collection, untick the Action checkbox for that collection (visible in the first column of the previous screenshot).
Clicking the Merge button prompts for confirmation, then immediately and irrevocably merges all selected records according to the Keep/Merge and Action selections.
Customer Import
Bulk Customer / Lead Import Utility has been Updated
Following the introduction of the Customer Import feature in March 2021, we have made some updates to this utility.
Notification Banner
When selecting the Customer Import option in the Utilities menu, a pop-up window is displayed, requesting confirmation to proceed. The pop-up window contains key information and tips about using the utility, and provides links to the relevant Support Centre documentation.
Customer Groups
Imported Customer records can now automatically be added to a Customer Group during import. The name of the group must be entered into the Customer Group column of the CSV, and the group name must be created in CommTrak prior to importing. (Settings > Customer Settings > Customer Groups).
Import Comment
An Import Comment field has been added to the import utility.
Before uploading Customer records, a comment must be provided; this will be displayed in the Previous Imports list.
Status Column
In the Previous Imports list, the Status column now displays the name of the staff member who instigated a rollback.
Feature Reminders
Rollback
After importing Customers, there is a one hour period during which you can instigate a 'rollback' on the batch of records, which will remove all the Customer records in that batch (including any manual updates that were made to the records during that hour). After one hour, imported Customer records cannot be deleted.
Leads Import
Leads can be imported using the Customer Import utility. Leads must be identified as such, as advised in the Customer / Leads Import article in the Support Centre.
Telesales Import
The Customer Import utility is intended for the batch import of Customers (organisations to which you have sold a product or service) and Leads (organisations with a current lead relationship). Please consider using the Telesales module import features for other company record imports. Please refer to the Telesales documentation in the Support Centre for further information, or contact CommTrak Support for advice.
Customer Portal Settings
Following the recent extensive enhancements to the Customer Portal, there is now a dedicated section in CommTrak Settings: Settings > Portal Settings.
Whilst the default behaviour of all Customer Portal-related settings remains unchanged, significant enhancements have been introduced to the way in which Data Sheet templates are allocated to Customers within the Portal, and also to the way in which Customers are associated with the Tickets-From-Emails accounts.
The updates to the Portal Settings are detailed below:
Customer Portal Modules Settings Have Moved
The Portal Modules settings (determining which modules can be accessed in the Portal) are now located in Settings > Portal Settings > Portal Modules
See Support Centre article Portal Modules (Settings) for further information.
Customer Portal Data Sheet Template Settings Enhanced & Moved
The Portal Data Sheet Templates settings (formerly accessed by clicking the Manage Portal Templates button in the Customer's Data tab), has been enhanced and moved to the Portal Settings:
Settings > Portal Settings > Portal Data Sheet Templates
In addition to being able to allocate Data Sheet templates to specific Customers, a template can now be allocated to a single Customer Group. This enhancement ensures that, where appropriate, all contacts for a Customer within a Customer Group can access the required Data Sheet template. A Data Sheet template can be allocated to multiple (unrelated) Customers, but only to a single Customer Group.
See Support Centre article Portal Data Sheet Templates (Settings) for further information.
Customer Portal Ticket Email Accounts Settings
When adding a Data Sheet within the Customer Portal, a contact is required to select the Data Sheet template, then select a Tickets-From-Emails account with which the Data Sheet will be associated.
The new Portal Ticket Email Accounts settings have been implemented to allow for the allocation of Tickets-From-Emails accounts to specific Customers, or to a single Customer Group:
Settings > Portal Settings > Portal Ticket Email Accounts
By default, all previously-configured and newly-created Tickets-From-Emails accounts remain visible to all Customers in the Data module of the Customer Portal; this ensures backwards-compatibility with the Portal configuration prior to the implementation of the new settings. If a Tickets-From-Emails account has been created for a specific Customer or Customer Group, it should be assigned to that Customer or Customer Group to ensure that other Customers cannot select it in the Portal.
A Tickets-From-Emails account can be allocated to multiple (unrelated) Customers, but only to a single Customer Group.
See Support Centre article Portal Ticket Email Accounts (Settings) for further information.