
Active Tickets Screen
The Active Tickets screen displays a list of active Tickets that can be sorted and filtered for selection or reassignment and is accessed via the Tickets option in the CommTrak Main Menu.
An active Ticket is a Ticket that has been created, but not closed, cancelled, or placed on hold.
This article contains the following sections:
New Ticket
Press the New Ticket button to create a new Ticket.
See article section Ticket Creation by CommTrak User for information relating to the creation of a new Ticket.
Tickets Search
The criteria fields in this section are used to filter the Active Tickets list that is displayed at the bottom of the screen.

The available search fields are:
Allocation
Click the dropdown list to filter the Active Tickets list, based on one of the following criteria (and subject to any other selected criteria):
- My Scope - all active Tickets allocated to the currently-signed-in user, or to a department of which they are a member
- Show All (default)- all active Tickets
- Created by me - only active Tickets created by the currently-signed-in user
- Allocated to me - only active Tickets allocated to the currently-signed-in user
Department/Staff
By default all Tickets (subject to other selected criteria) are listed. The Active Tickets list can be further filtered by ticking the box adjacent to one or more department or staff names.
Ticket Statuses
Ticking one or more Ticket Statuses in this field will filter the list to display only matching Tickets.
If no Ticket statuses are selected, all active Ticket statuses will be displayed.
Ticket Types
Ticking one or more Ticket Types in this field will filter the list to display only matching Tickets.
If no Ticket types are selected, all Ticket types will be displayed.
Ticket Subtypes
Ticket Types can be further filtered by Ticket Subtype. Adjacent to each Ticket Type filter, is a Ticket Subtype filter icon:

To filter the Active Tickets list by Ticket SubType, tick the box adjacent to the Ticket Type and press the filter icon (visible in the rightmost column in the previous image).
The Subtype filter list is displayed:

Pressing the Find button will update the Active Tickets list accordingly.
To clear Ticket Subtype filters, you must either:
- Untick unrequired subtypes
or
- Clear all subtypes for the current Ticket Type by pressing the white reset icon (visible in the previous image) at the top of the Filtered Ticket Subtypes filter.
Press the Find button to update the filters.
Added Between
Specify a start and end date-range using the calendar icons.
The Active Tickets list will be filtered to include only Tickets created within the specified date-range.
Deadline
Specify a start and end date-range using the calendar icons.
The Active Tickets list will be filtered to include only Tickets with a deadline in the specified date-range.
Ticket Priority
Select a Ticket priority from the dropdown list.
The default selection Any, displays Tickets of all priorities.
Search Criteria (1-5)
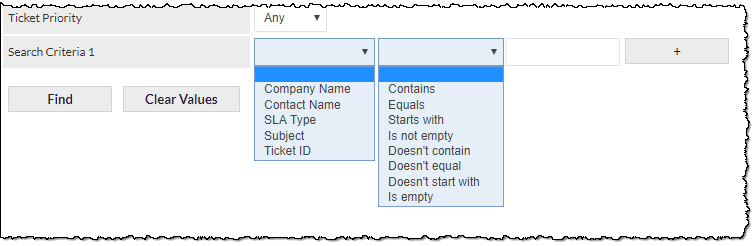
Select one of the following criteria from the first dropdown list:
- Company Name
- Contact Name
- SLA Type
- Subject
- Ticket ID
- Custom fields (if any)
Select one of the matching criteria from the second dropdown list:
- Contains
- Equals
- Starts with
- Is not empty
- Doesn't contain
- Doesn't equal
- Doesn't start with
- Is empty
In the text field, enter the text to match.
By default, only one criteria line is displayed. To display additional criteria lines (up to 5), click , and to remove a criteria line, click .
Once applied, all Ticket filters are 'remembered' and will continue to be applied upon returning to the screen at a later time. Be sure to remove filters that are no longer required!
Action Buttons
activates the search based on the specified criteria, and updates the Active Tickets list.
removes all search criteria and updates the Active Tickets list.
In addition to clearing all search fields, pressing the Clear Values button sets the Allocation field to the My Scope.
The search criteria are remembered (i.e. when leaving and returning to the Active Tickets screen).
Tickets Reassignment
This feature is permissions-based, and is not visible to all CommTrak users.
The available bulk-reassignments are:
- Department/Staff
- Ticket Type
- Ticket Status

Bulk-reassignment is irreversible! Please ensure that you have selected the correct Tickets and criteria prior to reassigning, as this feature cannot be undone. Please refer to the article Bulk Selection of Records prior to using the bulk-reassignment features, to ensure that you have a full understanding of the bulk-selection options.
To bulk-reassign Tickets, the following steps are required:
- In the Active Tickets list, select the Tickets to reassign, either singly (by ticking the box next to a Ticket), or select all Tickets currently displayed on-screen by ticking the box at the top of the selection column.
- Select the reassignment (either Department/Staff or Ticket Type or Ticket Status) from the dropdown list.
- Click Reassign next to the reassigned criteria.
Tickets can only be reassigned to either Department/Staff or Ticket Type or Ticket Status per reassignment; multiple reassignments can not be made simultaneously.
Active Tickets
This section lists Active Tickets based upon the filters (if any) that have been applied in the Ticket Search section.
Clicking the more info (i) icon, located at the left of each Ticket row, displays additional information about the Ticket in an expanding area. See the Column Sorting & Customisation article for more information.
Each row in the Active Tickets list relates to a single active Ticket. Colour coding and other visual features are used to provide visual cues to the user as to the status of the Ticket.
Clicking any Ticket item in the Active Tickets list will open the Ticket in a separate pop-up browser window or browser tab.
New Ticket Section
- New Ticket - creates a new Ticket.
Please see the section Ticket Creation by CommTrak User, below, for information relating to the creation of a new Ticket.
Tickets Search Section
The fields in this section are used to search and filter the Active Tickets list.
Please see the above section, Active Tickets Screen, Tickets Search, for further details relating to this feature.
In the Customer Tickets Screen, the Find feature filters both the Active Tickets list and the Previous Tickets list (see the sections immediately below for further information relating to these lists).
Active Tickets Section
This section lists Active Tickets based upon the filters or searches (if any) that have been applied in the Ticket Search section.
Each row in the Active Tickets list relates to a single active Ticket. Colour coding and other visual features are used to provide visual cues to the user as to the status of the Ticket. Please see the Active Ticket List Features section, below, for further details.
Clicking the more info (i) icon located at the left of each Ticket row displays additional information about the Ticket in an expanding area.
Clicking any Ticket item in the Active Tickets list will open the Ticket in a separate pop-up browser window or browser tab.
Active Ticket List Features
The Active Tickets list has several features to assist in the management of Tickets:
Ticket Currently Being Viewed
When another staff member is currently viewing a Ticket, an eyeball icon is displayed in the information column (as highlighted in the following image):

Hovering the mouse cursor over the icon displays a tooltip (not shown in the previous image) advising the staff name, the date and time at which the Ticket was opened for viewing.
When the other user is no longer viewing the Ticket, the eyeball icon is removed (next time the Active Tickets screen is refreshed).
Occasionally, the eyeball icon can remain on view, even when another user is no longer actively viewing the Ticket. This can occur, for example, if the other user's browser does not correctly close the window or tab of the Ticket that is being viewed. In these cases, the Ticket can be manually 'released' (i.e. marked as no longer being viewed) by viewing the Ticket and clicking the Release option when prompted.
In any case, a Ticket is always marked as no longer being viewed 48 hours after it was opened for viewing. This prevents cases where the eyeball icon would otherwise be displayed indefinitely.
Please refer to article Creating / Modifying a Ticket, section Currently Opened Tickets, for additional information about this feature.
Unread Tickets
Tickets that have not been viewed by the currently logged-in user, are displayed in bold text. Once viewed, the information text for the Ticket is no longer emboldened.
If the currently logged-in user wishes to revert the Ticket to being unread, this can be achieved by viewing the Ticket and pressing ; the pop-up Ticket window or browser tab will immediately close, and the Ticket information in the Active Tickets list will be displayed in bold text.
Note: The read/unread Ticket feature only relates to the currently logged-in user; i.e. each CommTrak user's read/unread status for each Ticket is registered separately.
Note: Marking a Ticket as unread does not affect the Seen By count or history; please see the section, Viewing or Updating a Ticket, Ticket Details Section, Seen By, for further information.
Overdue Tickets
When a deadline has been specified for a Ticket and the deadline has been breached, the Ticket information will be displayed in red text.
Last Action By
If the previous Ticket note (if any) was created by a CommTrak user, the name of the Department/Staff will be displayed in green text, indicating that an action has occurred on the Ticket.
If a customer subsequently replies to a Ticket, the customer contact's name will appear in green text, and the Department/Staff name will revert to a colour other than green.
The Department/Staff name and the Contact name will each toggle between being green as the communication between the two parties progresses.
This feature can act as a guide to the currently logged-in user, in identifying who is required to carry out the next action relating to a Ticket. For example, if a user has added a Ticket note that emails a customer, the Department/Staff name will be displayed in green, thus indicating that a response may be required from the customer. When the customer replies to the Ticket email, the Contact name will be displayed in green, thus indicating that the Department/Staff is required to respond.
Note: Please be aware that the green colour coding is intended to be a guide only; it is not guaranteed that the Department/Staff name appearing in green text can wait until the customer has responded, as other actions which do not rely on a response from the customer may be needed to resolve the Ticket.