What's New April 2020
Video presentations of all the new features in the April 2020 release are now available.
Workflows
Bulk Selection of Records
Reports
- Projects Reports - Current Project Status Criterion NEW
- Projects Reports - Project Classification Additional Field REMINDER
- Leads Reports - Forecast Date Additional Field NEW
Tickets
Customer Screen
Customer & Lead Screens
- Postcode Finder NEW
General
Workflows
Workflow Load Management
Workflow Load Management consists of two main aspects:
- Reviewing staff workload for Workflow Tasks
- Bulk-reassigning Workflow Tasks to another staff member
Accessing Workflow Load Management Features
CommTrak users with the required permissions can access the Workflow Load section at the top of the Active Workflows screen (shown collapsed in the following image):
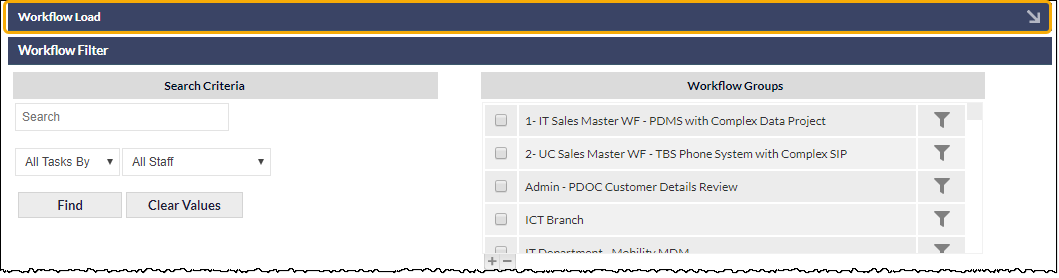
The Workflow Load section is collapsed by default, and will always display as collapsed when entering the Active Workflows screen. This behaviour is intentional, as the Workflow Load features utilise significant system resources, and are only intended for periodic use.
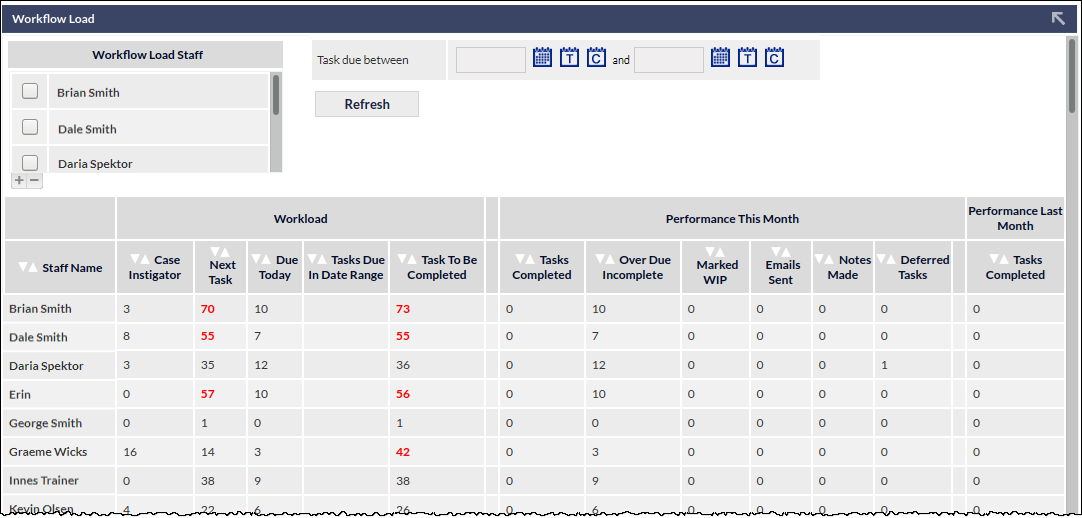
Expanding the Workflow Load section (by clicking the arrow at the right-side of the section header) displays the Workflow Load features:
Workflow Load Filters
The following filters are available for the Workflow Load list:
- Workflow Load Staff - filter the Workflow Load list to display only selected staff members
- Task due between - filter the Workflow Load list to display only Workflow Tasks due within the specified range
After making changes to either of the above filters, click to update the Workflow Load list.
The Workflow Load Staff filter is remembered between sessions; i.e. the user can leave the Active Workflow screen and, upon returning to the screen, the previous filters will be in place.
The Task due date filter is always cleared upon leaving the Active Workflow screen.
Workflow Load Limits
Workflow Loads that exceed a predefined limit are displayed in red text. For example, in the previous image, the Next Task count for Brian, Dale and Erin are displayed in red text, indicating that each of them has too many tasks allocated to them that are their Next Task in a Workflow Case.
Workflow Limits can be defined for the following Task counts:
- Next Task
- Due Today
- Total Tasks
Workflow Limit Settings
The settings for defining over-limit counts in Workflow Load Management are configured in:
Settings > Workflow Settings > Miscellaneous
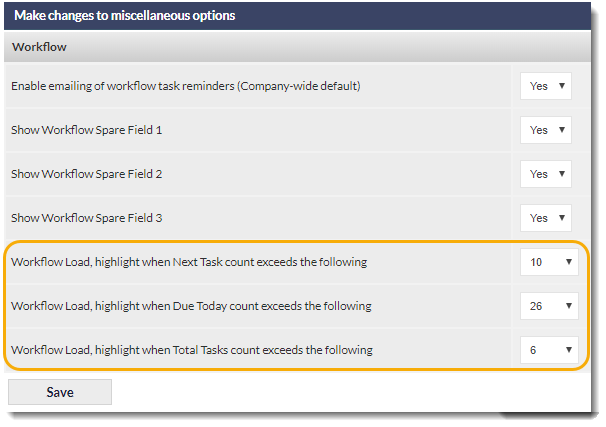
The drop-down list for each of the above highlighted settings allows for the selection of 1 through to 100, 200, 300, 500 and 1000 items.
Bulk-Reassigning Due Workflow Tasks
When viewing the Workflow Load list, clicking on the name of a staff member will present a pop-out window containing a list of all their due Workflow Tasks:
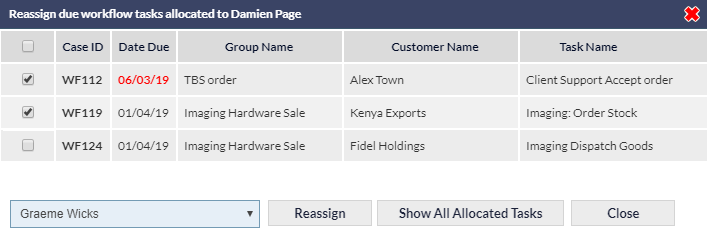
All allocated tasks for the currently-selected user can be displayed by clicking the Show All Allocated Tasks button (shown in the above image).
Overdue items are displayed in red text.
Tasks for reassignment can be selected by ticking the box in the left-most column of the relevant case row or, all Tasks assigned to the selected staff member can be selected by ticking the box in the left-most column header. The staff member to whom the task(s) will be reallocated should then be selected from the drop-down list at the bottom of the pop-out window; clicking the Reassign button will complete the process immediately.
Bulk reassigning Workflow Tasks cannot be reversed, and no further confirmation is requested after clicking the Reassign button.
Bulk reassignment is only available to users with appropriate permissions, as detailed below.
Workflow Load Management Permissions
To access Workflow Load, and Bulk Reassign Workflow Tasks, the user must have the appropriate permission, as shown in the following image:

The Allow users to manage staff workflow load (bulk task reassignment) is assigned to Supervisors by default, but can be assigned to Custom Roles as required.
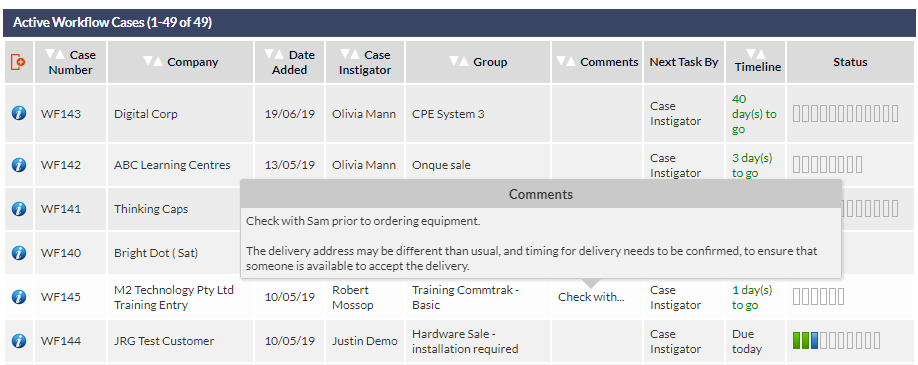
Workflow Comments Displayed in Tooltip
When viewing the Active Workflows Screen, the full text of the Comments field for a specific Workflow Case can be viewed in a tooltip window.
As shown in the following screenshot, the ellipsis displayed after the Comments text indicates that additional comments are available, and will be displayed when the mouse is hovered over the truncated comments text.
Bulk Selection of Records
Bulk-Selection of Records in Customer, Leads, Telesales & Tickets Screens
The bulk-selection of records has now been enhanced to enable selection of either:
- only records visible on the current page
or
- all records that match the current filter
Previously, bulk-selection of records was possible, but only applied to selected, visible items on the current page, up to a maximum 100 records, based on the per page option (at the bottom of the screen).
Bulk-selection of records is based on existing permissions for modifying and deleting records. i.e. If a user has permission to modify or delete single records, then they also have permission to bulk reassign and delete records.
This feature applies to the following screens:
- Customers
- Leads
- Telesales
- Tickets
Bulk-Selection of Records
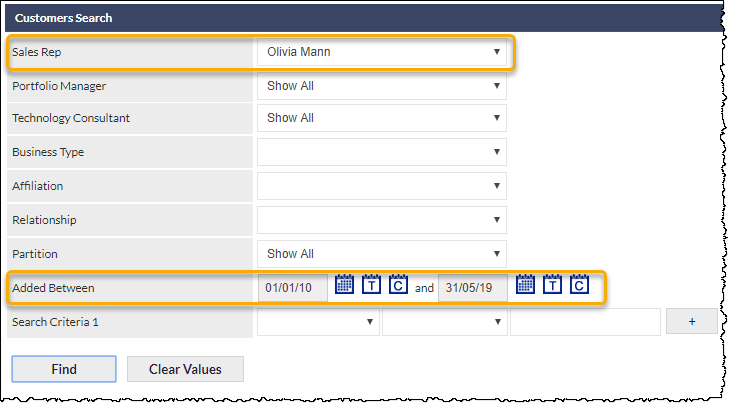
Specify the Required Search Filter
Prior to bulk-selecting records, it's important to ensure that you have specified appropriate search filters for your requirements. For example, on the Customers screen, you may wish to filter records that were added during a certain date range and are allocated to a specific Sales Rep:
An example of results using the above filter is shown in the following image:
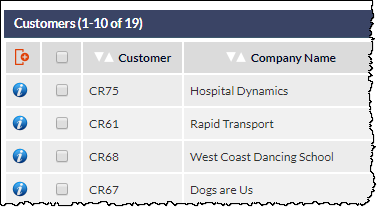
They key points to note about the above screenshot are:
- There are 19 Customer records that match the specified filter
- The first 10 of the 19 records are being displayed
This information can be ascertained from the text in the search results section header: Customers (1-10 of 19)
Perform the Bulk-Selection
To bulk-select records, click the select all box in the column header:

The bulk-selection options will be displayed in a pop-up window:
The following options are available:
- Select all on this page
- Select all filtered (record count)
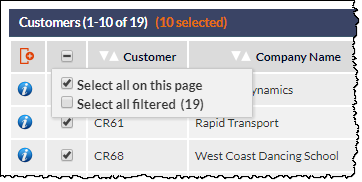
Select all on this page
Selecting this option will automatically tick the selection box adjacent to every record visible on the current page. In the screenshot above, 10 records would be selected (as identified in the blue section header). The number of records displayed per page is determined by the per page option at the bottom of the screen (maximum of 100 per page):

When Select all on this page option is ticked, the following will occur:
- All records visible on the current page will be ticked
- The select all tick-box in the column-header will change to indicate partial selection (a dash in the tick-box)
- The number of records selected will be shown in orange text, in the section header
The above three points can be been seen in the following image:
Any subsequent actions, such as reassignment or deletion, will only apply to the ticked records visible on the current page. These actions cannot be reversed.
When the Select all on this page option has been selected, individual records on the current page can be unticked, if required. The orange text indicating the number of selected records will be updated accordingly.
To deselect all selected records on the current page, click the Find button in the Search section; this will refresh the screen, and cancel all current selections.
Select all filtered
Selecting this option will automatically select all records resulting from the currently applied filter. In the screenshot above, 19 records would be selected.
The following confirmation message will be displayed when Select all filtered is selected:
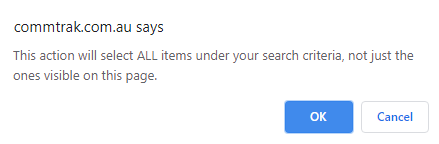
Clicking Cancel will hide the confirmation message, enabling you to choose the required selection option.
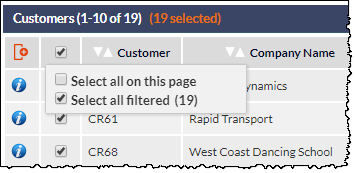
Clicking OK will confirm your selection, and the following will occur:
- All records matching the current filter will be ticked
- The select all tick-box in the column-header will change to a tick, to indicate selection of all filtered records
- The number of records selected will be shown in orange text, in the section header
The above three points can be been seen in the following image:
When the Select all on this page option has been selected, individual records on the current page can be unticked, but this will change the selection to only apply to ticked records visible on the current page; in other words, the bulk selection of all records matching the current filter will be cancelled. The orange text indicating the number of selected records will be updated accordingly.
To deselect all records matching the current search filter, click the Find button in the Search section; this will refresh the screen, and cancel all current selections.
Any subsequent actions, such as reassignment or deletion, will apply to all records matching the current filter. These actions cannot be reversed.
Performing a Bulk Action (such as Reassignment / Deletion)
After bulk-selecting records, a reassignment / deletion can be performed in the Reassignment section of the screen; select the required action (e.g. reassignment to a different salesperson), and click the adjacent Reassign button.
If only visible records on the current page have been selected, no further confirmation is requested, and the reassignment / deletion will occur immediately. These actions cannot be reversed.
If bulk-selection of all filtered records has been selected, a pop-up window will prompt for confirmation and, if confirmed, the reassignment / deletion will occur immediately.
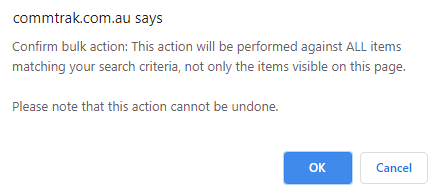
If the Cancel button is clicked, the action will not occur, and the current record selection will be retained, as identified by the orange records selected text in the results section header.
Bulk reassignment / deletion cannot be reversed; it is vital that you double-check your selection prior to confirming reassignment of all filtered records.
Reports
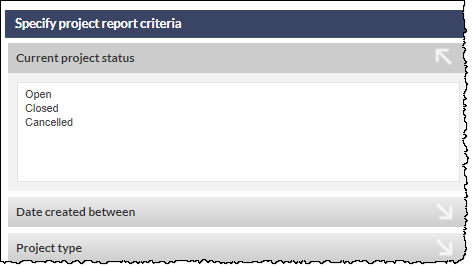
Projects Report - Current Project Status Criterion
A Current project status criterion has been provided to enable Projects Reports to be filtered based on the current status of Projects:
Projects Report - Project Classification Additional Field
We announced Projects Reports, and the Project Classification field in the What's New February 2020 article, but we wanted to remind you about the ability to include the Project Classification field in a Project report:
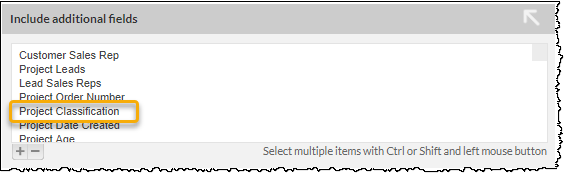
To include the Project Classification field in a Projects Report, expand the Include additional fields section, and select the required field (and other additional fields as required).
Leads Reports - Forecast Date Additional Field
Forecast Date is now available in the Include additional field section of the Leads Reports:
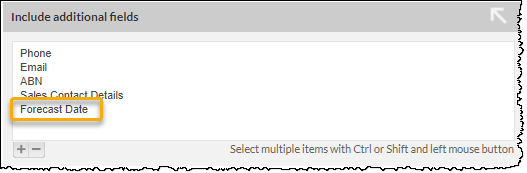
This provides for reporting on the Forecast Date of closed Leads, which was not previously possible.
Tickets
Include Email History 'Memory'
When adding a New Note to a Ticket, if you select Email Customer, the previous selection of the Include Email History option, for the current CommTrak user, is remembered:
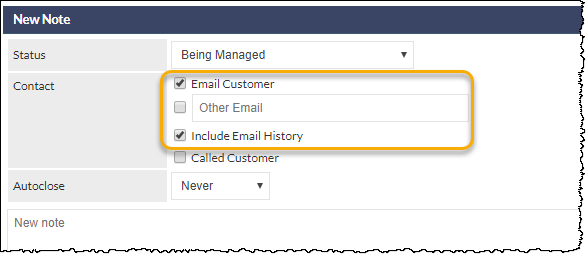
For example, if you tick Email Customer, and tick Include Email History, then the next time you tick Email Customer in any Ticket note, the Include Email History option will be ticked automatically (and vice versa).
See New Note section of the Creating / Modifying a Ticket article for further information about Ticket Note features.
Customer Screen
Folding Summary Sections
The following sections on the Customer Screen can now be folded (expanded and collapsed):
- Contacts Summary
- Inventory Summary

By default, the above summary sections are folded, but can be unfolded by clicking the arrow at the top-right of each section (highlighted in the above image).
CommTrak remembers each user's preference for each section; for example, if a user folds the Inventory Summary section, that section will remain folded on all Customer screens until unfolded again.
Customer & Lead Screens
Postcode Finder
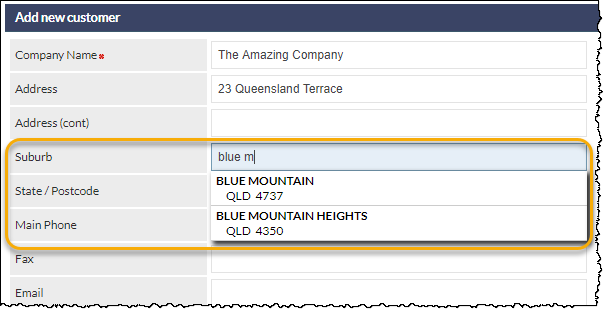
To improve speed and accuracy when entering Customer or Lead addresses, a Postcode Finder feature has been implemented.
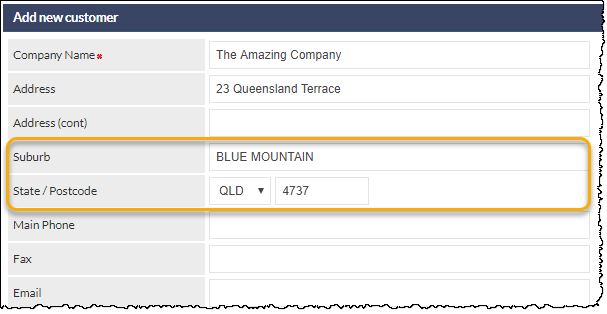
When text (minimum 3 characters) is entered into a Customer's Suburb field, CommTrak will automatically search the Australia Post postcode database for matches, which will be presented in a drop-down list. Clicking on an item in the list will complete the Suburb field, and will also automatically update the State and Postcode fields with the correct information, as shown in the following example screenshots.
Enter a partial Suburb name:
Click on the required Suburb to automatically complete the Suburb, State and Postcode fields:
General
List Record Counters
The record count has now been added to the section header of the record lists on the following screens:
- Leads
- Workflow
- Tickets
- Jobs
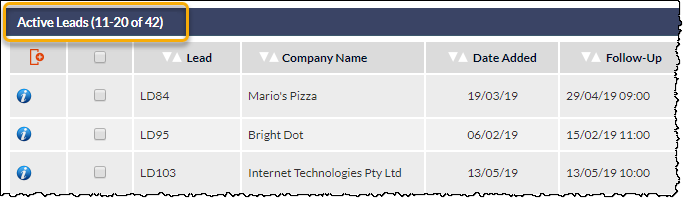
In the above example, taken from a Leads screen, there are total of 42 Leads that match the current search criteria, and the user has clicked the Next 10 Leads button (not visible in the above), to display the second page of Leads.
This feature was already available on the Customers, Telesales and Reports screens, and has been extended to the above screens for consistency.
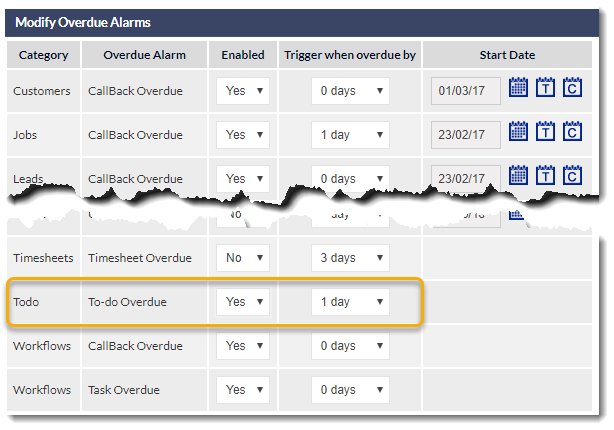
Overdue To-Do Alarms
Overdue Alarms are now available for To-Do items:
Overdue Alarms are a global setting; they are either on for all users, or off for all users. Please see the following articles for further information relating to Overdue Alarms:
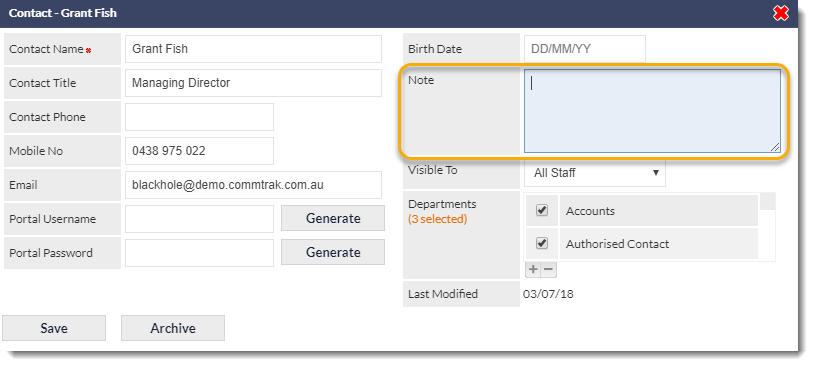
Multi-line Notes for Contacts
The Note field for Contacts has been changed to a multi-line field (previously a single text line), to enable entry of more detailed information.