
What's New May 2024
Data Sheets
- Field Groups - new feature
Leads
- Multiple Workflow Instigation within a Lead - enhancement
Workflows
- Datasheets in Workflows - enhancement
- Customer Contact Details Available in the Workflow Case Screen - enhancement
Tickets
- Active Tickets Screen - Filtering Subtype - enhancement
Reports
- Additional Report Criterion (Date Range > Yesterday) - enhancement
Data Sheets
Field Groups
The field groups feature provides two significant enhancements to the configuration of Data Sheets:
- Creation and use of field groups that can be reused within any Data Sheet
- The ability to duplicate a field group whilst completing a Data Sheet
A Field Group can consist of any number of fields. For example, a field group might pertain to a technician's site visit to repair equipment. The number of additional parts required cannot be known at the time the Data Sheet is designed, so an Additional Parts Field Group is created, allowing the technician to create as many entries as required:
Create a Field Group in the Data Sheet Settings
Settings > Data Sheets & CT-Sign Settings > Data Template Field Groups:

The field group in the previous image consists of three fields (Part Number, Quantity and Description).
Add the Field Group to a Data Sheet Template
Settings > Data Sheets & CT-Sign Settings > Data Templates > [Select or Add a Data Template]:
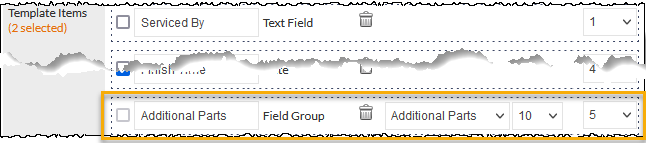
In the previous image, the Additional Parts field group has been specified in the same way that a standard field is specified. In this example, the dropdown field containing the number 10 represents the maximum number of times that the Field Group can be duplicated by the user of the data sheet.
Use the Data Sheet
When updating a Data Sheet, the Field Group is presented to the user with a heading identifying the group:

In the example shown in the previous image, the user can add more Additional Parts sections by pressing the plus (+) button. The following image shows the data sheet after the plus button has been pressed:

More groups can be added by the user, up to the limit specified in the Data Sheet template settings.
A Field Group can be removed by pressing the minus (-) icon (visible in the previous image).
For more information about Data Sheets and the Field Groups feature, refer to the following Support Centre articles:
Leads / Workflows
Multiple Workflow Instigation within a Lead
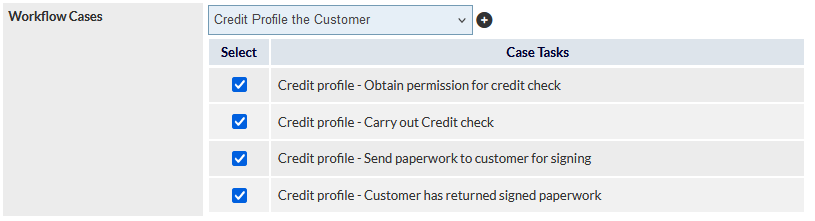
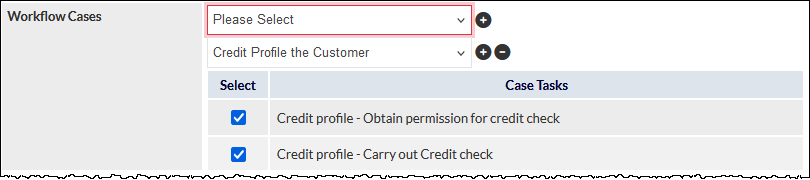
Multiple Workflow Cases can now be instigated from within a Lead. When a Lead is made successful, the Workflow Cases field is displayed:

Functionality for selecting a single Workflow Case remains unchanged; choose the required Workflow Group from the Workflow Cases dropdown list (visible in the previous image). The Case Tasks are displayed for review and can be unticked if required:
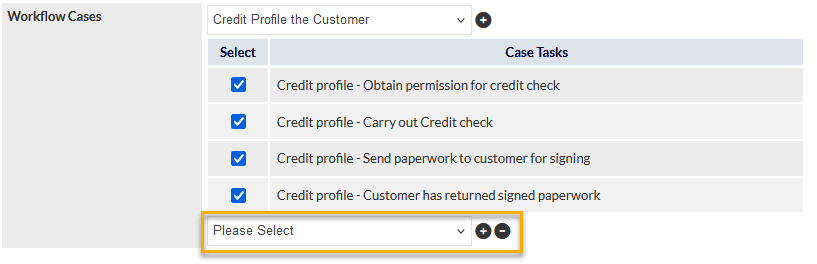
To add another Workflow Case to the Lead, press the plus (+) icon adjacent to the Workflow Group dropdown list (visible in the previous image). An additional Workflow Cases dropdown list is displayed below the Case Tasks for the first Workflow Case:
Choosing a Workflow Group from the second dropdown list will display the Case Tasks for that group:
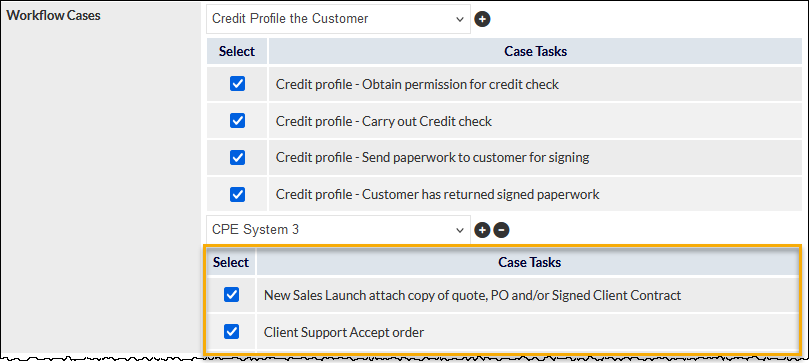
This process can be repeated to add further Workflow Cases to the Lead.
On a standard CommTrak installation, up to 5 Workflow Cases can be added to a single Lead at one time. Note that, once saved, further Workflow Cases can be added to the Lead using the same method.
When the Save button is pressed, all selected Workflow Cases are instigated immediately, and are shown in the Related To field within the Lead:

Only the first (topmost) Workflow Case is directly related to the Lead; additional Workflow Cases are related indirectly. For example, viewing the Related To field in WF202, shows that it is directly related to the Lead, because it was the topmost item in the Lead:

In this example, because WF203 is indirectly related, the Related To field within WF203 will not display a link to the Lead. However, in the Related Workflows field within WF203, it can be seen that WF202 is related, thus the current Workflow Case (WF203) must also be related to the Lead:

Unselected Workflow Case Items
When the Save button is pressed, unpopulated items will be removed, and only the populated Workflow Case(s) will be instigated.
Removing a Workflow Case Item
Prior to pressing the Save button, unneeded Workflow Case items can be removed by pressing the minus (-) button adjacent to the item to be removed (visible in the previous image).
Mandatory Workflow Field Considerations
If your CommTrak has been configured such that at least one Workflow Case selection is mandatory, the first Workflow Case must be specified. Failure to populate the first Workflow Case will result in a mandatory field warning.
In the following image, Workflow Case selection is mandatory, but the user has pressed the Save button without populating the first Workflow Case dropdown list:
In this example, if only one Workflow Case is required, the first dropdown list must be populated with the required Workflow Group and the second item (currently populated) must be deleted by pressing the minus (-) icon.
For additional information pertaining to customising Leads mandatory fields, refer to following Support Centre article:
More detailed information about the instigation of multiple Workflow Cases in a successful Lead can be found in the following Support Centre article:
Workflows
Data Sheets in Workflows
Data Sheets can now be directly added to a Workflow Case. The Data Sheets section is located immediately below the Case Tasks within a Workflow:
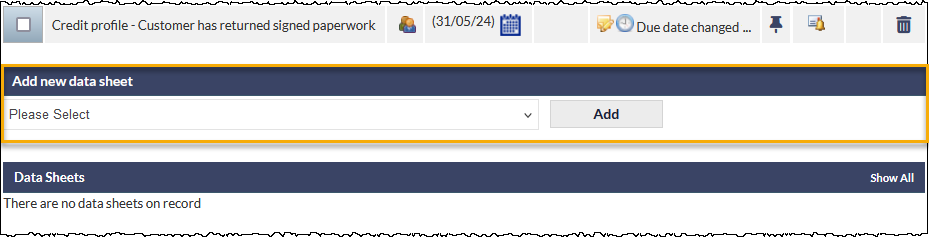
Select the required Data Sheet from the dropdown list, and press the Add button (visible in the previous image).
The selected data sheet will be presented on screen and can be modified as required, or saved as-is for later completion, by pressing the Add button in the data sheet.
Once added, the data sheet is added to the relevant data sheet folder (for example, System Info in the following image):
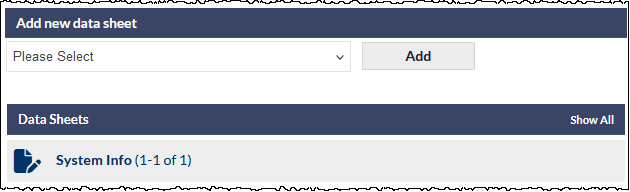
Click on the folder to expand it, which will show available data sheets:
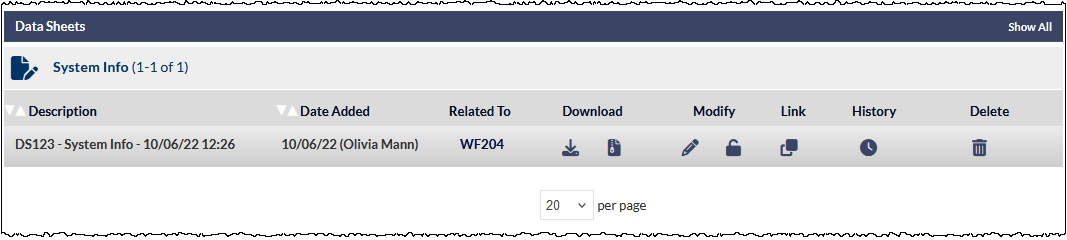
The standard data sheet features, identical to those available on the customer's Data tab, are displayed.
Data Sheets that have been created within a Lead to which the Workflow Case is related, are still displayed in the Lead Data Sheets field (formerly named Data Sheets, but renamed in this release, for clarity). For example, the Order Request data sheet visible in the following image was created in the related Lead:
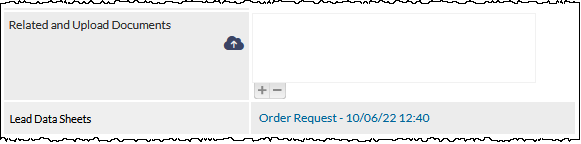
This is a convenience feature that provides one-click access to data sheets that have been generated within a related Lead.
For more information about the extensive data sheet features, refer to the Data Sheets section of the Data Screen article in the Support Centre.
For detailed information pertaining to the functionality of the Workflow Case screen, refer to the following Support Centre article:
Customer Contact Details Available in the Workflow Case Screen
Customer details along with the main contact details can now easily be accessed from within a Workflow Case screen. Previously, to view information such as customer Address, ABN, Main Phone, etc, it was necessary to view the Main Info tab for the customer, and then return to the Workflow Case.
To view the customer and main contact details, expand the Customer contact details section by pressing the arrow, rightmost in the section header, highlighted in the following image:

The section will expand to show the company and main contact details:
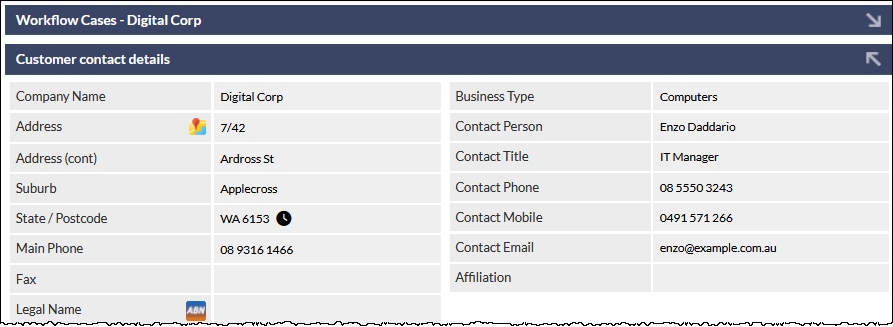
The previous screen image has been cropped for legibility; please view a Workflow Case screen to see all available fields.
The Workflow Case details remain visible below this section (i.e., scroll down to view the Case Tasks, etc).
The customer details section can be collapsed by pressing the arrow in the section header again.
When a Workflow Case is viewed, the Customer contact details section is always presented in its collapsed form.
For detailed information pertaining to the functionality of the Workflow Case screen, refer to the following Support Centre article:
Tickets
Active Tickets Screen - Filtering Subtype
On the Active Tickets screen (Tickets on the CommTrak main menu), Ticket Types can now be filtered by Ticket Subtype. Adjacent to each Ticket Type filter, is a Ticket Subtype filter icon (visible in the rightmost column in the following image):

To filter the Active Tickets list by Ticket SubType, tick the box adjacent to the Ticket Type and press the filter icon (visible in the rightmost column in the previous image).
The Subtype filter list is displayed:

Pressing the Find button will update the Active Tickets list accordingly.
To clear Ticket Subtype filters, you must either:
- Untick unrequired subtypes
or
- Clear all subtypes for the current Ticket Type by pressing the white reset icon (visible in the previous image) at the top of the Filtered Ticket Subtypes filter.
Press the Find button to update the filters.
For further information pertaining to the filtering Tickets and other Active Tickets screen functionality, refer to the following Support Centre article:
Reports
Additional Report Criterion (Date Range > Yesterday)
An additional option, Yesterday, has been added to the Date Range report criterion.
The following image shows this new option being selected in the Tickets > Date created between criterion, but this option is available in all reports where a data range of yesterday is relevant:
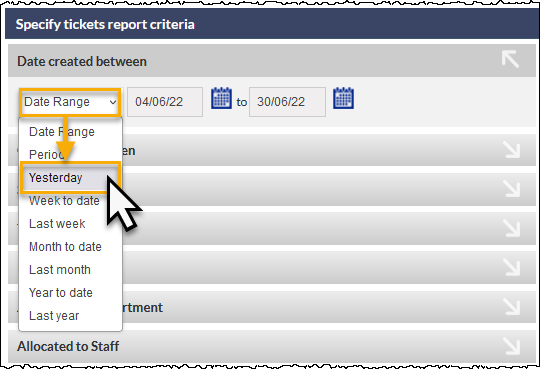
Selecting the Yesterday date range will ensure that the report includes only records where the relevant date matches yesterday's date.
Whilst useful when manually generating reports for on-screen viewing, this option is particularly useful in conjunction with auto-emailed reports. For example, it is now possible to create an auto-emailed report containing a list of all customers that were created on the previous day (as of the time the report was generated). Auto-emailed reports are generated in the very early hours of the morning, ensuring that such a report would contain results pertaining to the previous day's data.
For detailed information pertaining to CommTrak Reports, refer to the following Support Centre articles: