
Project Milestones & Tasks
This article pertains to Milestone, Task and Component features in the Projects module.
Prior to reading this article, we recommend referring to the following:
This article contains the following sections:
Project Milestones
A Project Milestone is a tool used by project managers to mark significant points in a project schedule. These points can indicate the beginning and end of a project, and signify the completion of a major phase of work. Milestones are often used as scheduling aids, and can help project managers plan and execute different phases of a project. By focusing on major progress points, milestones can help project managers keep track of a project's progress and ensure that it stays on schedule.
In CommTrak, a Project Milestone is a container for one or more Project Tasks, and a Project can consist of one or multiple Milestones.
A Milestone is completed when all Tasks within the Milestone have been completed.
For a Project to be considered completed, all Milestones must have been completed, and all unrelated, unallocated components must have been either allocated to Tasks or removed from the Project.
The Project's Status field does not represent a calculated progression of the Project; it is intended that the Project Manager will manually update the Status field as the Project progresses. The available statuses are configured per Project Type in the Project Settings.
Milestone Features
Milestones are listed under the Milestones section header within a Project:
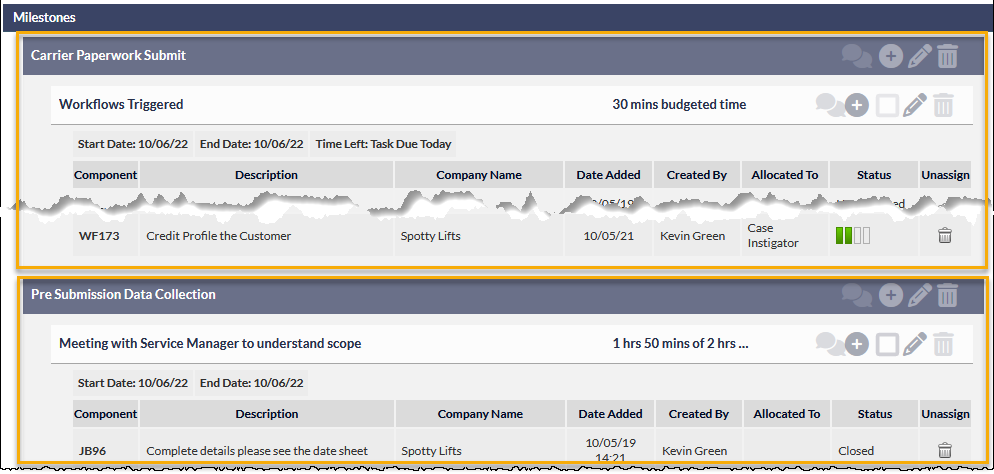
The previous image shows two Milestones (each emphasised with an orange border for the purposes of this documentation). The Milestones in this example are named:
- Carrier Paperwork Submit
- Pre Submission Data Collection
The topmost Milestone in the previous image is shown containing a single Task (named Workflow Triggered).
Milestone Actions
Each Milestone header contains four icons:

- Note - Add a new Note, or view all Notes for this Milestone.
- Add - Add a Task to this Milestone
- Edit - Edit the name of the Milestone
- Delete - Delete the Milestone
Add a Note or View Milestone Notes
If there are existing notes for this Milestone, the Note icon is displayed in orange colour.
Press the Note icon to display the Project milestone notes pop-up window.
Existing notes are listed at the bottom of the pop-up window.
- To add a note, enter the text of the note, and press the Add button.
- To close the window, press the red X icon (top-right of the window).
Project Notes cannot be modified or deleted.
In addition to being listed in the Project Notes pop-up window, Project notes are also listed in the Previously saved / send notes section of the Project (bottom-most on the Project screen).
Add a Task to the Milestone
Press the Add icon
The following fields are displayed:
- Task Name (mandatory) - the name of the Task
- Task Budget - hours and minutes allocated to this Task
- Start Date - the planned start date of the Task
- End Date - the planned end date of the Task
- Related Milestone - this dropdown list defaults to the name of the Milestone for which the Add Task icon was pressed. However, an alternative Milestone can be selected
- Press the Add button to add the Task.
Edit Milestone Name
Press the Edit icon to display the Edit Project milestone pop-up window.
- Modify the Milestone name as required, and press the Save button.
Pressing the red x icon (top-right of the window) closes the window without saving any changes.
Delete Milestone
- Press the Trash icon to delete the Milestone and press the OK button to confirm or the Cancel button to retain the Milestone.
A Milestone can only be deleted if it does not contain any Tasks (i.e. the Milestone must be 'empty').
Changing the Order of Milestones
The order of milestones can be changed by clicking the Milestone's header, and dragging and dropping it above or below another Milestone.
Changing the order of Milestones does not change any of the Milestones' parameters, as they are simply a container for Tasks.
Project Tasks
A Project Task is an activity that contributes to the overall completion of a project.
Each Task in a CommTrak project can contain one or more Components (see heading Project Components).
Typically, a Task will be assigned to a Milestone, although it is possible create a standalone Task (known as an orphan Task).
Task Actions
Each Task header contains five icons:

- Note - Add a new Note, or view all Notes for this Task.
- Add - Add a Component to this Task
- Complete - When ticked, designates that the Task has been completed
- Edit - Edit the Task details
- Delete - Delete the Task
Add a Note or View Task Notes
If there are existing notes for this Task, the Note icon is displayed in orange colour.
Press the Note icon to display the Project task notes pop-up window.
Existing notes are listed at the bottom of the pop-up window.
The following fields are displayed:
- Task Note (mandatory) - the text of the note
- Staff - the staff member to whom this task note is being allocated (default: current user)
- Activity - the name of the activity; refer to article Productivity Activities for further information about this feature
- Time Spent - the duration of the activity; refer to article Productivity Activities for further information about this feature
- Press the Add button to add the Task.
To close the window, press the red X icon (top-right of the window).
Task Notes cannot be modified or deleted.
In addition to being listed in the Task Note pop-up window, Task notes are also listed in the Previously saved / send notes section of the Project (bottom-most on the Project screen).
Add a Component
Pressing the Add icon presents the Add Project Component pop-up window from which you can create a new Component, or add an existing component the the Task.
A Task Component is any one of the following CommTrak items:
- Ticket
- Job
- Workflow Case
- To-Do
- Inventory Order
Complete Task
Before a Task can be designated as completed, all Components within the Task must have been completed. For example:
- All Tickets must be either closed
- All Jobs must be closed
- All Workflow Cases must be completed
Once all Components within a Task have been completed, the Task itself can be designated as having been completed, by ticking the completion tick-box in the Task header.
The following image shows a completed Task; the tick-box can be seen amongst the icons, rightmost in the Task header.

When a Task is complete, the Task header is displayed in light-green colour, as shown in the previous image.
If a Component is added to the Task after the Task has been designated as completed (or a Component's status is changed to being incomplete), the Task will revert to an incomplete state; i.e. the completion box will be unticked, and the Task head will change to slate-grey colour.
Edit Task Details
Press the Edit icon
The following fields are displayed:
- Task Name (mandatory) - the name of the Task
- Task Budget - hours and minutes allocated to this Task
- Start Date - the planned start date of the Task
- End Date - the planned end date of the Task
- Press the Save button to update the Task, or press...
Delete Task
- Press the Trash icon to delete the Task and press the OK button to confirm or the Cancel button to retain the Task.
A Task can only be deleted if it does not contain any Components (i.e. the Task must be 'empty').
Changing the Order of Tasks
The order of Tasks can be changed by clicking the Task's header, and dragging and dropping it above or below another Task.
Changing the order of Tasks does not change any of the Tasks' parameters, as they are simply a container for Components.
A Task can be dragged into a different Milestone.
Task End-Date Indicator
When a Project Task is overdue, or due today, a warning indicator icon is displayed and the Timeline text is highlighted:
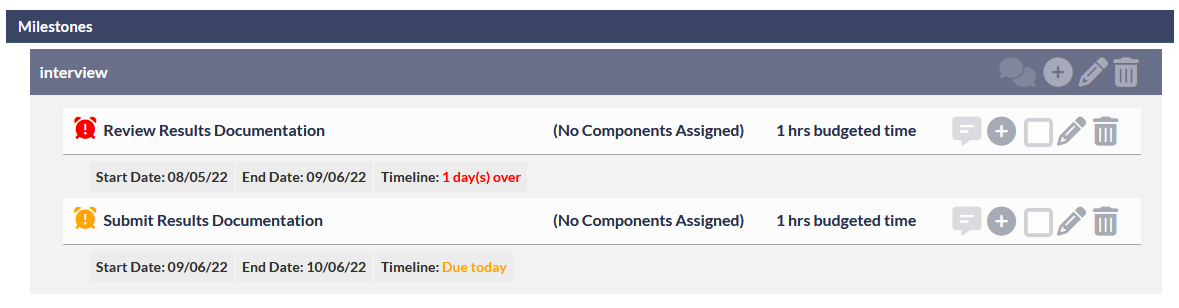
- When the Task is overdue, the indicator and Timeline text are displayed in red.
- When the Task is due today, the indicator and Timeline text are displayed in orange.
Project Action Buttons
The following buttons are pinned to the bottom of the Project screen:
- Save - update any changes made to the Project
- Add Milestone - Add a new Milestone to the Project
- Add Task - Add a new Task to the Project
- Cancel Project - Cancel the Project (the Project can subsequently be reactivated from the Customer's Projects screen).