
What's New May 2020
Outlook Calendar Synchronisation
Data Sheets
Workflow / Projects
SMS
- SMS Management Update
Outlook Calendar Synchronisation
Microsoft 365 Calendar API
CommTrak calendar synchronisation now directly integrates with the Microsoft 365 API, providing enhanced features and substantially-reduced configuration requirements:
- Outlook is not required to run on the desktop for synchronisation to occur
- Calendar synchronisation server is not required
- Multiple Outlook/365 calendars synchronise consistently
- Multiple, colour-coded calendars in CommTrak
- End-user can easily configure their own synchronisation settings
- No third-party add-in is required for Outlook application
- Official Microsoft 365 API with Microsoft verification and authentication
We strongly advise that users with a Microsoft 365 (formerly Office 365) subscription, should change to the Microsoft 365 API integration for calendar synchronisation. Users can easily configure their own CommTrak settings, typically without assistance from their IT Support team.
To activate this feature, Microsoft 365 integration must be enabled in CommTrak; please see Support Centre article, Microsoft 365 Integration (Settings).
Step-by-step end-user documentation is available in the CommTrak Support Centre article, Outlook Calendar Synchronisation (Microsoft 365).
We recommend that CalDav synchronisation is now only used with a standalone Outlook application; i.e. when users do not have a Microsoft 365 subscription.
Data Sheets
Statement Description (new field type)
A new type of Data Sheet field, Statement, has been added.
The purpose of the Statement field type is to provide formatted text targeted at the person who is entering information into the Data Sheet. For example, the statement may be an explanation of the following section in the Data Sheet, or details of a process that is to be followed, which may include URLs to other web pages.
With a minimal knowledge of HTML, the person who initially creates the Data Sheet Template in CommTrak, can include any HTML tag to format the statement text.
The following image shows an example of some basic formatting being applied in the Data Sheet Template in the CommTrak Settings:
 The above example would insert (1) two blank lines, and (2) a link to a website, presented to the user as the clickable text, website.
The Customer's view of the resulting Statement field would appear in a Data Sheet as follows (the affected area is highlighted orange):
 In the previous screenshot, we can see that there are (1) two blank lines, and that (2) the link to the web page is presented as the text website, rather than as a complete URL. Please note that, in this example, clicking on the link would open up the linked website in the same browser tab as the Data Sheet. In practice, a _target attribute should be specified, to ensure that the website is opened in a new browser tab.
The previous image shows the Statement field type being used in a Data Sheet that has been created with the Template Toolkit, but it can also be used in Inline Data Sheets (i.e. those Data Sheets, which are completed within any Data Sheet section on a CommTrak page (e.g. a Lead, Telesales Opportunity, Data Sheet tab on Customer Screen).
Email Address & Attachment Selection
A new, modern method of selecting email addresses has now been implemented, and filtering has been added to attachment selection.
Selecting Email Addresses
The following documentation refers to the To field, but equally applies to the Cc and Bcc fields.
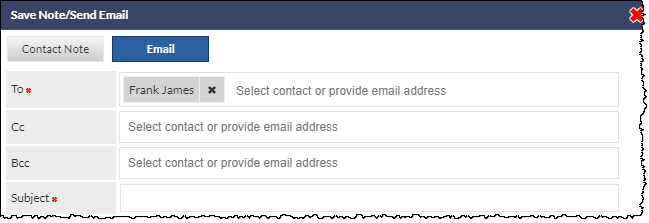
When sending emails from CommTrak, the drop-down list from which email addresses are selected has been updated to display Customer contact and Staff email addresses. To select an email address, click the text area of the To field to display the drop-down list:
 The Customer contact and Staff email addresses are listed under their respective headings.
By default, the Staff email section is initially collapsed; click the Staff heading to display the list of Staff members (as displayed in the previous screenshot).
Upon selecting a name from either section, the email recipient will be displayed in the To field:
To select multiple email recipients, click in the blank area of the To field (i.e. on the Select contact or provide email address hint); the drop-down list of Customer contacts and Staff will be displayed again.
Manually Entering an Email Address
To manually enter an email address, click on the Select contact or provide email address hint, and type the email address, immediately followed by a semi-colon;
Viewing Contact Details Summary
After selecting a recipient, clicking on the box containing their name will display a summary of the contact record:

Removing a Recipient
To remove a recipient from the To field, click the X icon, displayed to the right of their name.
Selecting Attachments
Customer / Document Library
To select a document from either the Customer Documents or the Document Library, click in the blank area of the Attach Files field (i.e. on the Select files to attach hint); the drop-down list of documents (if any) will be displayed:

Click the required document to add it to the list of document attachments:

Filtering the Document List
When a document name (or partial name) is known, it can easily be located by clicking in the blank area of the Attach Files field, and typing the known characters of the file name.
In the following example, the digits 2019 have been entered (highlighted 1), and the list of documents has been filtered to only shown items containing the matching characters (highlighted 2):

Removing an Attachment
To remove an attachment, click the X icon, displayed to the right of document name.
Workflow / Projects
Workflow / Project Relationships
The Related Workflows field in the Active Workflow Case screen has been updated to prevent the selection of Workflows that are already related to a different Project.
In the following image, we can see that the currently-displayed Active Workflow is related to PR5 (highlighted 1). We are unable to relate another Workflow that is related to a different Project; if we attempt to do so, we will find that the tick-box adjacent to the Workflow (highlighted 2) is disabled and, when the mouse hovers over the disabled tick-box, a tooltip is displayed advising that, This case is currently related to another project (highlighted 3).

SMS
SMS Management
As there has been an increase in the utilisation of the SMS platform within CommTrak, we have simplified the process for managing password changes.
To set up an SMS account, manage SMS credit, and change passwords, visit: http://shop.m2technology.com.au/shop/e-sms/m2/login.html
The web portal can also be used to configure and manage Bulk SMS traffic to groups, and for producing reports.
Changing the Password
If you are using the SMS feature in CommTrak and you wish to change the password, you must do so in both locations; i.e. in both CommTrak and in the Web Portal.
To update the password in CommTrak: Settings > General Settings > Company Details > [Enter the Admin Password]

The passwords in both CommTrak and the SMS web portal must be identical, otherwise CommTrak's SMS features will not function.