
What's New April 2023
General
Expenses and Reimbursements
Leads
- Lead Creation Enhancements Update
- Lead Forecast History New
Data Sheets
- Custom Fields in Data Sheets Update
Projects
- Enhanced Budget Tab Update
- Enhanced Budget Reporting Update
Reports
Tickets
- Add Note Button Removed Update
General
Information Notifications
Notification pop-ups have been updated throughout CommTrak to eliminate the need to manually confirm notifications when further action is not required from the user.
For example, when forwarding an original email from a Ticket, the user is no-longer required to click 'OK' to continue. Instead, a banner is displayed at the top of the page:

You don't need to dismiss the banner; you can continue working in CommTrak, and the banner will automatically clear after 3 seconds.
Direct Links
Direct links to specific CommTrak components, such as customer records, tickets, and leads, are now available throughout CommTrak.
Direct links are unique to each CommTrak component and can only be accessed by authenticated users who are logged into CommTrak.
For each type of CommTrak component, there are two locations from where a link can be copied:
In the section header for the component:

In a list of components:
When viewing a list of components, the direct link is displayed when hovering over the row of an item in the list, as shown in the following image.

To copy a direct link (URL) from a page and save it to your clipboard, click on the 'Copy URL' icon. Once you've clicked the icon, a banner will be displayed to confirm that the link has been copied to the clipboard.
Once the link is in your clipboard, you can use it in a variety of ways, such as:
- Pasting it into an email to a colleague
- Pasting it into a team chat message
Some applications, such as Microsoft Teams, automatically display an information card for pasted links. For example, when pasting a CommTrak customer record link into Teams, the link information will be displayed in the chat message:

The ability for an application to display an information card relies on a standard called the Open Graph (OG) protocol (to which CommTrak links conform), and the display of OG cards is dependent upon the application into which the link is being pasted.
Expenses and Reimbursements
Expenses and Reimbursements is a new module in CommTrak, that enables staff to enter their expenses (or the expenses of other staff) within CommTrak, and submit them for approval.
Receipts can be uploaded as images, which are attached to the expenses claim.
Staff can add and review their own expense claims by pressing the My Details (gear) icon on the CommTrak information bar, and selecting the Expenses tab:

Submitting Expenses
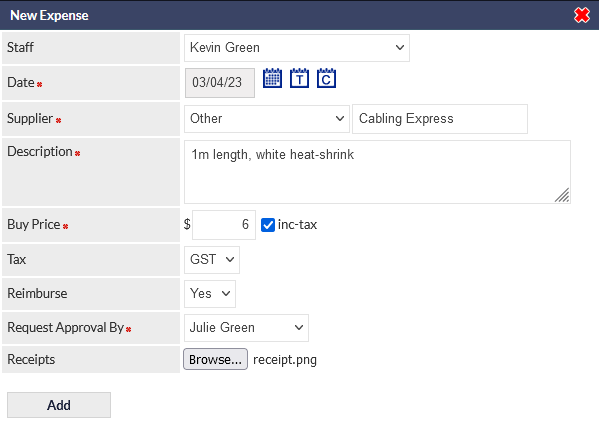
Pressing the Add New Expense button displays the New Expense pop-up window:
Expenses can also be submitted from with a Job, in the Materials Used field:

To submit an expense claim and reimbursement request, and to optionally upload images of receipts, the claims icon (adjacent to the Materials Used field label) should be pressed, and this will display the New Expense pop-up window.
The fields populated in the example image (Silicone sealant, Heatshrink), are intended to identify costs incurred during completion of the Job. These fields are integral to the upcoming CommTrak Accounts integration features, and will be displayed as items that can optionally be billed within a Job.
Expense Approvals and Reimbursements
When a claim for reimbursement is made, the person from whom approval is being sought will receive an email notification.
Approvals and reimbursements are accessed via the Utilities menu (permissions are required):
The following image is an extract from the Expenses utility screen:

In the example image, there is a single expense awaiting approval, but if there are multiple expenses, several (or all) items can be selected and approved / reimbursed simultaneously, by ticking the box adjacent to the claims.
Once approved, those claims that require reimbursement move into the Awaiting Reimbursement section, and once reimbursed, those claims move into the Approved and Reimbursed section.
For additional information about these features, please refer to the Expenses and Reimbursements category in the CommTrak Support Centre.
Leads
Lead Creation Enhancements
In line with the ongoing standardisation of component screens throughout CommTrak (i.e. Tickets, Jobs, Workflows), the Leads module has now been updated.
Creating a New Lead for an Existing Customer
When creating a new Lead from a Customer's Leads tab, the following screen is presented:

The Lead detail is entered into this screen, and the user can choose not to notify the Sales Rep (and Relationship Managers, if any), of the creation of the new Lead.
When the Add button is pressed, the Lead is created, and the main Lead screen is displayed.
Creating a New Lead Without a Customer
When creating a new Lead from the Active Leads screen (i.e. when a Customer record does not exist), the following screen is presented, the Customer and Contact fields are displayed above the Lead details section:

When the details have been entered, and the Save button has been pressed, the Lead is created and the main Lead screen is displayed.
Leads Forecast History
Changes to a Lead's Forecast date are now recorded and the history of changes can be viewed within the Lead. When a Lead's Forecast date is added or changed, an information icon is displayed adjacent to the Forecast field:

If the Forecast Date has been changed, the information icon (right-most in the previous image) will be displayed. Click the information icon to view the forecast history:

For more information about CommTrak's Leads feature, please refer to the Support Centre Leads category.
Data Sheets
Custom Fields in Data Sheets
Custom Fields in HTML Data Sheets are now available across the following modules (previously only available in Jobs):
- Customers
- Leads
- Tickets
- Jobs
Hovering over the help ( question mark) icon, adjacent to the custom legend, in the template editor, displays a pop-up window containing the details of each Custom Field placeholder. The following image shows the pop-up help window in the Jobs section of the Data Sheet template placeholder list:

In the above example, the Site Safety Officer placeholder would be applied in a Data Sheet HTML template as follows:
[% job.custom.item("Site Safety Officer") %]
HTML Data Templates require some knowledge of HTML, as the templates are created as a file external to CommTrak and subsequently uploaded and attached to an existing Data Sheet Template.
For additional information about the Data Sheets feature, please refer to the following Support Centre articles:
- Data Screen (using Data Sheets)
- Data Sheet & CT-Sign Settings
Projects
Enhanced Budget Tab
The Projects Budget tab has been enhanced to categorise product types separately:
- Hardware
- SaS non-labour
- SaS labour
- Labour (Job /Ticket)
Each type is now displayed in its own section, as highlighted in the following image:

Enhanced Budget Reporting
Additional criteria have been added to the Projects Report, to account accurately for each of the Quote Item types:
- Project Budget Cost SaS
- Project Budget Cost SaS Labour
- Project Budget Sell SaS
- Project Budget Sell SaS Labour
- Project Budget GP SaS
- Project Budget GP SaS Labour
The above items can be added to a Project Report by selecting them in the Include additional fields criteria:

Reports
Additional Contract Fields (Customers Report)
The Customers Report now includes 5 new contract-related fields in addition to the previously-available fields.
The original fields are:
- Contract Name
- Contract Expiry
The new, additional fields are:
- Contract Start
- Contract Duration (amalgamates two fields, contract name and period)
- Cost to Customer
- Contract Revenue
- Contract Details
All contract fields are now displayed in the report when a contract-related criteria are selected (i.e. Contract expires between / With selected contract name).
Tickets
Add Note Button Removed
Following feedback from users of the CommTrak Tickets module, the Add Note button has been removed, and the Save button now both saves the Ticket details, and adds a Note (if any of the Note fields have been populated):

Naturally, when saving or adding any information, mandatory fields must be completed. For example, Ticket Subject is mandatory and must be populated when saving a Ticket. If any of the Ticket Note fields are modified (e.g. Ticket Status is changed), mandatory Ticket Note fields (e.g. note text) must be populated.
Customer Portal
Contact's Ticket Notes Visible in the Portal
When a customer responds to a CommTrak Ticket, their responses are now included in Ticket notes that are listed in the Customer Portal.
This feature enables contacts, who have portal access, to view notes that they have sent.
Internal Ticket notes (i.e. notes added to a Ticket and not sent to a contact or external email address) are never displayed in the Customer Portal, nor are they displayed in the Ticket Email History that can optionally be included with Ticket responses.