
Custom Field Settings
Custom Fields can be created for the following CommTrak screens:
- Contacts
- Customer
- Job
- Lead
- Project
- Ticket
- Workflow
The configuration of Custom Fields is the same for each of the above screens, and the available options are described below.
For information pertaining to the end-user presentation of Custom Fields, please refer to the CommTrak User Support article Custom Fields.
Custom Fields Overview
Custom fields in CommTrak allow additional data to be recorded in the above-listed CommTrak screens. Custom fields can be of various types, such as text, dropdowns, dates, and more, as detailed in the Add a Custom Field section of this article.
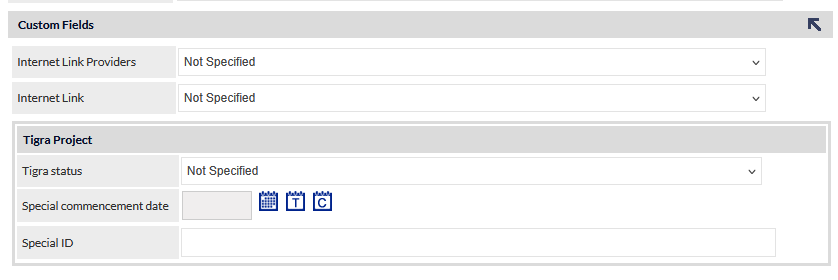
Custom fields may be configured as standalone fields, where each field is logically unrelated to other fields, or they may be grouped into collections known as custom field groups. For example, the Tigra Project group shown in the following image contains three related fields: Tigra status, Special commencement date, and Special ID. In contrast, the example fields Internet Link Providers and Internet Link are standalone and not part of any group.
There is no limit to the number of custom fields or field groups that can be created. Standalone fields do not need to be displayed together and can be positioned above, below, or between any field groups. The display order of all groups and ungrouped fields within the Custom Fields section can be configured to meet your organisation’s requirements.
Grouping fields can help structure related information and improve data entry consistency across records.
Custom Field Settings
Accessing Custom Field Settings:
Settings > Custom Field Settings > [module] (e.g. Contact Custom Fields)
When the module is selected, you will be prompted for the CommTrak Administrator password.
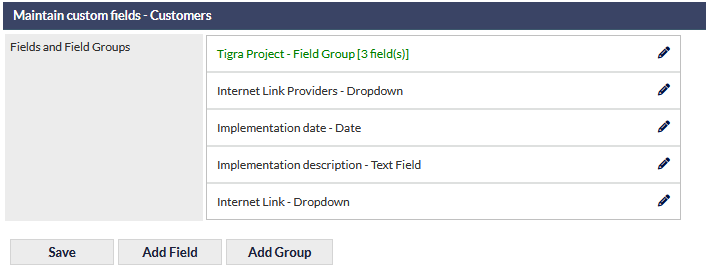
In the custom field settings, field groups are displayed with green text and custom fields are displayed with blank text (visible in the previous image).
Add a Custom Field
Custom fields can be created as standalone fields or they can be created from within an existing custom field group. In either case, custom fields can subsequently reallocated to a different group or as a standalone field.
Press the Add Field button
The following fields are presented:
Label (mandatory)
Enter the label name for this field.
Field Group
Select the custom field group to which this field is to be assigned, or select None if it is a standalone field.
Type
Available field types are:
- Checkbox
- Checkbox (Multi)
- Date
- Dropdown
- Text Area
- Text Field (default)
- URL
The function and options for the available field types are described under the later heading, Custom Field Types.
The Field Type cannot be changed after the field has been added.
Required (default No)
Select Yes or No from the dropdown list to determine whether or not the field is mandatory.
If a field is specified as mandatory, a user will not be able to save data on the screen until the mandatory custom field has been populated.
Visible in Portal (default No)
This option determines if the custom field is visible in the Customer Portal and, if it is visible, whether or not it can be edited in the portal.
The available options are:
- No (default) - the field will not be displayed in the portal
- Yes - Editable - the field will be displayed in the portal and can be edited
- Yes - Read Only - the field will be displayed in the portal and cannot be edited
This field is only available for Custom Fields in the following screen selections:
- Contact
- Customer
- Ticket
Press the Add button to create the field
Edit a Custom Field
Click the edit (pencil) icon adjacent to the Custom Field name.
Modify the custom field as required.
The field Type cannot be edited (e.g. a dropdown field cannot be changed to a different field type such as checkbox).
- Press the Save button to create the field
If the new custom field has been assigned to a custom field group, the settings for that group will be displayed when the custom field has been saved. This provides the opportunity to make changes to the group.
Delete a Custom Field
Deleting a Custom Field is irreversible. Data that has been entered into a deleted custom field cannot be recovered. Please ensure that you do not require any data that has been entered into the Custom Field prior to deletion.
Click the edit (pencil) icon adjacent to the Custom Field name.
- Press the Delete button
Confirmation will be requested prior to the deletion of the Custom Field.
Archive a Custom Field
Custom Fields can be archived; the field is only displayed if it contains data. Archived fields remain visible in the Include additional fields criteria of the relevant Reports screen.
The Archive button is only displayed if data has previously been saved into the Custom Field (i.e. the Custom Field has been populated for any record).
To archive a custom field, click the edit (pencil) icon adjacent to the Custom Field name.
- Press the Archive button
Confirmation will be requested prior to the archival of the Custom Field.
Once archived, the Custom Field will be displayed in red, strikethrough font:

Reactivate an Archived Custom Field
To reactivate an archived Custom Field, click the edit (pencil) icon adjacent to the Custom Field name.
- Press the Reactivate button
The Custom Field will be visible on the relevant screens, and data previously stored in the field will be restored.
Change the Display Order of Custom Fields:
Click and drag the field name (as shown in the previous image) up or down to position the Custom Field as required.
- Press Save to confirm the arrangement.
Custom Field Group Settings
Add a Custom Field Group
Press the Add Group button.
Enter the name of the group into the Group Name field:

Press Add to start creating the custom group.
To add a new field to the group, press the Add Field button.
The New custom field pop-up window is displayed. Complete the fields as described in the section Add a Custom Field earlier in this article.
After adding a field to a field group, the field group settings are shown:

When there are multiple fields in a group, the fields can be dragged and dropped into the desired order.
After changing the order of fields within a group, you must press the Save button to preserve the changes to the order of the fields.
Press the Close button to return to the Custom Fields settings home page.
Delete a Group
Press the Delete button to delete the group. You will prompted to confirm deletion.
Deleting a field group does not delete the fields within the group. Any fields within the group will be unassigned from the group.
Custom Field Types
When creating a new Custom Field, the following field types are available:
Checkbox
A single item that can be ticked or unticked.
Checkbox (Multi)
A list of options from which multiple items can be selected.
When this option is selected, an additional field is presented:
- Allowed Values (mandatory) - Press + adjacent to this field to add a checkbox item. Repeat to add further items, or press - to remove items.
Date
A date field from which a date can be selected.
The date selection is presented to the end-user via the standard CommTrak Date Selection features.
Dropdown
A dropdown list from which a single item can be selected.
When this option is selected, an additional field is presented:
- Allowed Values (mandatory) - Press + adjacent to this field to add a dropdown list item. Repeat to add further items, or press - to remove items.
Text Area
A free-form text area.
No character limit.
Text Field (default)
A single line of text.
Character limit of 64.
URL
A single line of text that will appear as a clickable link.
Character limit of 4096 (maximum of 47 characters will be displayed when saved).
End-User View
This section shows an example of each Custom Field type, as presented to CommTrak end-users:
Checkbox

Checkbox (Multi)

Date

Dropdown

Text Area

Text Field (default)

URL
Prior to data being entered into the URL field, it is displayed as an single-line text field:

After data has been entered into the URL field and the record has been saved, it is displayed as a clickable link:

Clicking the edit (pencil) icon enables editing of the field.
If the URL is longer than 50 characters, only the first 47 characters will be displayed, and an ellipses (...) will be appended (as seen in the above image).