
CommTrak Add-In for Outlook
Please note that the CommTrak Add-In for Outlook is a legacy product. If you currently have the add-in installed in Outlook, you may continue to use it, but it is no-longer supported.
The CommTrak Add-In for Outlook was provided free-of-charge to licensed CommTrak users. Due to the wide range of desktop hardware, operating systems, and desktop & network security measures implemented across organisations, the add-in was provided as-is, without warranty or guarantee of any functionality. Technical support for the installation or use of the add-in is no-longer provided.
M2 Technology’s CommTrak team has developed the CommTrak Add-In for Outlook, to aid you in quickly locating your CommTrak customers and contacts, and to assist in the organisation of incoming emailed documents that you wish to associate with Customers and Leads.
The key features of the add-in are:
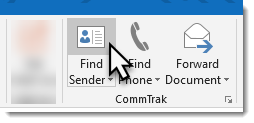
- Find Sender – a single click will locate the Customer or Lead record of the sender of an Outlook email, in CommTrak
- Find Phone – locate a CommTrak Customer or Lead record by highlighting any phone number in an Outlook email
- Forward Document – Send the current email to CommTrak, to associate the email with the relevant CommTrak Customer or Lead
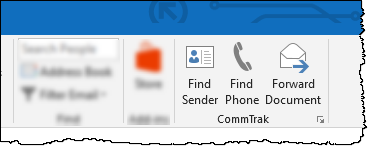
Once installed in Outlook, the add-in is presented as a CommTrak group on the Outlook Home ribbon:
This article assumes that the CommTrak Add-In for Outlook has already been installed and configured with your CommTrak site details (a 30-second task for most users), and is ready for use.
The installation & configuration documentation is available on request.
General Notes About Usage
- You must be logged-in to CommTrak in your default web browser (we recommend Google Chrome). Your browser does not need to be visible on your screen, i.e. it may be minimised, or behind another window.
- The selected email must be an Outlook email item; i.e. it cannot be a calendar invitation, task or other type of Outlook item.
- If multiple emails are selected in Outlook, only the first-selected email item will be processed if a CommTrak action is selected; additional email items in the selection will be ignored.
Known Limitations & Issues
- CommTrak Add-In for Outlook does not recognise Windows' custom scaling and resolutions, which may cause the bottom of some dialogue boxes to be 'clipped' (some features will not be displayed). If you experience this issue, please reset your computer's resolution and scaling to Windows' recommended settings, prior to installing and using the add-in.
- During installation, you may be presented with a message advising that the installation has failed for security reasons. Please contact CommTrak Support for advice on resolving this issue.
Find Sender
The Find Sender button automatically displays the CommTrak Customer record (or Lead with a contact), in the browser window, for the sender of the currently-selected email:
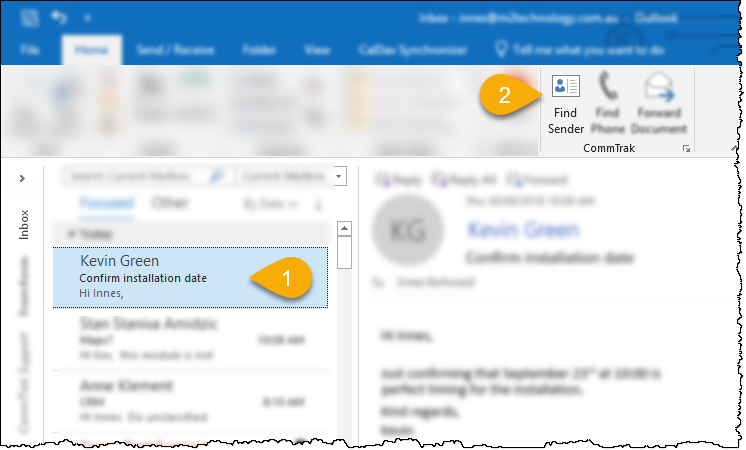
To use the Find Sender feature, ensure that an email item is selected in Outlook (1 in the above image), then click the Find Sender button in the CommTrak group on the Outlook Home ribbon (2 in the above image).
- If the sender’s email address is associated with a single CommTrak record, that record will be displayed immediately in CommTrak.
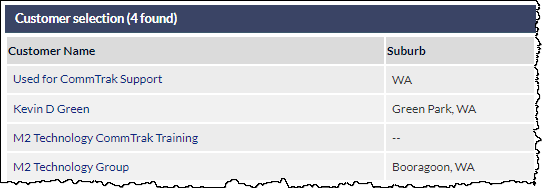
- If the sender’s email address is associated with multiple CommTrak records, a list of matching records will be displayed in CommTrak; the required item can then be clicked to display the record. In the example below, the email sender’s email address is specified as a contact or as a customer’s main email address for four different customer records, which have been displayed for selection:
Clicking any one of the matching items will display the respective Customer or Lead in CommTrak.
Find Phone
The Find Phone button searches CommTrak records for a telephone number that contains the highlighted digits in the currently-selected email item.
To use the Find Phone feature, ensure that an email item is selected in Outlook, click-and-drag the mouse over a telephone number (or partial number) in the body of the email message (1 in the image below), then click the Find Phone button in the CommTrak group on the Outlook Home ribbon (2 in the image below).
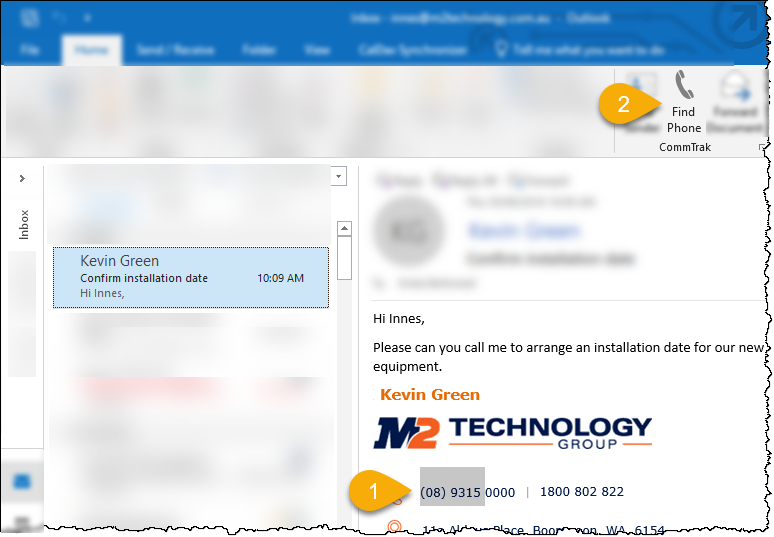
The highlighted portion of the email message must contain at least three digits, but may contain as many characters as required (e.g. the whole telephone number). In the example in the above image, only the first six digits of a telephone number have been selected, and CommTrak will search for all telephone numbers containing those consecutive digits. All other highlighted characters, such as brackets and spaces, will be ignored by the CommTrak search.
- If the selected digits are found in a telephone number associated with a single CommTrak record, that record will be displayed immediately in CommTrak.
- If the selected digits are found in telephone numbers associated with multiple CommTrak records, a list of matching records will be displayed in CommTrak (as shown in the image below); the required item can then be clicked to display the record.
Forward Document
The Forward Document button provides a quick method of attaching complete emails or their attachments to CommTrak records (i.e. Customer record or Lead), and integrates with CommTrak’s existing Incoming Documents module.
Examples of use-cases for the Forward Document feature are attaching:
- a purchase order document to a Lead
- an email ‘discussion’ to a Customer Record
It is strongly recommended that the Forward Document feature is used only for incoming emails for which it is important to have a record within CommTrak (e.g. purchase orders, and other important attachments or conversations). Forwarding all incoming emails to CommTrak will cause distraction from important items and will also needlessly consume your allocated storage allowance within CommTrak.
A document can be forwarded to CommTrak either with, or without, an item reference:
Forwarding Without an Item Reference
An email can quickly be forwarded to CommTrak (with two clicks!), so it can subsequently be attached to a Customer, Lead, Ticket or Job using the features of CommTrak’s Incoming Documents module. The benefits of using this forwarding method are:
- A CommTrak item reference is not required to forward the document.
- In CommTrak, specific attachments to the email can be associated with a CommTrak record, rather than the whole email, which may include several email replies, and numerous images such as logos.
Forward an email to CommTrak’s Incoming Document module:
- Select an email item in Outlook
- Click the Forward Document button in the CommTrak group on Outlook’s Home ribbon
- Click the Forward button in the CommTrak Add-In dialogue box
All other options available in the CommTrak Add-In dialogue box can be ignored (although you can click if you do not wish to proceed with forwarding the email).
Steps 2 & 3 are shown in the image below:
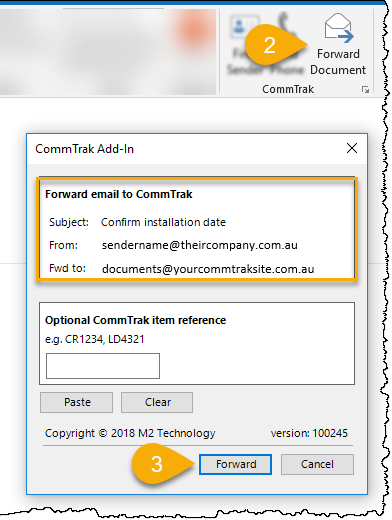
The selected document will immediately be forwarded to CommTrak’s Incoming Document module (as with any outgoing email, it will also be stored in your Outlook Sent Items folder). It will take a few moments – typically 10-20 seconds – for the document to be visible within CommTrak.
Note the orange-highlighted area in the image above; this section displays three items of information which are useful to check prior to clicking the Forward button, to ensure that you are forwarding the correct email to CommTrak:
- Subject: The subject of the email that you are forwarding
- From: The email address of the person who sent the email to you
- Fwd to: The special CommTrak email address allocated to your CommTrak Incoming Documents module (this email address will always be the same for your organisation, unless you have access to multiple CommTrak sites).
Once the forwarded email is visible in CommTrak, you can attach either the whole email, or selected attachments, to the relevant CommTrak record (i.e. Customer, Lead, Job, Ticket) using CommTrak’s Incoming Documents feature.
Forwarding With an Item Reference
An email can be forwarded to CommTrak and automatically attached to the relevant CommTrak record (i.e. Customer or Lead), by specifying an item reference prior to forwarding the email.
In order for an email to be automatically attached to a CommTrak record:
- You must know the relevant item reference (e.g. CR4836 for a customer, LD1940 for a lead).
- The Incoming Documents feature within CommTrak, must be configured to ‘Automatically store and allocate incoming email documents’.
CommTrak’s Incoming Documents configuration can be found in CommTrak's General Settings (Miscellaneous). Your organisation’s CommTrak Champion / Administrator will need to ensure that this setting is configured appropriately.
The steps required to forward and email with an item reference are:
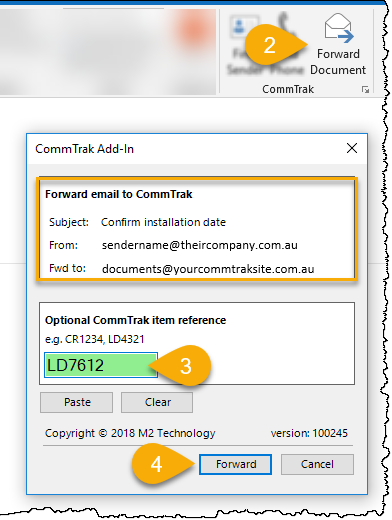
- Select the email item in Outlook
- Click the Forward Document button in the CommTrak group on Outlook’s Home ribbon
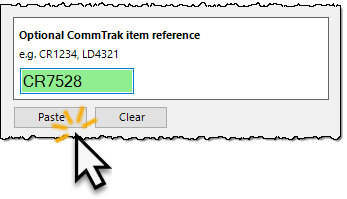
- Enter (or paste) a valid CommTrak item reference (e.g. LD7162)
- Click the Forward button
Steps 2 – 4 are shown in the image below:
When specifying a CommTrak item reference, you must enter an item reference in the valid format, or you will not be able to forward the message.
CommTrak Add-In for Outlook cannot determine if the item reference exists within CommTrak; it can only determine if the item reference provided is in a valid format:
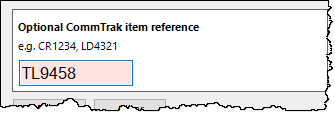
In the image above, an incorrectly formatted item reference has been entered (TL records do not exist in CommTrak), and the field is highlighted in red. The item reference will need to be entered correctly or cleared before proceeding.
CommTrak Item References
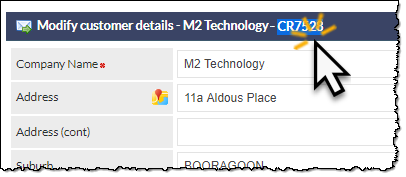
Item references are automatically allocated within CommTrak, and can be located for Customers and Leads, as shown in the images below:
Customer Reference: (CR)
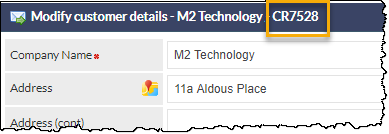
Lead Number: (LD)
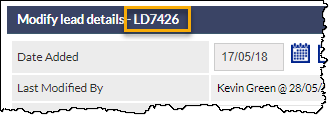
Each of the prefixes must be followed by numerical digits only, when entering the item reference into CommTrak Add-In for Outlook.
Tip for quickly pasting an Item Reference into the Add-In
When in CommTrak, double-click on the item reference number; this will automatically highlight the whole item reference, ready for copying:
You can then either:
- right-click on the selected item reference, and select Copy from the browser’s pop-up menu
- or, press the keyboard shortcut for Copy (e.g. Ctrl-C in Windows)
Then, click in CommTrak Add-In for Outlook:
Multiple CommTrak Sites
If you have access to multiple CommTrak sites, CommTrak Add-In for Outlook will need to be configured accordingly.
The installation & configuration documentation is available on request.
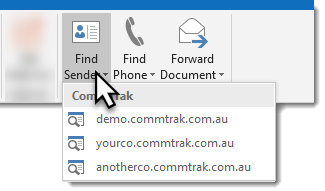
If multiple CommTrak sites have been configured in your add-in, the action buttons will appear as two-part buttons:
In the above image, the mouse is positioned over the top-half of the two-part Find Sender button. If the top-half is clicked, the Find Sender action will be executed using the add-in’s active CommTrak site (typically your most commonly-used CommTrak site will have been configured as the active site).
Holding the mouse over the lower-half of the two-part button, and clicking, as shown in the image below, displays a drop-down menu listing the available CommTrak sites. Clicking on one of the site names in the list, will execute the action on that CommTrak site.
Installation Issues
A link to the setup file will be provided upon request. Please consult your IT / Security department prior to downloading and installing the add-in.
Due to the wide range of desktop hardware, operating systems, and desktop & network security measures implemented across organisations, M2 Technology does not provide technical support for the installation or use of the add-in.
- In Windows 10, open "Internet Properties". In Windows 11, this is named "Internet Options"
- Select Security tab
- Select Trusted Sites
- Click Sites
- In "Add this website to the zone:" box, type https://*.commtrak.com.au
- Click Add
- Click Close
- Click OK
- Install CommTrak Add-In for Outlook
Known Limitations
Projects and Workflow not Supported
Forwarding to Projects and Workflow, from the add-in, are not supported. There are no plans to update the add-in in this respect.
If you wish to forward documents to a Project or Workflow, please forward the email using your email client as documented in the Incoming Documents article.
Custom Module Prefixes not Supported
Only CommTrak's default module prefixes (TK, JB, LD, etc) are supported within the add-in. It is possible, within CommTrak's general settings, to customise the prefixes, but such customisations are not supported by the add-in.