
Ticket Service Level Agreements (SLA) (Settings)
Service Level Agreements (SLAs) can be assigned to Tickets, to assist in monitoring agreed ticket-response times, and to send email notifications to staff when the SLA is about to be, or has been, breached.
Before an SLA can be assigned to a ticket, it must already have been assigned to the customer, on the Customer's main screen. i.e. SLAs cannot be assigned to tickets for customers on an ad hoc basis.
Assigning an SLA to a customer does not automatically assign the SLA to every ticket for that customer. The SLA must manually be assigned to manually-created tickets or, for tickets created by tickets-from-email, the SLA must be specified in the Tickets From Email Settings.
Accessing Ticket Service Level Agreements (SLA) Settings
Settings > Ticket Settings > Ticket Service Level Agreements (SLA).
The settings are presented as shown in the below image:
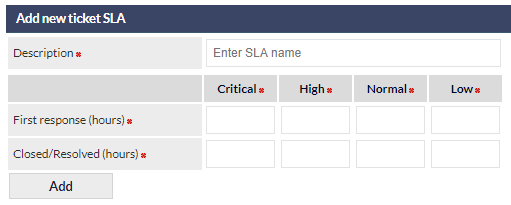
First response is considered to be the first Ticket Note (with email or phone call) added to the customer's ticket after creation of the ticket.
Adding a New Ticket SLA
- Enter the new SLA name into the Description field of the Add new ticket SLA section
- Enter the response and resolved / closed times (in hours), into the fields for each ticket priority (all fields are mandatory)
- Click
Modifying a Ticket SLA
To modify a ticket SLA:
- Click the name of the SLA to modify, in the list at the top of the screen.
- Modify the name of the SLA, or adjust the response and closed / resolution times, as required.
- Click
Archiving a Ticket SLA
Archiving a Ticket SLA has the following effects:
- The SLA can no-longer be added to customer records
- The SLA is hidden on customer records on which the SLA had previously been assigned
- The SLA remains active and visible on any tickets for which that SLA had previously been applied
- The SLA cannot be assigned to future tickets
To archive a Ticket SLA:
- Click the name of the SLA to archive in the list at the top of the screen.
- Click
When archived, the SLA agreement name will be displayed in the list of SLAs at the top of the Settings screen, with the suffix (Archived).
Reactivating an Archived Ticket SLA
The Reactivate option is only available if the selected SLA is currently archived.
Reactivating a Ticket SLA has the following effects:
- The SLA will be reinstated on the main Customer screen, for customers that had the SLA assigned prior to archival
- The SLA can be applied to new tickets (for customers which have the SLA assigned)
To reactivate a Ticket SLA:
- Click the name of the archived SLA in the list at the top of the screen.
- Click
Deleting a Ticket SLA
Deleting a Ticket SLA has the following effects:
- The SLA is removed from customer records to which the SLA had previously been assigned
- The SLA is removed from any tickets to which that SLA had been assigned
- The SLA is removed from the Settings, and cannot be restored
To delete a Ticket SLA:
- Click the name of the SLA to delete, in the list at the top of the screen.
- Click
Once deleted, an SLA cannot be restored.