
Configuring Single Sign-On (SSO) with Microsoft Entra ID
CommTrak supports Single Sign-On (SSO) using the SAML protocol, so your staff can log in with the same credentials they use for other company systems instead of a separate CommTrak password.
This guide covers setup with Microsoft Entra ID (formerly Azure AD). CommTrak also works with other SAML-based identity providers, such as Okta and Google Workspace, but those are not covered in this guide.
SSO is available on all CommTrak sites at no extra cost. Accessing the SSO setup screens requires your CommTrak Admin password.
Before you begin
You will need:
- Admin access to your CommTrak site, including the CommTrak Admin password.
- Admin access to your organization's Microsoft Entra ID tenant.
- Your CommTrak hostname (for example,
yourcompany.commtrak.com.au).
Setup involves two roles working independently: your Entra ID (Identity Provider or IdP) admin and your CommTrak (Service Provider or SP) admin. These may be the same person or different people. A short handoff of values passes from the IdP admin to the SP admin partway through, covered below.
Step 1: Agree on setup values
Before either side starts configuring anything, agree on two values:
- CommTrak hostname - this determines two URLs both sides will use:
- SP Entity ID:
https:///<hostname>/saml/metadata - SP ACS URL:
https:///<hostname>/saml/acs
- NameID match field - the user attribute Entra ID sends, which CommTrak uses to match the incoming login to an existing staff record:
- Email path: Entra ID source attribute
user.mail, matched against CommTrak'semailfield. - Username path: Entra ID source attribute
user.userprincipalname(oruser.onpremisesamaccountname), matched against CommTrak'susernamefield.
With both values agreed, the IdP and CommTrak setup steps below can proceed in parallel, with no further coordination needed until the handoff.
Step 2: Configure Microsoft Entra ID (IdP admin)
- In the Entra admin center, go to Enterprise applications > + New application.
- Select Create your own application, give it a name (for example, "CommTrak"), choose Integrate any other application you don't find in the gallery (Non-gallery), then select Create.
- Open the new application and go to Single sign-on > SAML.
- In the Basic SAML Configuration section, select Edit and enter:
- Identifier (Entity ID):
https:///<hostname>/saml/metadata(use your real hostname, not a placeholder) - Reply URL (ACS URL):
https:///<hostname>/saml/acs - Leave Sign on URL, Logout URL, and Relay State blank.
- In the Attributes & Claims section, select Edit, then select the Unique User Identifier (Name ID) row and set:
- Source attribute: as agreed in Step 1 (
user.mail, oruser.userprincipalname/user.onpremisesamaccountname) - Name identifier format:
Default(orEmail Addressfor the email path)
- In the SAML Certificates section, note the following values under Set up [application name] - you will hand these to the CommTrak admin:
- Microsoft Entra Identifier
- Login URL
- App Federation Metadata Url (strongly recommended, as it allows CommTrak to keep the IdP certificate up to date automatically)
- Optionally, download the Certificate (Base64) file. This is only needed if the CommTrak install cannot reach the federation metadata URL directly.
Do not use the Import Certificate option near the top of the SAML Certificates section. That replaces Entra ID's own signing certificate and requires a .pfx file. It is not part of the standard CommTrak setup.
Restrict access to assigned users (recommended)
By default, any user in your Entra ID tenant can sign in to CommTrak via SSO, subject to CommTrak's own user matching. To restrict SSO sign-in to specific staff:
- Go to Manage > Properties and set Assignment required? to Yes, then save.
- Go to Users and groups and add the staff who should be able to sign in.
Users who are not assigned will be blocked by Entra ID before they are redirected back to CommTrak.
Handoff to the CommTrak admin
Send the CommTrak admin:
- Microsoft Entra Identifier
- Login URL
- App Federation Metadata Url
- The Certificate (Base64) file, only if needed
- Confirmation of the NameID choice from Step 1
- Confirmation of which users have been assigned access
Step 3: Configure CommTrak (SP admin)
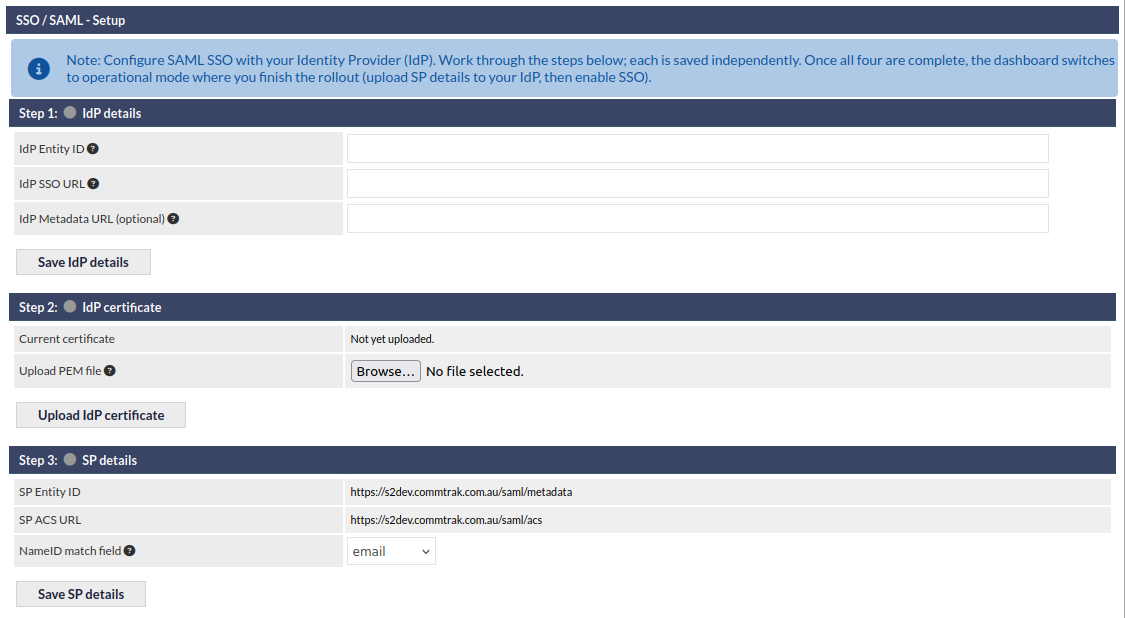
In CommTrak, go to Settings > User Settings > Single Sign-on (SSO) / SAML. You will be asked for your CommTrak Admin password. The setup screen presents four steps.

Before any values are entered, the SSO settings screen looks like this:
Step 3.1: IdP details
Enter the values from the handoff packet:
- IdP Entity ID: Microsoft Entra Identifier
- IdP SSO URL: Login URL
- IdP Metadata URL: App Federation Metadata Url
Select Save.
Step 3.2: IdP certificate
- Recommended: select Refresh from metadata URL to pull the current certificate from the federation metadata. This also enables automatic daily refresh later, so certificate rotation on the Entra ID side requires no ongoing action from you.
- Fallback: upload the Certificate (Base64) file from the handoff packet. Use this only if your CommTrak install cannot reach the IdP metadata URL.
Step 3.3: SP details
- SP Entity ID and SP ACS URL are automatically derived from your hostname and should match what the IdP admin entered in Entra ID.
- Set the NameID match field to
emailorusername, as agreed in Step 1.
Select Save.
Step 3.4: Generate SP keypair
Select Generate SP keypair. This creates a 2048-bit RSA certificate and key valid for three years.
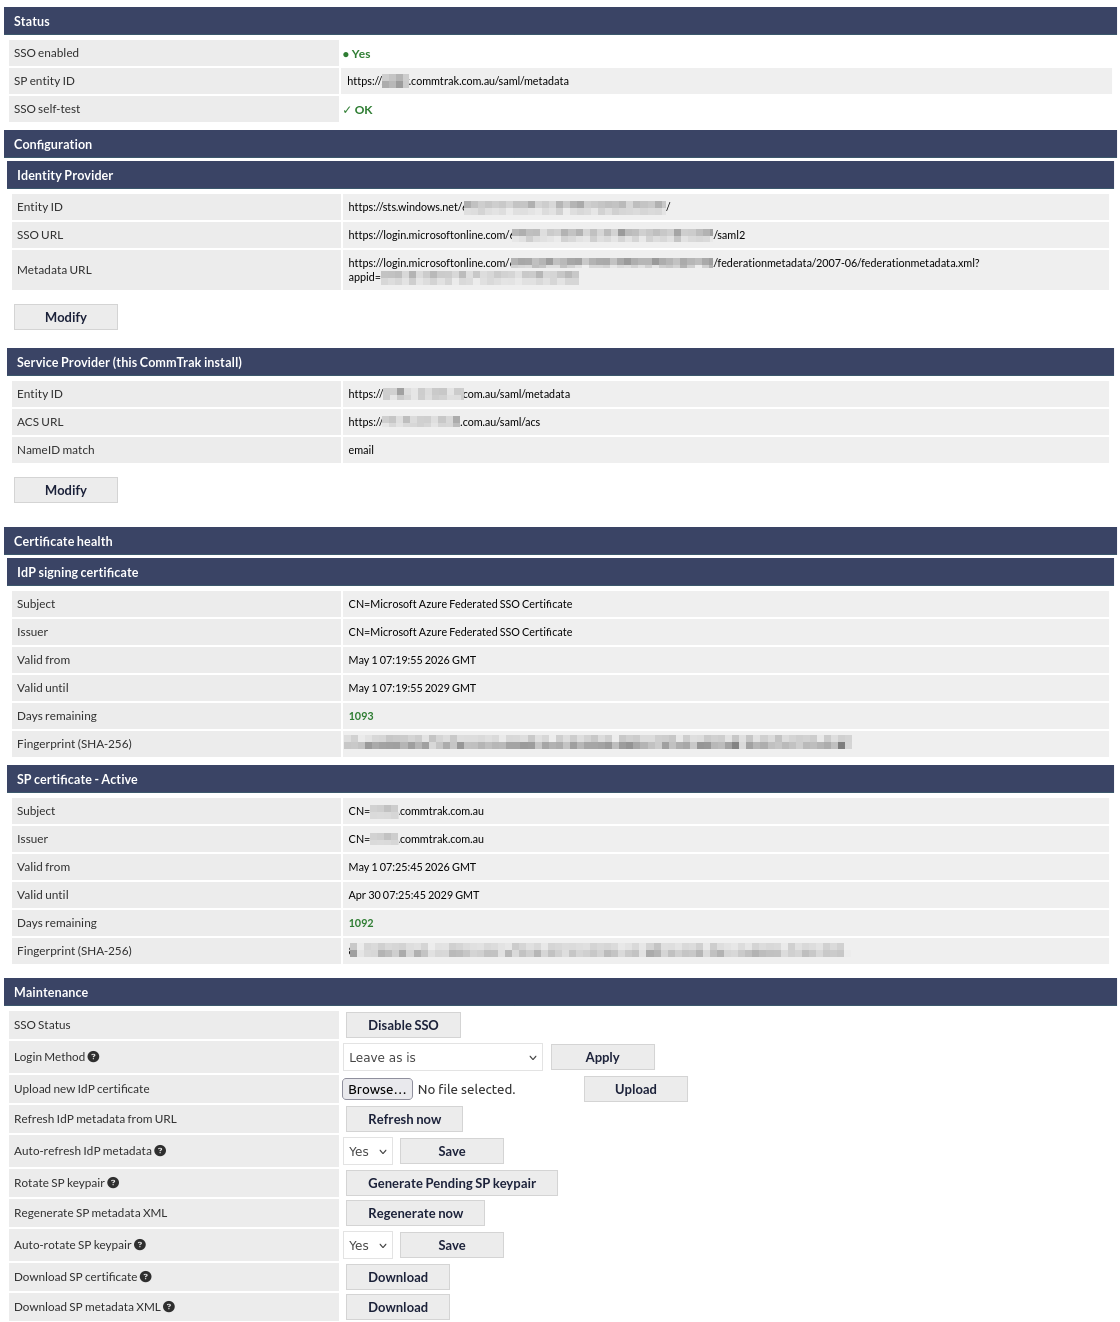
Once all four steps are complete, the dashboard switches to Operational Mode.
Turn on operational defaults
In the Maintenance section:
- Confirm the SSO self-test shows a green/OK status.
- Set Auto-refresh IdP metadata to Yes (requires the IdP Metadata URL to have been set).
- Set Auto-rotate SP keypair to Yes.
- Set SSO Status to Enabled.
Step 4: Verify the connection
Either the IdP admin or the CommTrak admin can run this check:
- Open an incognito or private browser window and go to your CommTrak login page.
- Select SSO Log in.
- You should be redirected to sign in with your Entra ID credentials, then redirected back to CommTrak and logged in.
If sign-in fails, the CommTrak admin and Entra ID admin should compare notes using their own systems' sign-in records to identify which side needs attention.
The login screen
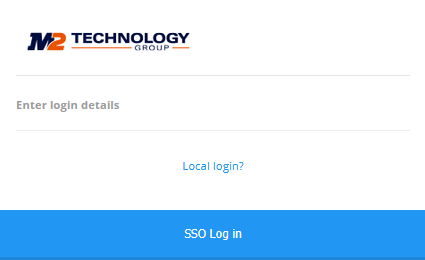
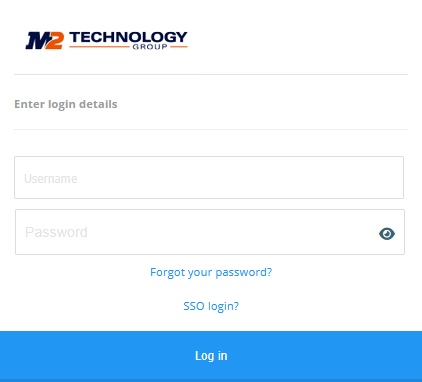
Once SSO is enabled, the CommTrak login screen offers both sign-in methods:
- By default, users see an SSO Log in button, with a Local login? link to switch to a username and password form instead.
- On the local login form, users see username and password fields, with an SSO login? link to switch back.
Managing who can use SSO
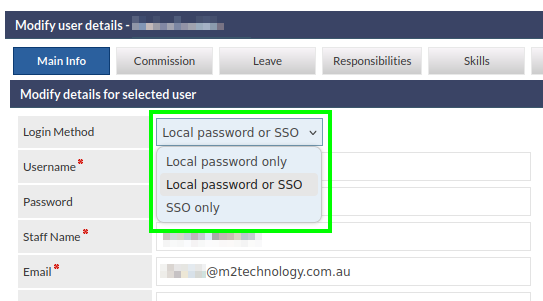
Each staff record has a Login Method setting with three options:
- Local password only
- Local password or SSO
- SSO only
Changing a user's Login Method requires the CommTrak Admin password.
On any CommTrak site with SAML enabled, newly created staff default to SSO only.
Rolling out SSO to your whole team
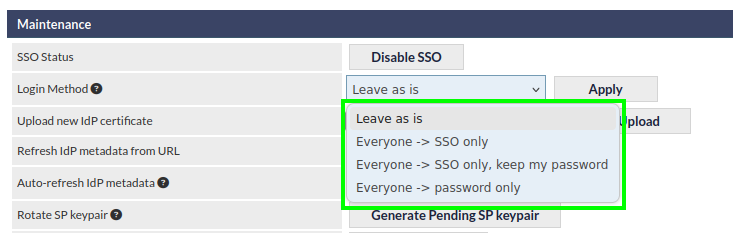
To change the Login Method for all staff at once, go to Settings > SSO / SAML > Maintenance and use the Login Method dropdown, then select Apply. Four options are available:
- Leave as is (default) - applying this makes no changes.
- Everyone -> SSO only - every active user, including the admin performing the action, loses password login. This option is blocked while SSO is disabled, to prevent locking everyone out.
- Everyone -> SSO only, keep my password - every active user except the admin performing the action is switched to SSO only. This is the recommended option for an initial rollout, since it leaves the admin with password login as a fallback. This option is also blocked while SSO is disabled.
- Everyone -> password only - every active user is reset to password-only login. This option is always available, and is used to roll back from SSO.
Certificate rotation
CommTrak and Entra ID both use certificates that expire and need periodic rotation. With the recommended settings from Step 3, this is largely automatic.
Entra ID's certificate (rotates approximately every three years):
- With Auto-refresh IdP metadata set to Yes, CommTrak checks the metadata URL daily and picks up the new certificate automatically. No action needed.
- If auto-refresh is off, select Refresh IdP metadata from URL in Maintenance to pull the update manually, or upload the new certificate manually on installs without a metadata URL.
CommTrak's SP certificate (also a three-year lifetime):
- With Auto-rotate SP keypair set to Yes, CommTrak automatically generates, activates, and retires certificates as they approach expiry. No action needed.
- For manual or ad-hoc rotation, use Generate Pending SP keypair in Maintenance, then Make Primary once ready. The previous certificate can be deleted afterward from the Certificate health section.
If you have configured the optional advanced setup where CommTrak's certificate is uploaded into Entra ID as a verification certificate, auto-rotate should be turned off, since automatic rotation would desynchronize the two sides. This advanced configuration is not covered in this guide.
Frequently asked questions
Can I use an identity provider other than Microsoft Entra ID? Yes. CommTrak supports any SAML 2.0 identity provider, including Okta and Google Workspace. This guide covers Entra ID specifically; contact CommTrak support if you need guidance for a different provider.
Do users still need a CommTrak password if they are set to SSO only? Yes. Even when a user's Login Method is set to SSO only, they retain a CommTrak password behind the scenes. It's required for CommTrak app approvals and other administration features.