
Ticket Template (Settings)
The Ticket Templates feature enables the creation of templates that can be selected when adding a new Ticket. This feature is useful when similar Tickets are created frequently, allowing for the pre-population of many Ticket fields.
The following image shows the Ticket Template being used in a new ticket:
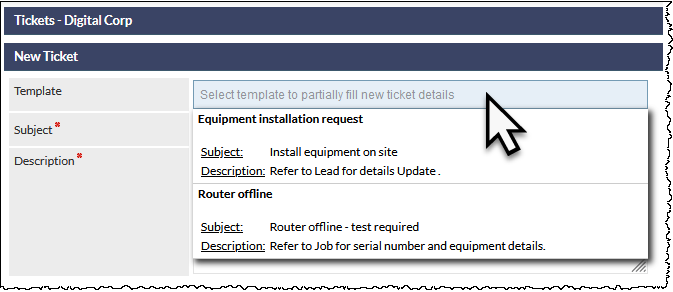
When the user selects a template, all specified fields are populated automatically, including placeholders in the Subject and Description (where available).
The Ticket Template field is only displayed when creating a new Ticket - it cannot later be used to updated an existing Ticket.
Accessing Ticket Template Settings
Settings > Ticket Settings > Ticket Templates
Add a New Ticket Template
Press the New Ticket Template button
The Ticket Template fields are displayed (see the later section Ticket Template Fields).
Complete the fields as required then press either:
- Add - to confirm the new Ticket Template creation, or...
- Cancel - to cancel the new Ticket Template (all populated fields will be lost).
Clone an Existing Ticket Template
Press the Clone Ticket Template button
The following fields are displayed:
- Template Name (mandatory) - the name of the new Ticket Template.
- Based on Template (mandatory - select the name of the existing template to clone.
Complete the fields as required then press either:
- Clone - to display the cloned Ticket Template for editing, or...
- Cancel - to cancel the new Ticket Template (all populated fields will be lost).
After pressing Clone, modify the fields as required (see the later section Ticket Template Fields).
Press either:
- Save - to save any changes and continue editing the current template.
- Close - to exit the newly-cloned template without saving any changes
- Delete - to delete the newly-cloned template. Note that there is no confirmation prompt; the template will be deleted immediately.
Modify an existing Ticket Template
Select an existing Ticket Template from the list presented at the top of the screen.
Modify the fields as required (see the later section Ticket Template Fields).
Press either:
- Save - to save any changes and continue editing the current template.
- Close - to exit the selected template without saving any changes
- Delete - to delete the selected template. Note that there is no confirmation prompt; the template will be deleted immediately.
Delete an existing Ticket Template
- Select a Ticket Template from the list displayed at the top of the settings screen
- Press Delete. Note that there is no confirmation prompt; the template will be deleted immediately.
If a ticket type or subtype is deleted, all tickets that currently have the deleted type or subtype assigned will have the ticket type and subtype removed (i.e. a ticket type will no-longer be assigned to the ticket).
Deleting a Ticket Template cannot be reversed.
Ticket Template Fields
Template Name (Mandatory)
The name of the template as it will appear in the New Ticket Template field dropdown list.
Subject (Mandatory)
The Subject to be populated when the template is selected.
Placeholders can be specified in the Subject; see Placeholders later in this article.
Description (Mandatory)
The Description to be populated when the template is selected.
Placeholders can be specified in the Description; see Placeholders later in this article.
Priority
The Priority of the Ticket, either:
- Critical
- High
- Normal (default)
- Low
Ticket Type
Select the Category and Subcategory as required.
Subcategory is optional.
Department / Staff
Specify the Department /Staff to which the Ticket will be allocated.
Email Account
The Email account that will be used to send emails pertaining to the Ticket
Close Immediately
- Ticked - the Ticket will be closed immediately upon being added
- Unticked (default) - the Ticket status will be Open upon being added
Visible in Portal
- Ticked - the Ticket will be visible in the Customer Portal
- Unticked (default) - the Ticket will not be visible in the Customer Portal
Assigned To
The Staff /Departments to whom this Ticket Template will be available.
The options are:
- Company Wide - available to all staff
- Selected Departments - available only to the selected departments. When selected, Ticket Departments are displayed and can be ticked as required
- Selected Staff - available only to the selected staff. When selected, all staff names are displayed and can be ticked as required
- Personal Response (default) - available only to the staff member who created the template
Placeholders
Placeholders can be used in both the Subject and the Description fields in the Ticket Template.
Available placeholders are listed in the Legend section of the Ticket Template Description field and are enclosed in a double-hash (##) as shown in the following example image:
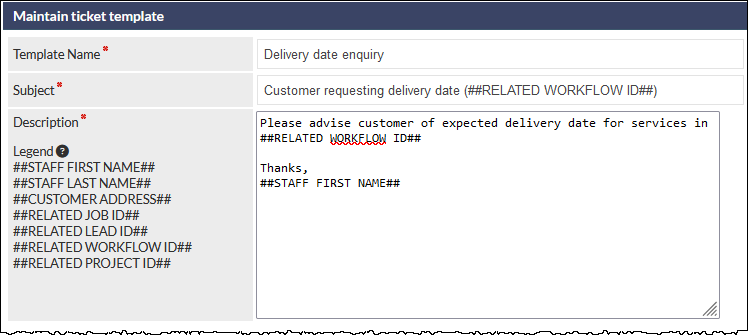
The above image shows the ##RELATED WORKFLOW ID## placeholder being used in both the Subject and the Description. In addition the first name of the staff member who creates the ticket will be used in the message sign-off.
Pressing on a placeholder name in the Legend automatically copies the placeholder into the device's clipboard. It can then be pasted into the Subject and / or Description fields as required.